Part 3: How to Effortlessly Master Copilot Studio Topics — 5 Steps to Smarter Conversation Flows
If you’ve followed Parts 1 and 2 of this series, your Microsoft Copilot Studio agent is already live and answering questions from a knowledge source. That’s genuinely useful. But there’s a whole layer of control you haven’t touched yet — and that’s exactly what this final part covers.
This is Part 3 of the series. Here’s where we’ve been:
- Part 0 — Overview: What is Microsoft Copilot Studio and who is it for? (already published)
- Part 1 — How to Build a Microsoft Copilot Studio Agent — No Code, 30 Minutes (already published)
- Part 2 — Copilot Studio Knowledge Sources: Easy Guide to SharePoint URLs and Files (already published)
- Part 3 (you’re here) — Copilot Studio Topics Explained: Easy Guide to Conversation Flows
By the end of this post, you’ll understand what Copilot Studio topics are, when to use them instead of a knowledge source, and how to build your first one from scratch — using our IT support agent as the working example.
What Are Copilot Studio Topics, Really?
When your agent answers a question like “how do I reset my password?” it’s reading your knowledge source and generating a response. That works well for open-ended questions where the answer already exists in a document.
But what if you want the agent to ask the user something first? What if the answer depends on what they say? A knowledge source can’t handle that on its own.
That’s where Copilot Studio topics come in.
Copilot Studio topics are structured conversation flows you design yourself — node by node. You decide exactly what the agent says, what it asks, and what happens depending on the user’s answer. Think of them as decision trees you build visually, without writing a single line of code. Microsoft’s official Copilot Studio topics documentation covers the full technical reference if you want to go deeper after this guide.
Copilot Studio Topics vs Generative Answers — When to Use Which
Most people building their first Microsoft Copilot Studio agent don’t realise these two things work differently. Here’s a plain-English comparison:
| Generative answers | Copilot Studio topics | |
|---|---|---|
| How it works | AI reads your knowledge source and generates a response automatically | You design the exact conversation flow step by step |
| Best for | Open-ended Q&A, document lookup, FAQs | Structured processes, collecting information, routing decisions |
| Setup effort | Low — connect a knowledge source and you’re done | Medium — you design the flow yourself, node by node |
| IT support example | “What is the VPN server address?” | “I need to raise an IT request” → agent asks hardware or software → routes accordingly |
The best agents use both. Generative answers handle broad Q&A. Copilot Studio topics handle specific structured workflows where a back-and-forth conversation is needed.
The 5 Building Blocks of Copilot Studio Topics
Every Copilot Studio topic is made up of nodes — blocks you connect together on a visual canvas to form the conversation flow. You don’t write code. You click, type, and connect.
Here are the five node types you’ll use as a beginner:
| Node type | What it does | IT support example |
|---|---|---|
| Trigger | The phrases that start this Copilot Studio topic | “I need IT help”, “raise a request”, “log a ticket” |
| Message | Sends text to the user | “Sure, I can help. Let me ask you a couple of things first.” |
| Question | Asks the user something and stores their answer | “Is your issue with hardware or software?” |
| Condition | Branches the flow based on what the user said | If hardware → route A. If software → route B. |
| End conversation | Closes the topic cleanly | “Your request has been logged. Someone will be in touch shortly.” |
Step-by-Step: Build Your First Copilot Studio Topic in 6 Steps
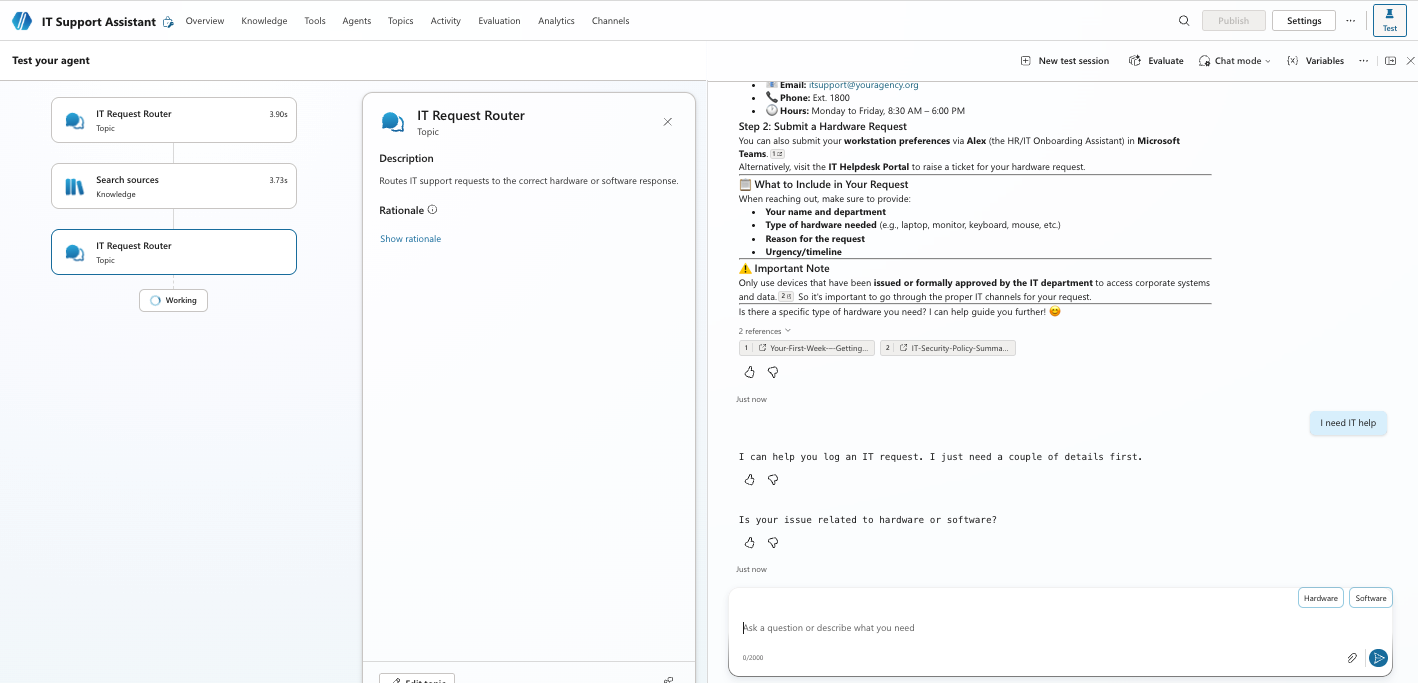
We’ll build a practical IT support routing topic. When a user says they need IT help, the agent asks whether it’s a hardware or software issue — then routes them to the right response.
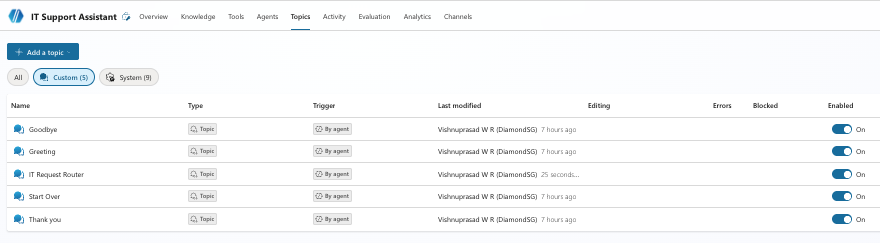
Step 1 — Create a New Copilot Studio Topic
Go to the Topics tab in the top navigation of Copilot Studio.
Click Add a topic → From blank.
You’ll land on the topic canvas. The Trigger node is already placed at the top — you can’t move or delete it. It’s the fixed starting point of every Copilot Studio topic.
Step 2 — Describe What Your Copilot Studio Topic Does
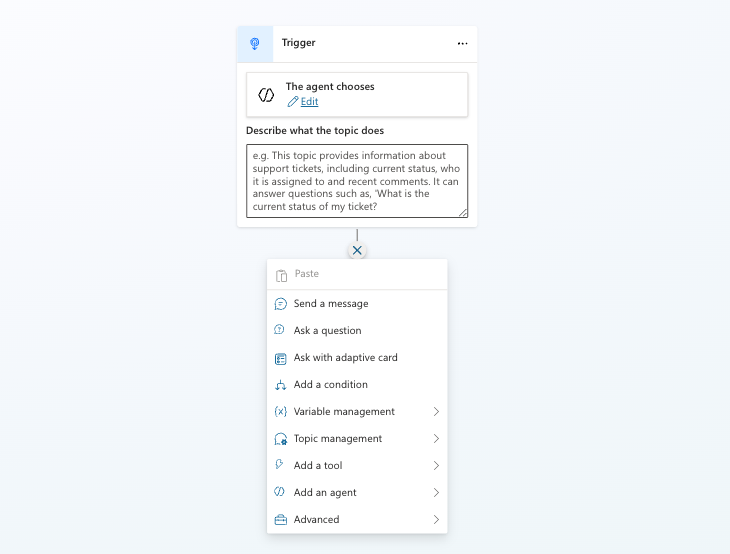
Inside the Trigger node you’ll see two things.
First, The agent chooses with an Edit link. Clicking Edit opens a condition builder on the right panel — this is for advanced trigger logic. Leave it alone for now.
Below that is the Describe what the topic does field. This is what matters. Type a clear, specific description of what this topic handles:
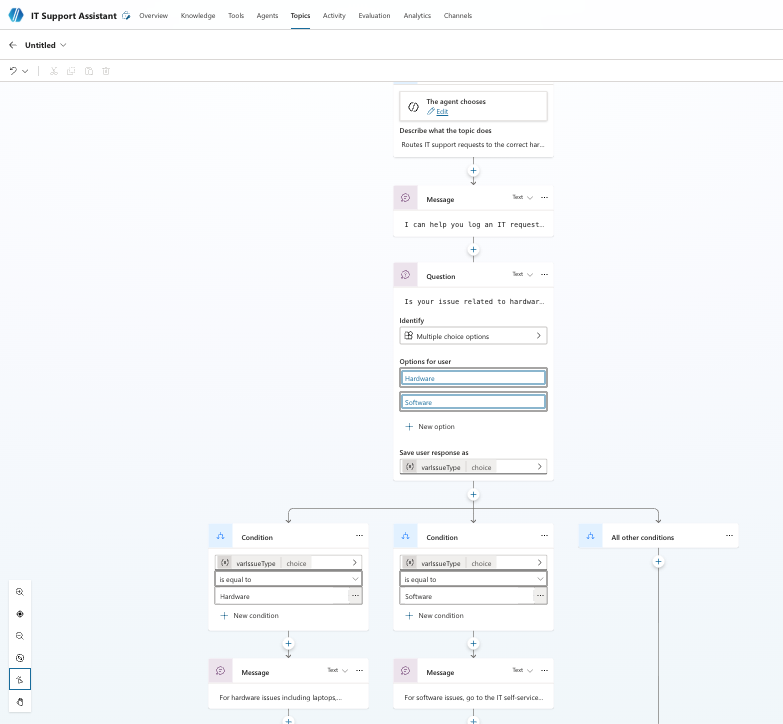
Routes IT support requests to the correct hardware or software response.The agent reads this description to decide when to activate this Copilot Studio topic during a conversation. You do not need to add trigger phrases separately — the description drives it. The more specific you write it, the more accurately the topic fires.
Step 3 — Add a Message Node
Below the Trigger node you’ll see a + button. Click it.
A menu appears with all available node types: Send a message, Ask a question, Ask with adaptive card, Add a condition, Variable management, Topic management, Add a tool, Add an agent, and Advanced.
Select Send a message.
A message box appears on the canvas. Type a short acknowledgement:
I can help you log an IT request. I just need a couple of details first.One sentence is enough here. This node just sets a friendly tone before the question — don’t try to do more with it.
Step 4 — Add a Question Node to Your Copilot Studio Topic
Click the + button below the Message node and select Ask a question.
A Question node appears. In the question field, type:
Is your issue related to hardware or software?Below the question you’ll see the Identify section. Set it to Multiple choice options.
Under Options for user, add two options: Hardware and Software. Click + New option to add each one.
At the bottom of the Question node you’ll see Save user response as showing Var1 — choice. Click the arrow on the right of that field. This opens the Variable properties panel on the right side of the screen.
At the top of that panel you’ll see Variable name with a text field. Clear the default name and type varIssueType. Leave all other settings as they are — Type will already show as choice and Usage will be set to Topic (limited scope) which is correct. Close the panel.
Step 5 — Add a Condition Node
Click + below the Question node and select Add a condition.
Three branches appear on the canvas automatically — two Condition branches and one All other conditions branch on the right.
In the first Condition branch, click the variable selector and choose varIssueType. Set the condition to Hardware.
In the second Condition branch, set it to varIssueType equals Software.
The All other conditions branch on the right catches anything that doesn’t match — add a fallback message there for anything unexpected.
Click the + inside the Hardware branch and select Send a message. Do the same inside the Software branch:
- Hardware branch: For hardware issues including laptops, monitors, keyboards, and peripherals, go to the IT self-service portal and select Hardware Request. Your manager will receive an approval email and IT will confirm delivery timelines. For faulty equipment, select Hardware Fault and describe the problem in detail.
- Software branch: For software issues, go to the IT self-service portal and select Software Request. Include the software name, version, and your business reason. Standard requests are processed within 2 business days. Urgent requests can be marked High Priority in the form.
Step 6 — Save and Test Your Copilot Studio Topic
Click Save at the top right of the canvas.
When you click Save for the first time, Copilot Studio will prompt you to give the topic a name. Use something specific that tells you exactly what the topic does at a glance — for example IT Request Router. Avoid generic names like Topic 1 or New topic. As your agent grows and you add more Copilot Studio topics, clear names are what save you from opening every single one just to remember what it does.
Once saved, open the Test panel in the top right corner and type something that matches your topic description — try I need IT help. Walk through both branches and check:
- Does the Copilot Studio topic fire correctly?
- Does the Question node show Hardware and Software as clickable options?
- Does each branch return the right response?
- Does the conversation end cleanly after the final message?
If the topic isn’t firing, go back to the Trigger node and improve the description to be more specific about what user requests this topic handles.
4 Tips for Building Better Copilot Studio Topics
Once you’ve built your first topic, these four things will save you a lot of time fixing problems later.
Add More Trigger Phrases Than You Think You Need
If a Copilot Studio topic isn’t firing when you expect it to, trigger phrases are almost always the reason. Five is a minimum — ten is better.
Think about formal vs informal phrasing, short vs long versions, and the way people type when they’re in a hurry. “IT issue”, “need help with IT”, “something’s not working” — all of these could be the same request from different people.
One Question Per Node in Your Copilot Studio Topic
Each Question node should ask exactly one thing. Multi-part questions confuse both the AI and the user.
If you need two pieces of information, use two separate Question nodes in sequence. It feels more natural in conversation anyway.
Name Your Variables Immediately
Copilot Studio gives variables default names like Var1 and Var2. Rename them the moment you create them.
varIssueType tells you exactly what that variable holds. Var1 tells you nothing — especially when your Copilot Studio topics grow and start using five or six variables at once.
Remember: Copilot Studio Topics Always Win
When a user’s message matches a Copilot Studio topic trigger, the topic runs — even if your knowledge source could also answer the question.
This isn’t a problem if your trigger phrases are specific. But if they’re too broad, the topic fires when you didn’t intend it to and blocks the generative answer. Design trigger phrases carefully.
3 Copilot Studio Topics Worth Building for IT Support
Now that you know how the mechanics work, here are three practical Copilot Studio topics that make real sense for an IT support agent — all based on the IT Support Knowledge Base from Part 1.
Password Reset Routing Topic
Trigger description: handles requests where users can’t log in, have forgotten their password, or need to reset their Windows or Microsoft 365 account credentials.
Question: Is this for your Windows login or your Microsoft 365 email?
Branch accordingly — Windows reset steps vs Microsoft 365 reset steps — pulling the exact instructions from Section 1 of the knowledge base. This is more reliable than leaving it to generative answers because the steps differ and users need the right one.
VPN Troubleshooting Topic
Trigger description: handles requests where users cannot connect to the VPN, are seeing authentication errors, or the VPN is dropping connection.
Question: What are you experiencing? Offer the four common issues from the VPN troubleshooting table in the knowledge base as multiple choice options: Authentication failed, MFA prompt not arriving, Connected but can’t access internal sites, VPN keeps disconnecting.
This turns a static troubleshooting table into an interactive flow — much easier for a non-technical employee to use than reading through a table themselves.
New Request Intake Topic
Trigger description: handles requests where users want to submit a new request for software, hardware, or equipment.
Question: What type of request is this? Options: Software, Hardware, Other.
Branch to the correct self-service portal instructions from the knowledge base for each option. This single Copilot Studio topic replaces three separate knowledge source lookups and gives users a much cleaner experience.
Sample Test Questions for Your Copilot Studio Topic
Before you share the agent with anyone, run through these in the Test panel. They cover the main paths your Copilot Studio topic should handle — including one it should decline.
- I need IT help — should trigger the topic and ask the hardware or software question
- Raise an IT request — should trigger the same flow via a different phrase
- My laptop screen is cracked — after selecting Hardware, should return the hardware self-service portal instructions
- I need Adobe Acrobat installed — after selecting Software, should return the software request process
- Can you book me an IT training session? — should not trigger this topic and should fall back to the knowledge source or escalate to the helpdesk
For each test, check two things — did the right branch fire, and did the response match what you put in the Message node? If a branch isn’t returning the right message, open that condition node and check the variable name matches exactly what you set in Step 4.
What’s Next After Copilot Studio Topics
That’s the full series. You’ve gone from zero — no agent, no knowledge source, no topics — to a properly configured Microsoft Copilot Studio agent with structured Copilot Studio topics handling your key workflows and generative answers covering everything else.
Here’s a quick recap of what each part covered:
- Part 1 — What Copilot Studio is and whether it’s right for you
- Part 2 — Building your first agent, writing instructions, connecting a knowledge source
- Part 3 (this post) — Copilot Studio topics: structured flows, conditions, and branching
The next blog takes everything you’ve learned and puts it together in a real-world use case — a fully built Helpdesk agent. Stay tuned for that one.
If you have questions, suggestions for new topics, or want to share what you’ve built, head to the Contact page — happy to hear from you.
For more Power Platform guides, browse the Power Platform articles on wrvishnu.com.
2 thoughts on “Copilot Studio Topics: 5 Easy Steps to Smarter Agent Flows – Part 3”