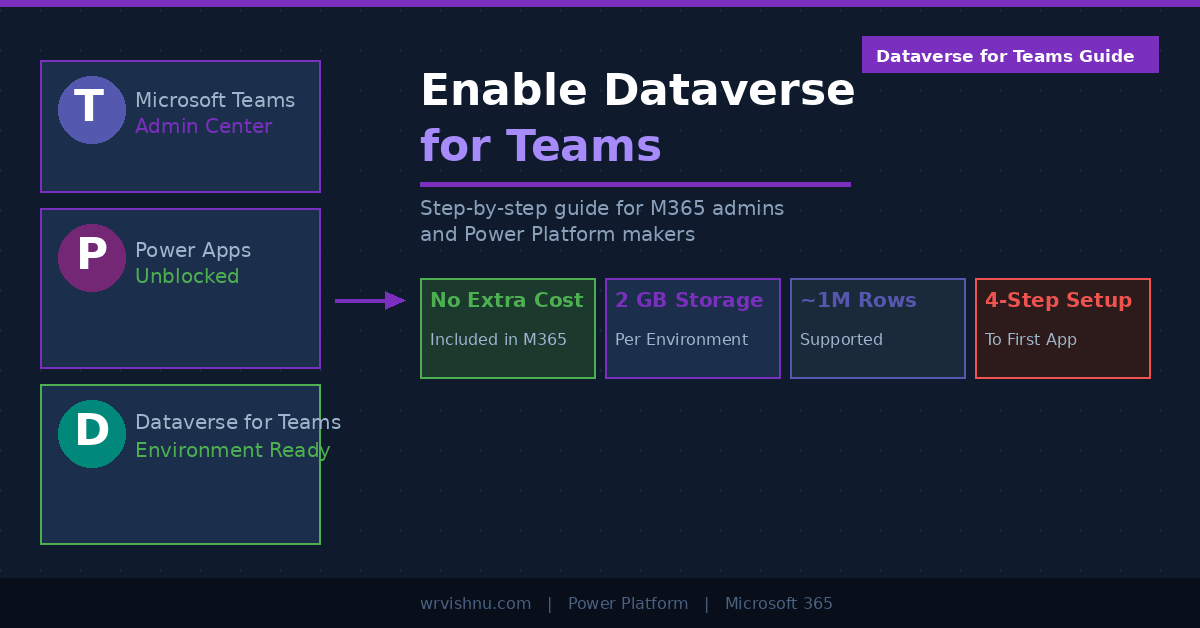
Power Automate Approval Flow SharePoint — Step-by-Step Beginner Guide
Power Automate approval flow SharePoint — this tutorial shows you how to build one from scratch in under an hour. If you have ever had to chase a manager for leave approval over email, you already know how easy it is for requests to get lost, delayed, or forgotten. This flow handles the entire process automatically — from the moment an employee submits a leave request, all the way through manager approval, SharePoint update, and employee notification.
By the end of this guide you will have a fully working Power Automate approval flow SharePoint solution that requires no manual follow-up from anyone. The manager receives a structured approval email and responds with a single click. SharePoint is updated instantly. The employee is notified of the outcome — including any comments the manager left. All of this runs on standard Microsoft 365 connectors with no premium licence required.
This tutorial is part of the Power Platform beginner series on Beginner Guides. If you have not yet built the LeaveRequests SharePoint list and Power Apps Canvas App covered in the previous guide, it is worth starting there first — this flow plugs directly into the same list.
In This Guide
- What You’ll Build
- What You’ll Learn
- Prerequisites
- Step 1 — Add the Manager_Email Column to Your SharePoint List
- Step 2 — Create a New Automated Cloud Flow
- Step 3 — Configure the SharePoint Trigger
- Step 4 — Compose the Approval Message (Cmp_BuildApprovalDetails)
- Step 5 — Send the Approval Request (Apv_SendLeaveApproval)
- Step 6 — Add the Approval Outcome Condition (Cnd_ApprovalOutcome)
- Step 7 — Approved Branch: Update SharePoint and Notify the Employee
- Step 8 — Rejected Branch: Update SharePoint and Notify the Employee
- Step 9 — Save and Test the Flow
- Common Mistakes to Avoid
- What’s Next
What You’ll Build
In this tutorial you will build a Power Automate approval flow SharePoint solution that fires automatically every time a leave request is submitted to your list. The flow sends an approval email to a manager, waits for their response, then updates the SharePoint item status and notifies the employee — all without any manual intervention.
This Power Automate approval flow SharePoint setup connects directly to the LeaveRequests list built in the previous tutorial. If you have not built that yet, start there first — the list structure and column names are the foundation this flow depends on.
The entire flow uses standard connectors only. No premium licence is required.
What You’ll Learn
- How to trigger a flow automatically when a new item is created in a SharePoint list
- How to use a Compose action to build a dynamic approval message from SharePoint data
- How to use the Start and wait for an approval action to send an approval request and pause the flow until the manager responds
- How to use a Condition to branch the flow based on whether the request was approved or rejected
- How to update a SharePoint list item from within a flow using the Update item action
- How to send a personalised outcome email to the employee using dynamic content
- How to name actions clearly so your flow is easy to read and maintain
Prerequisites
Before you start building this Power Automate approval flow SharePoint tutorial, make sure you have the following in place:
- Microsoft 365 account — Any plan that includes Power Automate and the Approvals connector (Microsoft 365 Business Basic or higher). No premium licence is required.
- SharePoint LeaveRequests list — The list built in the previous tutorial, with these columns already created:
- Title (Single line of text) — the reason for leave
- StartDate (Date and Time, Date Only format)
- EndDate (Date and Time, Date Only format)
- LeaveType (Choice: Annual, Medical, Emergency, Unpaid)
- Status (Choice: Pending, Approved, Rejected — default: Pending)
- Manager_Email column — A new column you will add to the list in Step 1. This stores the manager’s email address so the flow knows who to send the approval request to.
- Power Automate access — Sign in at make.powerautomate.com using your Microsoft 365 work or school account.
- Edit permissions on the SharePoint list — The account you use to build the flow must have at least Contribute access to the LeaveRequests list so it can update items.
Following on from the Power Apps tutorial? If you built the Leave Request Tracker Canvas App in the previous guide, this flow plugs directly into the same SharePoint list. Every time an employee submits a request through the app, this flow will fire automatically.
Step 1 — Add the Manager_Email Column to Your SharePoint List
The Approvals connector sends the approval request to an email address. The simplest way to store this for each request is a dedicated column in your SharePoint list.
Go to your LeaveRequests SharePoint list and add the following column:
- Manager_Email (Single line of text, Required) — The email address of the manager who will approve or reject this request. Employees enter this when submitting their leave request.
Why not a People picker column? A People column requires an extra lookup step inside the flow to retrieve the email address, which adds complexity. Using a plain text column for the email address keeps the flow straightforward — a perfect trade-off for a beginner flow.
Your LeaveRequests list should now have these six columns in total:
- Title — Single line of text (Required)
- StartDate — Date and Time (Required)
- EndDate — Date and Time (Required)
- LeaveType — Choice (Required)
- Status — Choice (default: Pending)
- Manager_Email — Single line of text (Required)

Step 2 — Create a New Automated Cloud Flow
- Go to make.powerautomate.com and sign in.
- Click + Create in the left navigation panel.
- Select Automated cloud flow.
- In the dialog that appears, name the flow Leave Request Approval Flow.
- In the search box under Choose your flow’s trigger, type SharePoint.
- Select When an item is created from the list of SharePoint triggers.
- Click Create.
Power Automate will open the flow designer with the trigger already placed on the canvas. You will build the rest of the flow by adding actions below it.
Action naming convention: Throughout this tutorial, every action is given a clear name using a short prefix followed by a descriptive label — for example, Cmp_ for Compose actions, Apv_ for approvals, Cnd_ for conditions, Upd_ for SharePoint updates, and Eml_ for email actions. This makes your flow easy to read at a glance, especially as it grows. To rename any action, click the three dots (…) in its top-right corner and select Rename. Note: Power Automate does not allow renaming the trigger — only actions added below it can be renamed.
Step 3 — Configure the SharePoint Trigger
The trigger is automatically named When an item is created by Power Automate and cannot be renamed. You only need to configure its two fields to point it at the correct list.
- Click the trigger card on the canvas to expand it.
- Set Site Address to your SharePoint site URL. Click the dropdown and select it from the list, or paste the URL directly.
- Set List Name to LeaveRequests.
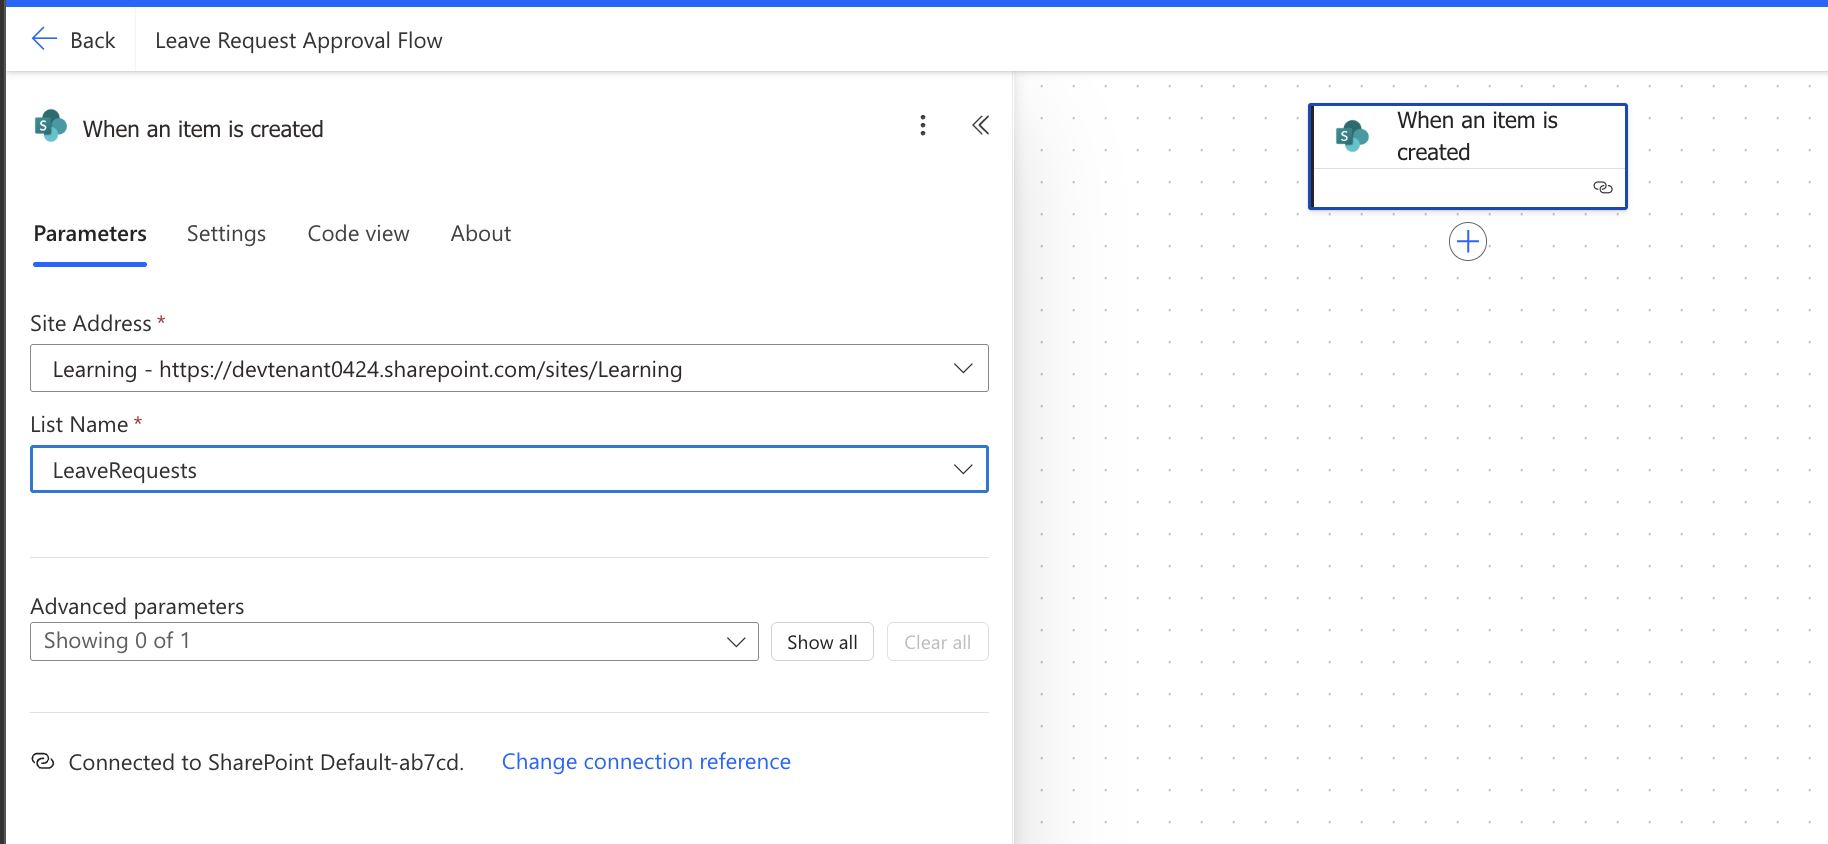
Important: This trigger fires when a new item is created in the list — not when it is edited. If you want the flow to also fire when an employee updates an existing request, you would use the When an item is created or modified trigger instead. For this tutorial, we use created only.
Step 4 — Compose the Approval Message (Cmp_BuildApprovalDetails)
Before sending the approval request, build the message body in a Compose action. This keeps all your dynamic content in one place and makes the approval email much easier to read and edit later.
- Click + New step below the trigger.
- Search for Compose and select the Compose action (under Data Operation).
- Rename it to Cmp_BuildApprovalDetails.
- Click inside the Inputs field and type the following, inserting dynamic content tokens where indicated:
A new leave request has been submitted and requires your approval.

Employee: [Created By DisplayName]
Reason: [Title]
Leave Type: [LeaveType Value]
From: [StartDate]
To: [EndDate]

Please review and respond using the Approve or Reject buttons in this email.
To insert the dynamic content tokens shown in brackets above:
- Click inside the Inputs field where you want to insert a token.
- Click the lightning bolt icon (or click Add dynamic content in the panel that appears on the right).
- Search for the field name and click it to insert it. For example, search Title to insert the leave reason, and search Created By to find the Created By DisplayName token.
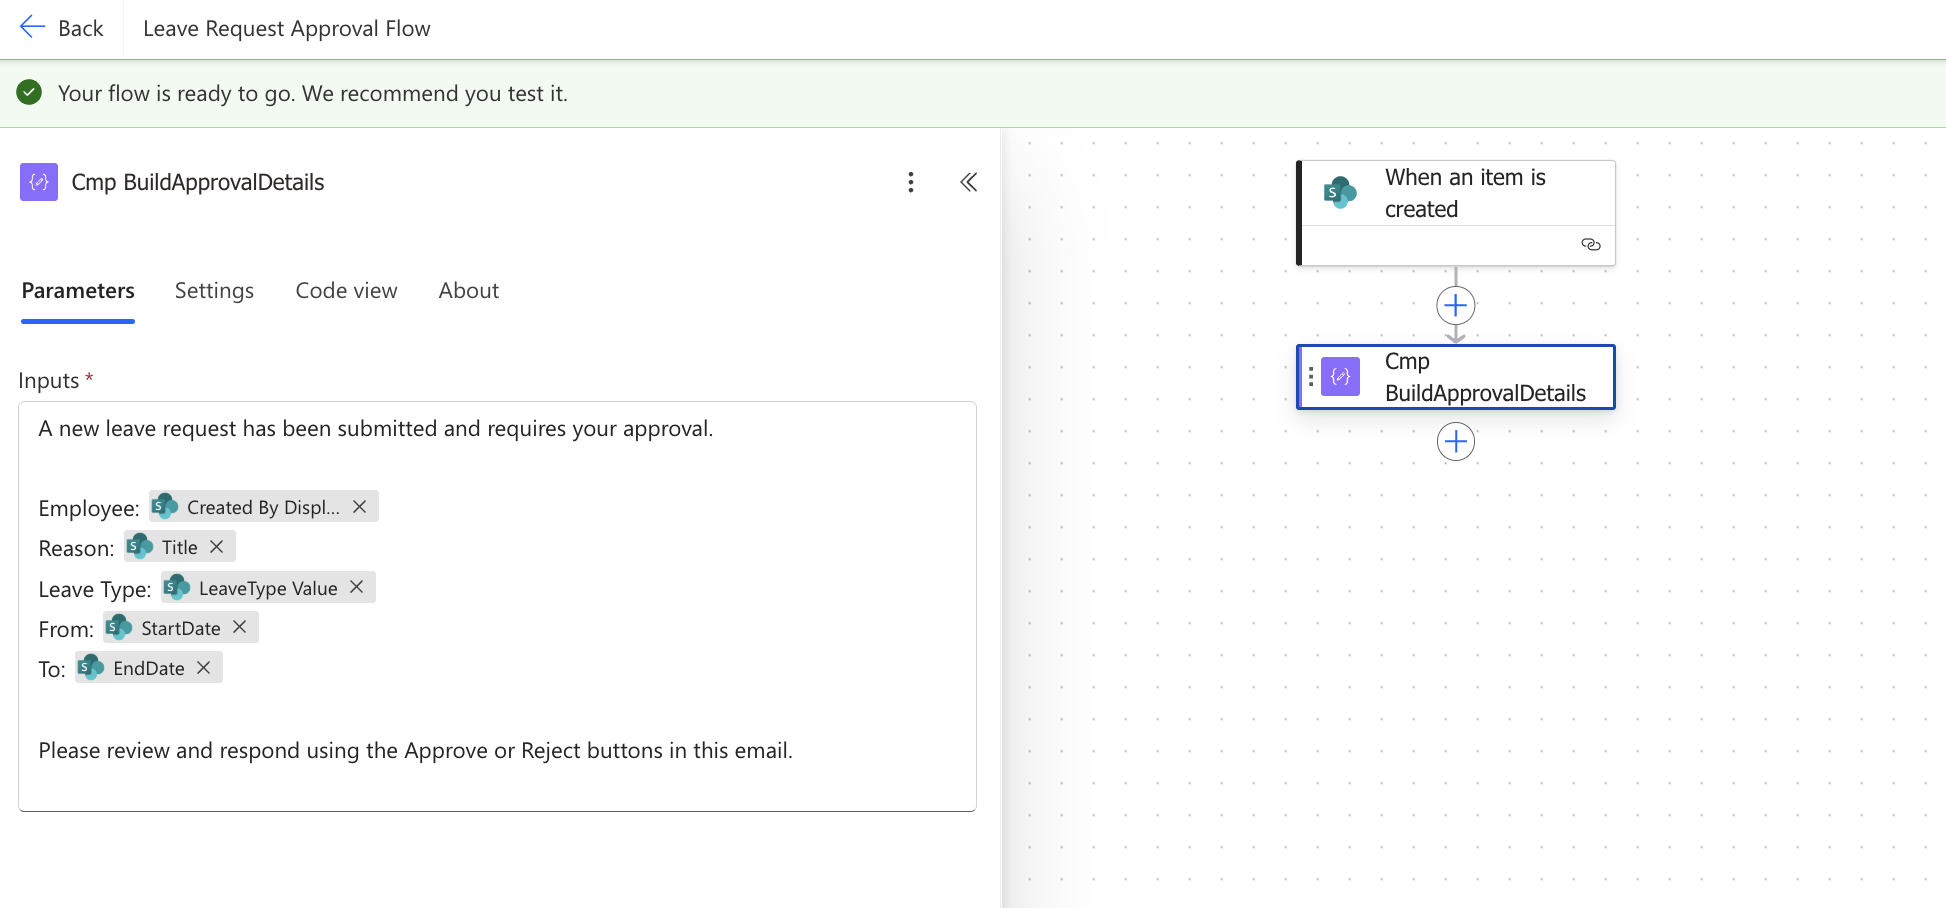
Why use a Compose action first? You could type the message body directly inside the approval action, but using Compose first has two advantages: it keeps the approval action clean and readable, and it lets you reuse the same message in multiple places without retyping it. You will reference this Compose output in the next step using the Outputs token.
Step 5 — Build the Power Automate Approval Flow SharePoint Action (Apv_SendLeaveApproval)
This is the core action of the flow. The Start and wait for an approval action sends the approval request to the manager and pauses the flow entirely until the manager responds — whether that takes five minutes or five days. You can read more about how this action works in the official Microsoft Power Automate approvals documentation.
- Click + New step.
- Search for Start and wait for an approval and select it (under the Approvals connector).
- Rename it to Apv_SendLeaveApproval.
- Set Approval type to Approve/Reject — First to respond.
- Set Title — click inside the field and type, then insert dynamic content:
Leave Request: [Title] — [LeaveType Value]- Set Assigned to to the Manager_Email dynamic content token from the trigger. This is the email address the employee entered when submitting their request.
- Set Details to the Outputs token from Cmp_BuildApprovalDetails. Click Add dynamic content, search for Outputs, and select the one listed under Cmp_BuildApprovalDetails.
- Leave all other fields at their defaults for now.
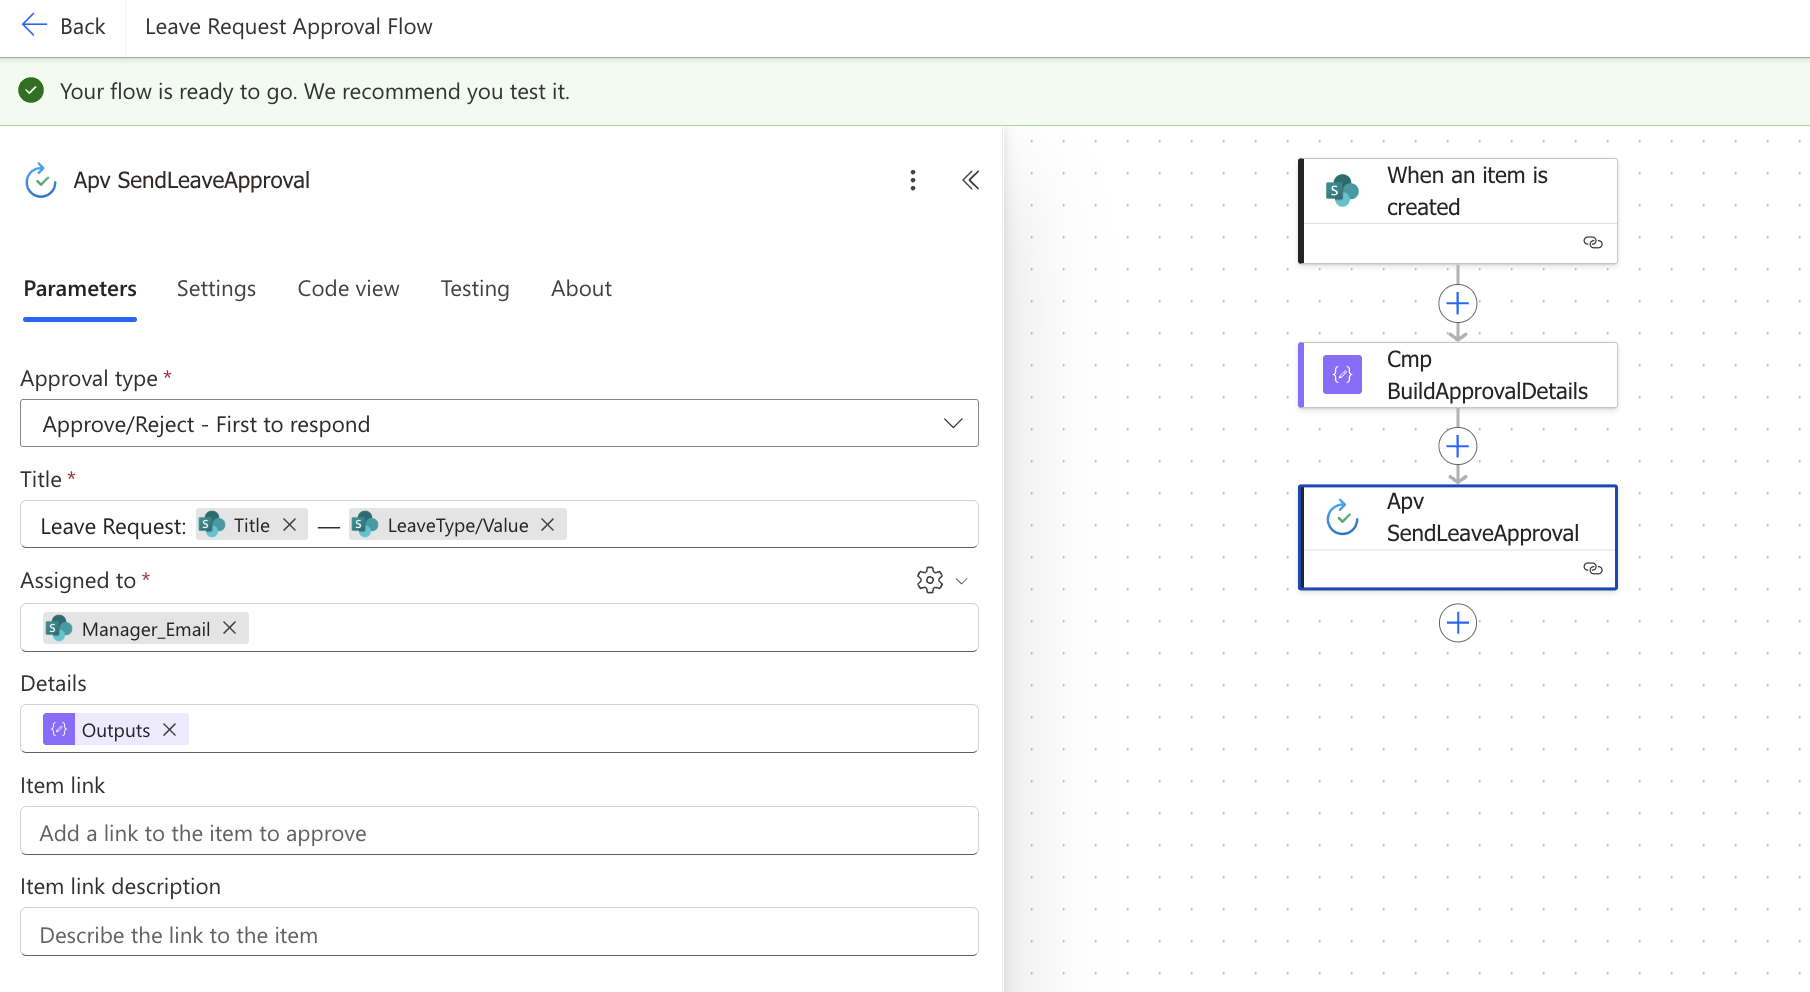
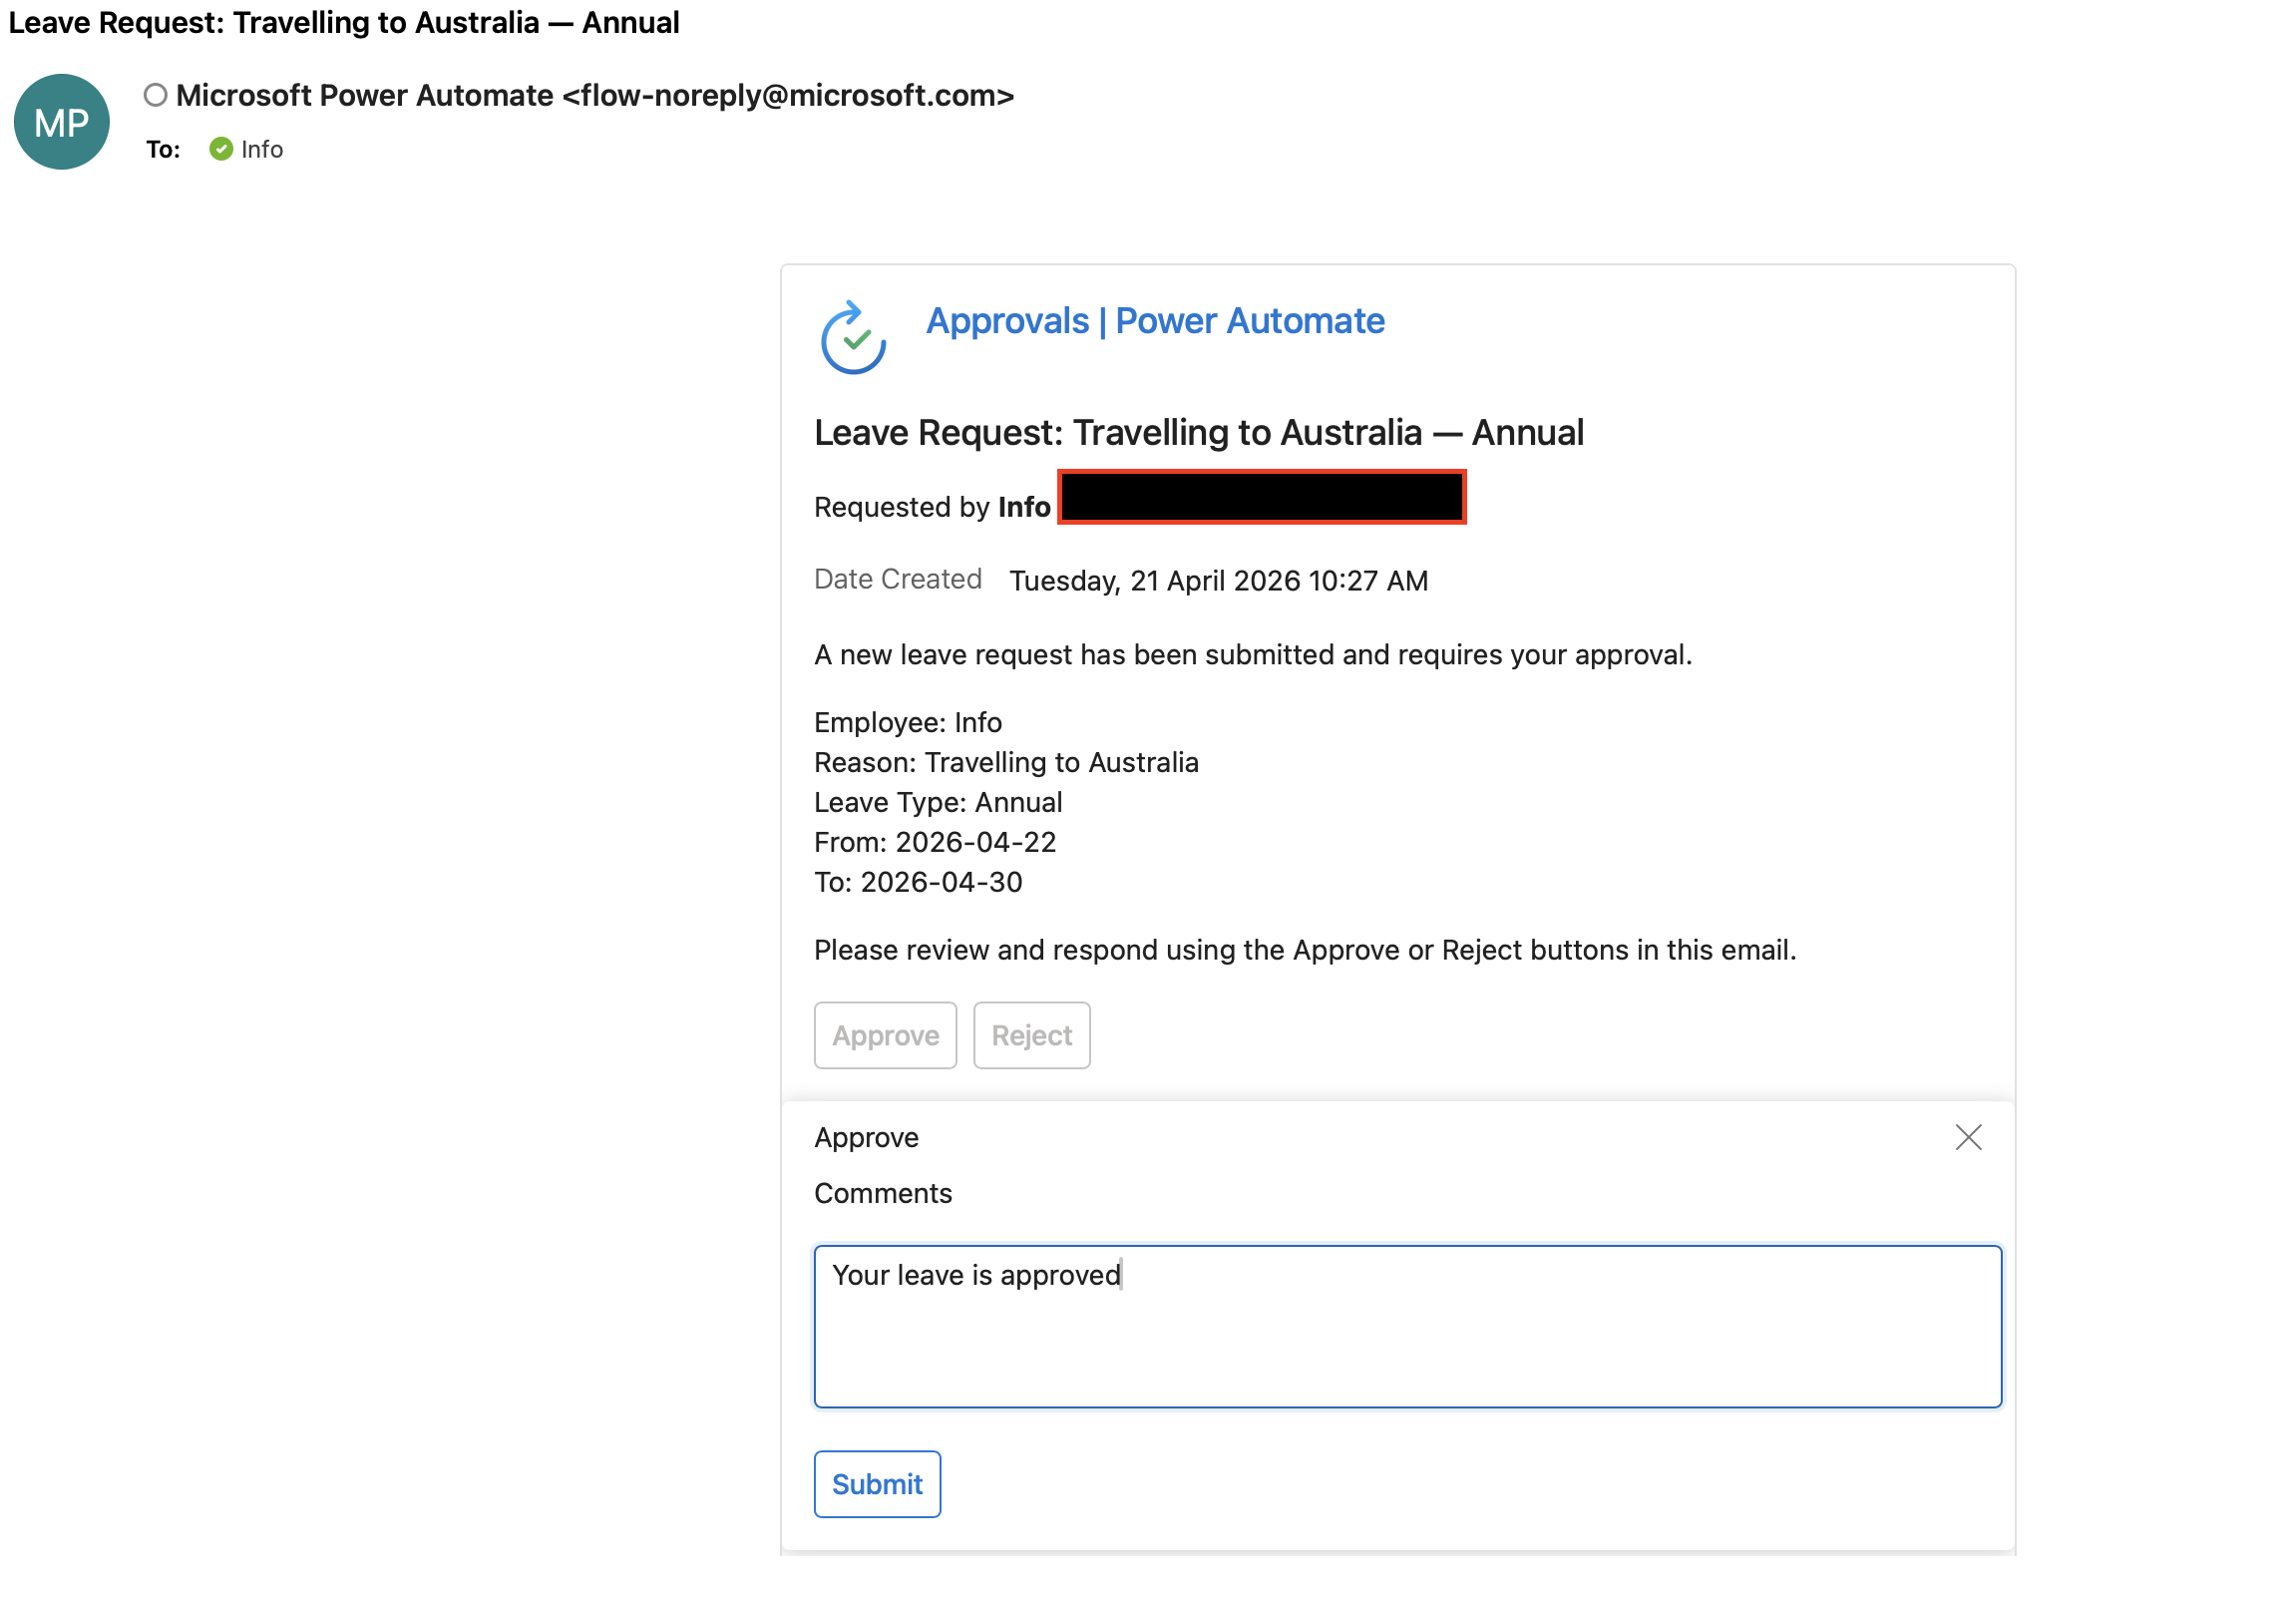
What does the manager see? The manager receives an email from Power Automate with the leave details and two buttons — Approve and Reject. They can add a comment before clicking Submit. Once they respond, the flow resumes automatically and moves to the condition in Step 6.
Timeout: By default, the approval request does not expire. If you want it to auto-reject after a set number of days, you can configure this under the approval action’s settings. This is an optional enhancement for after you have the basic flow working.
Step 6 — Add the Approval Outcome Condition (Cnd_ApprovalOutcome)
After the manager responds, the flow needs to check whether they approved or rejected the request and route itself down the correct path. A Condition action works like an if/else decision point — it evaluates a value, and splits the flow into two separate branches based on whether the result is true or false.
- Click + New step.
- Search for Condition and select it (under Control).
- Rename it to Cnd_ApprovalOutcome.
- Click inside the left-hand value field of the condition row. Click Add dynamic content.
- Search for Outcome and select the Outcome token listed under Apv_SendLeaveApproval. This contains the manager’s response — either the text Approve or Reject.
- Set the operator (middle dropdown) to is equal to.
- In the right-hand value field, type Approve exactly — with a capital A, no extra spaces.
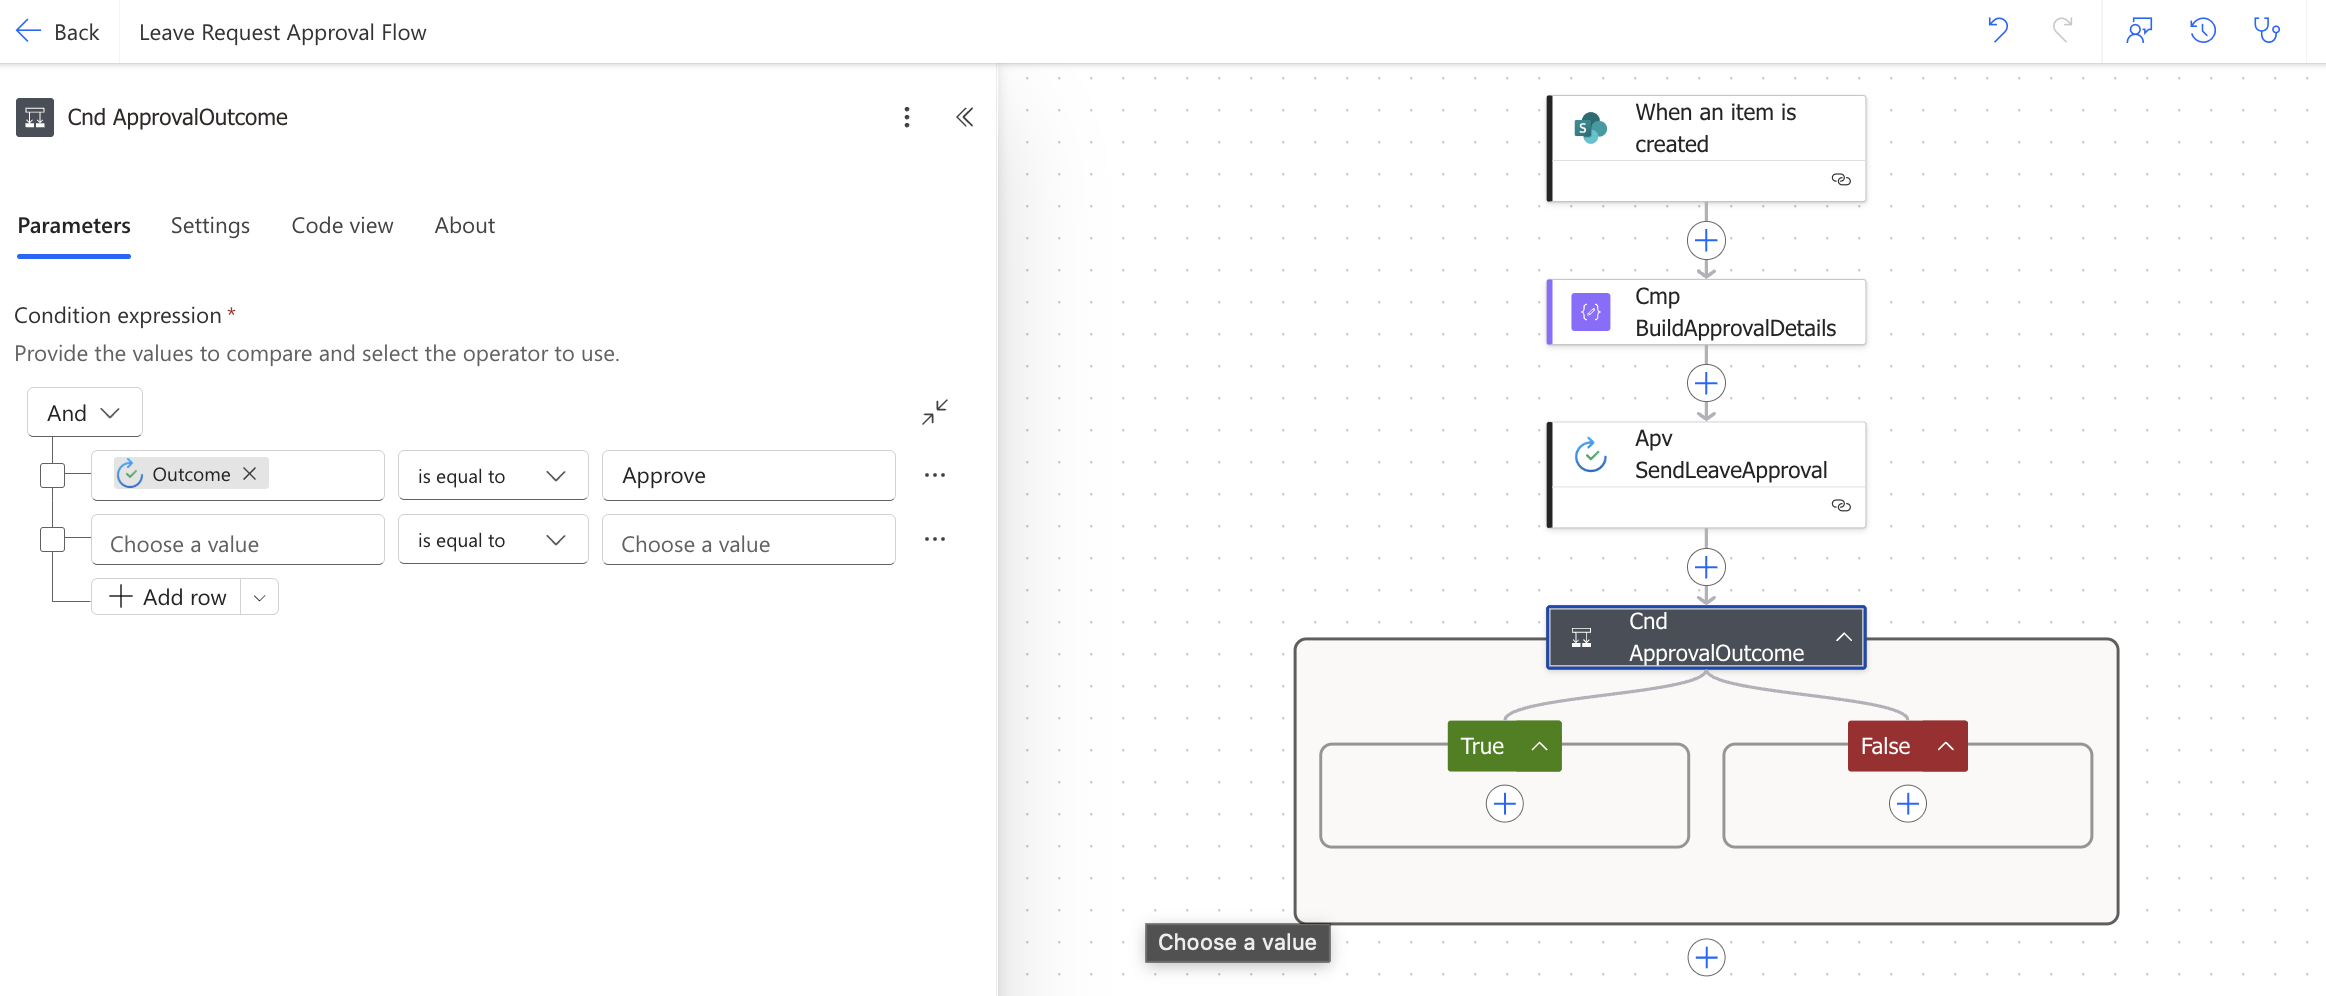
Once configured, the condition splits the flow into two clearly labelled branches:
- True condition (If yes) — Runs when Outcome equals Approve. The SharePoint item is updated to Approved and a confirmation email is sent to the employee. Covered in Step 7.
- False condition (If no) — Runs when the Outcome does not equal Approve, meaning the manager clicked Reject. The SharePoint item is updated to Rejected and a rejection email is sent. Covered in Step 8.
Important: The Outcome value is exactly Approve with a capital A — not Approved. If you type Approved or approve (lowercase), the condition will never evaluate to true and every request will always follow the false (rejected) path.
Why check for Approve and not Reject? It is safer to set the true condition to Approve and let the false branch handle everything else. Any unexpected outcome value — such as a cancelled or timed-out approval — will safely fall into the false branch rather than accidentally triggering an approval.
Step 7 — Approved Branch: Update SharePoint and Notify the Employee
Everything inside the True section runs when the manager clicks Approve. You will update the SharePoint item’s Status to Approved and send a confirmation email to the employee.
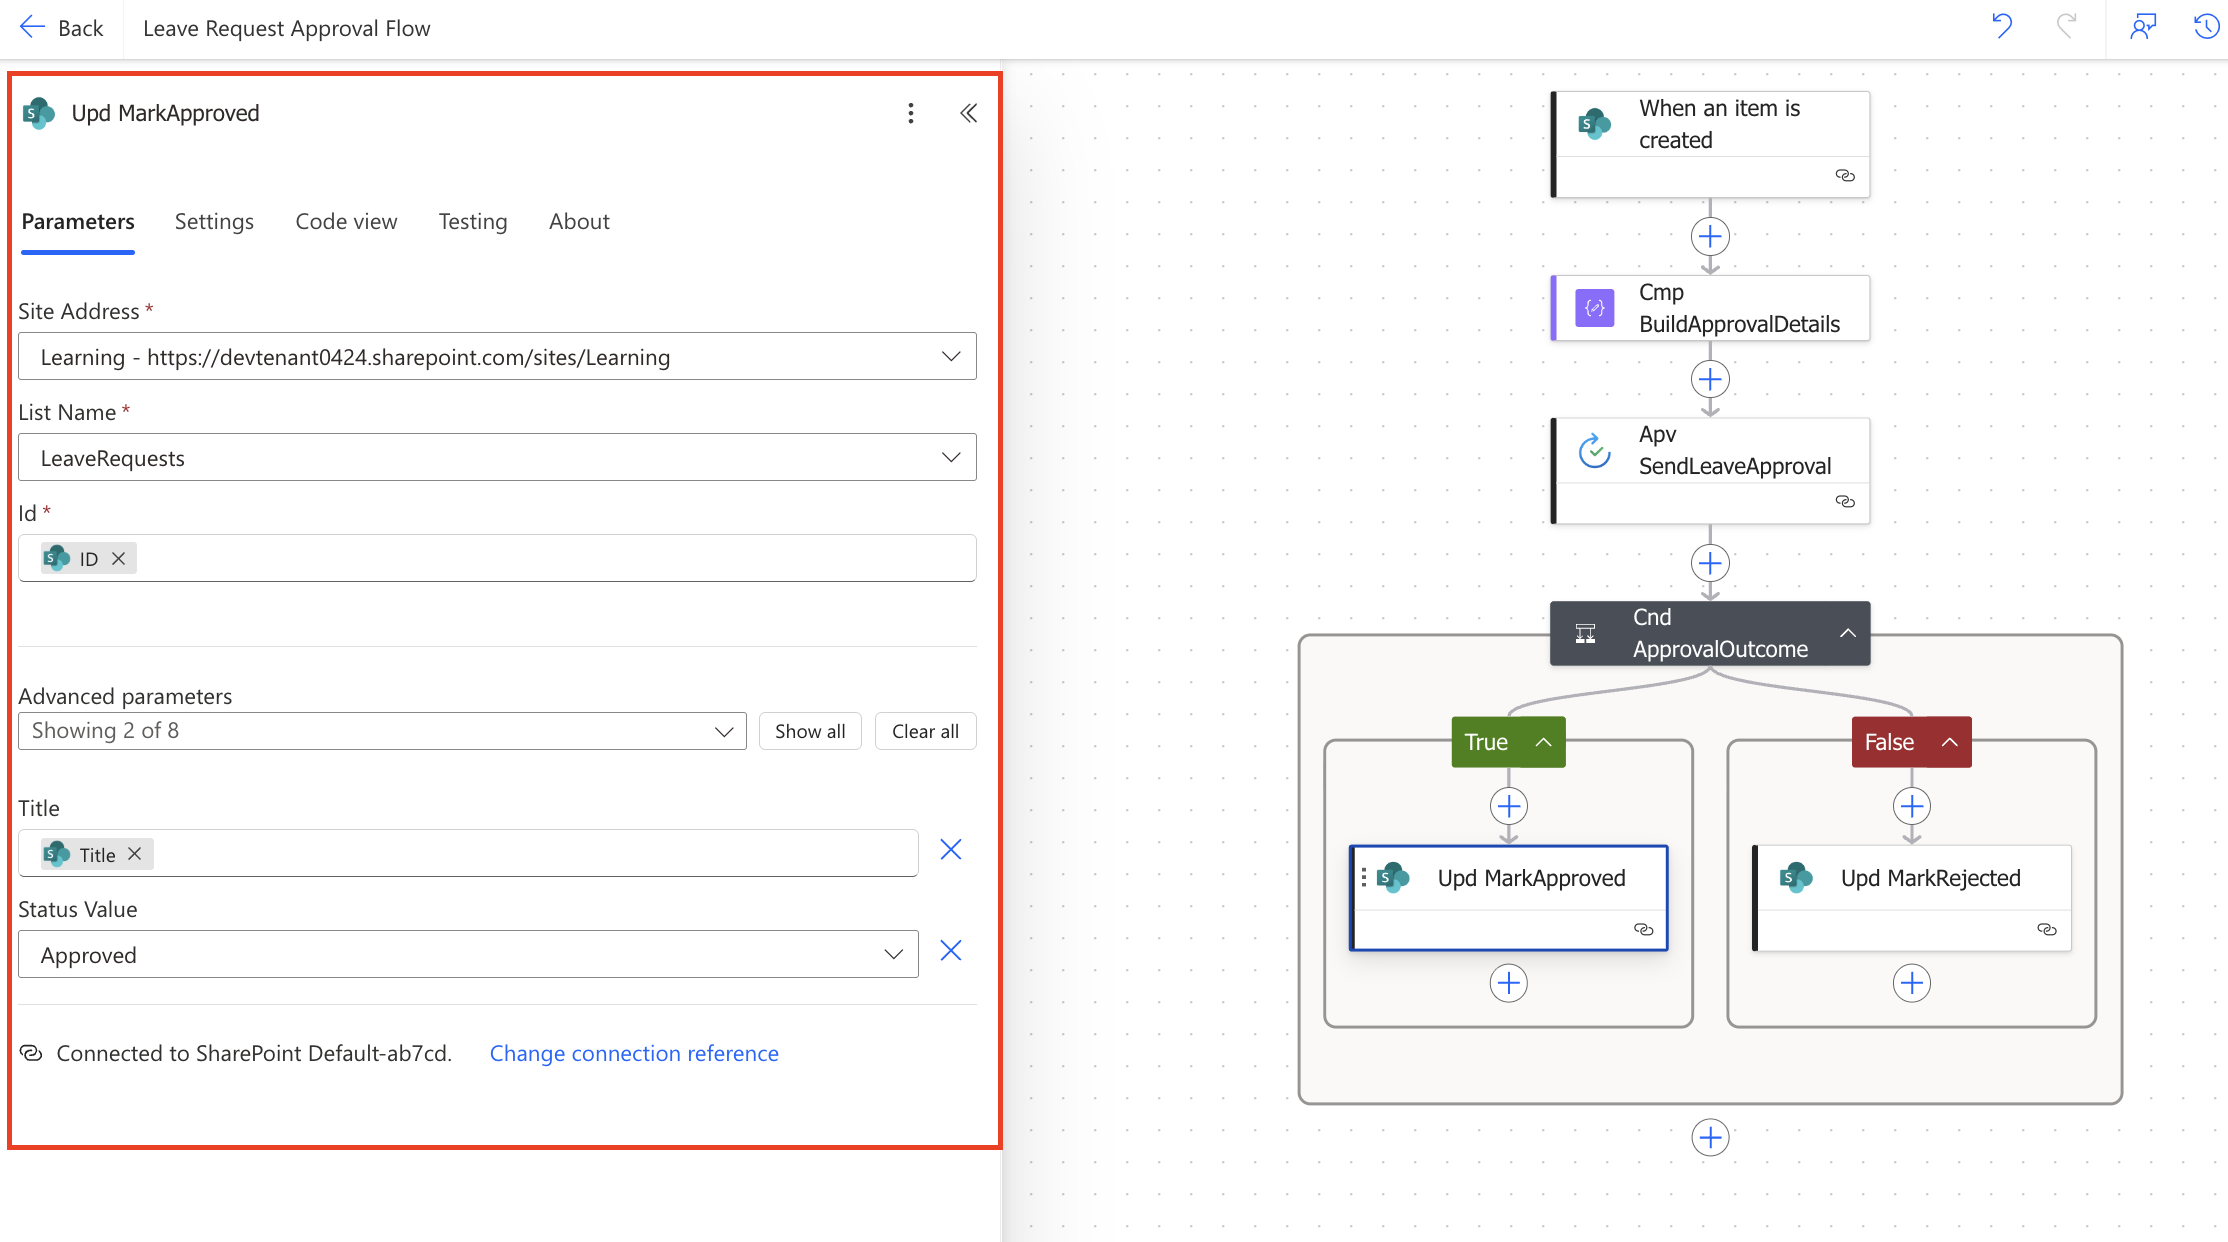
7.1 — Update the SharePoint Item (Upd_MarkApproved)
- Click Add an action inside the True branch.
- Search for Update item and select the SharePoint Update item action.
- Rename it to Upd_MarkApproved.
- Set Site Address to your SharePoint site (same as the trigger).
- Set List Name to LeaveRequests.
- Set Id to the ID dynamic content token from the trigger. This tells the action which list item to update — the exact row that triggered the flow.
- Click Advanced parameters → click Show all. This reveals the Title and Status Value fields which are hidden by default.
- Set Title to the Title dynamic content token from the trigger. This field is required by SharePoint even if you are not changing its value.
- Find the Status Value field and set it to Approved. In the rejected branch (Step 8.1) you will set this same field to Rejected.
Why do I need to set the Title field? SharePoint’s Update item action requires the Title field to be included in every update, even if you are not changing its value. If you leave it blank, the action will overwrite the existing reason for leave with an empty value. Always pass the Title dynamic content token back into this field.
Status values at a glance: The Status Value field is the only difference between the two Update item actions in this flow. In the True branch set it to Approved. In the False branch (Step 8.1) set it to Rejected. Both values must match the Choice options in your SharePoint Status column exactly, including capitalisation.
7.2 — Notify the Employee (Eml_NotifyApproved)
- Click Add an action below Upd_MarkApproved, still inside the True branch.
- Search for Send an email (V2) and select the Office 365 Outlook action.
- Rename it to Eml_NotifyApproved.
- Set To to the Author/Email dynamic content token from the trigger. This is the email address of the employee who submitted the request.
- Set Subject to:
Your leave request has been approved — [Title]- Set Body to:
Hi [Created By DisplayName],

Great news — your leave request has been approved.

Reason: [Title]
Leave Type: [LeaveType Value]
From: [StartDate]
To: [EndDate]

Manager's comments: [Responses Comments]

Your leave request in SharePoint has been updated to Approved. If you have any questions, please contact your manager directly.

Regards,
HR Automation
For the Responses Comments token, click Add dynamic content inside the Body field, search for Comments, and select the token listed under Apv_SendLeaveApproval.
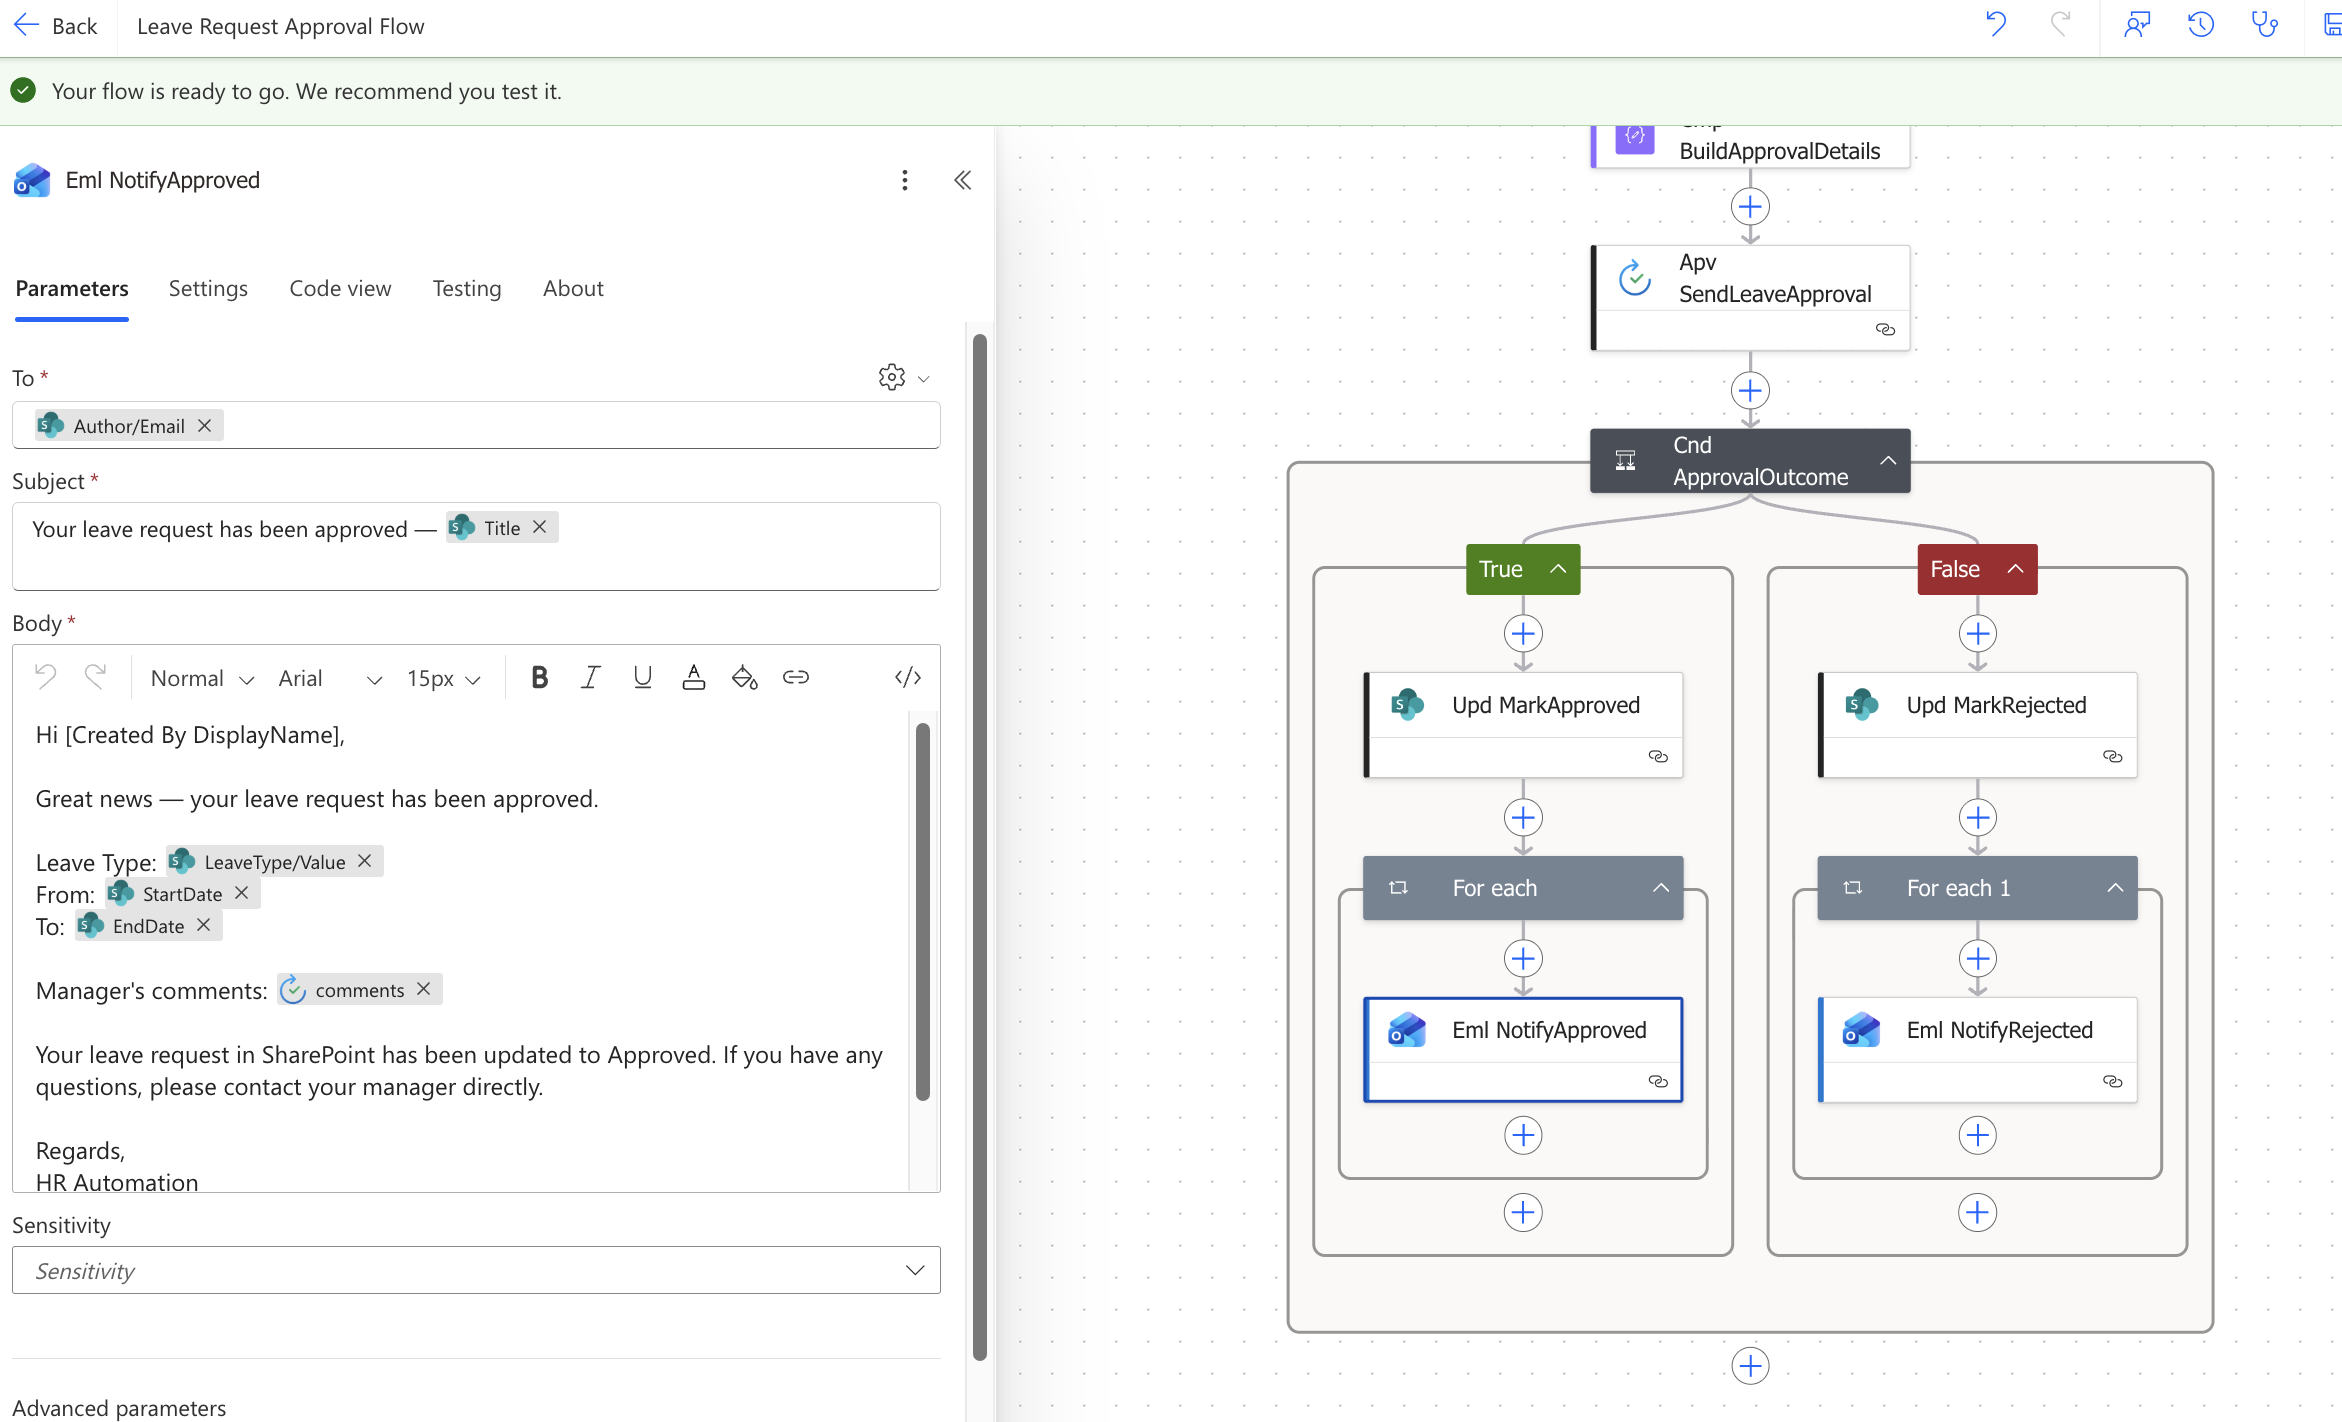
Why is my email action inside a For each loop? When you add the Comments token from the approval action into your email body, Power Automate automatically wraps the Send an email action inside a For each loop. This is expected behaviour — approval responses are returned as an array and Power Automate iterates through each response to extract the comments. You do not need to configure the For each loop manually. Leave it as is and it will work correctly.
Step 8 — Rejected Branch: Update SharePoint and Notify the Employee
Everything inside the False section runs when the manager clicks Reject. The steps mirror the approved branch exactly — only the Status value and email content change.
8.1 — Update the SharePoint Item (Upd_MarkRejected)
- Click Add an action inside the False branch.
- Search for and select the SharePoint Update item action.
- Rename it to Upd_MarkRejected.
- Configure Site Address, List Name, Id, and Title exactly as you did in Step 7.1.
- Under Advanced parameters → Show all, find the Status Value field and set it to Rejected.
8.2 — Notify the Employee (Eml_NotifyRejected)
- Click Add an action below Upd_MarkRejected, still inside the False branch.
- Search for and select the Office 365 Outlook Send an email (V2) action.
- Rename it to Eml_NotifyRejected.
- Set To to Author/Email from the trigger.
- Set Subject to:
Your leave request was not approved — [Title]- Set Body to:
Hi [Created By DisplayName],
Thank you for submitting your leave request. Unfortunately, your request has not been approved at this time.
Reason: [Title]
Leave Type: [LeaveType Value]
From: [StartDate]
To: [EndDate]
Manager's comments: [Responses Comments]
If you would like to discuss this further, please contact your manager directly. You are welcome to submit a new request if your circumstances change.
Regards,
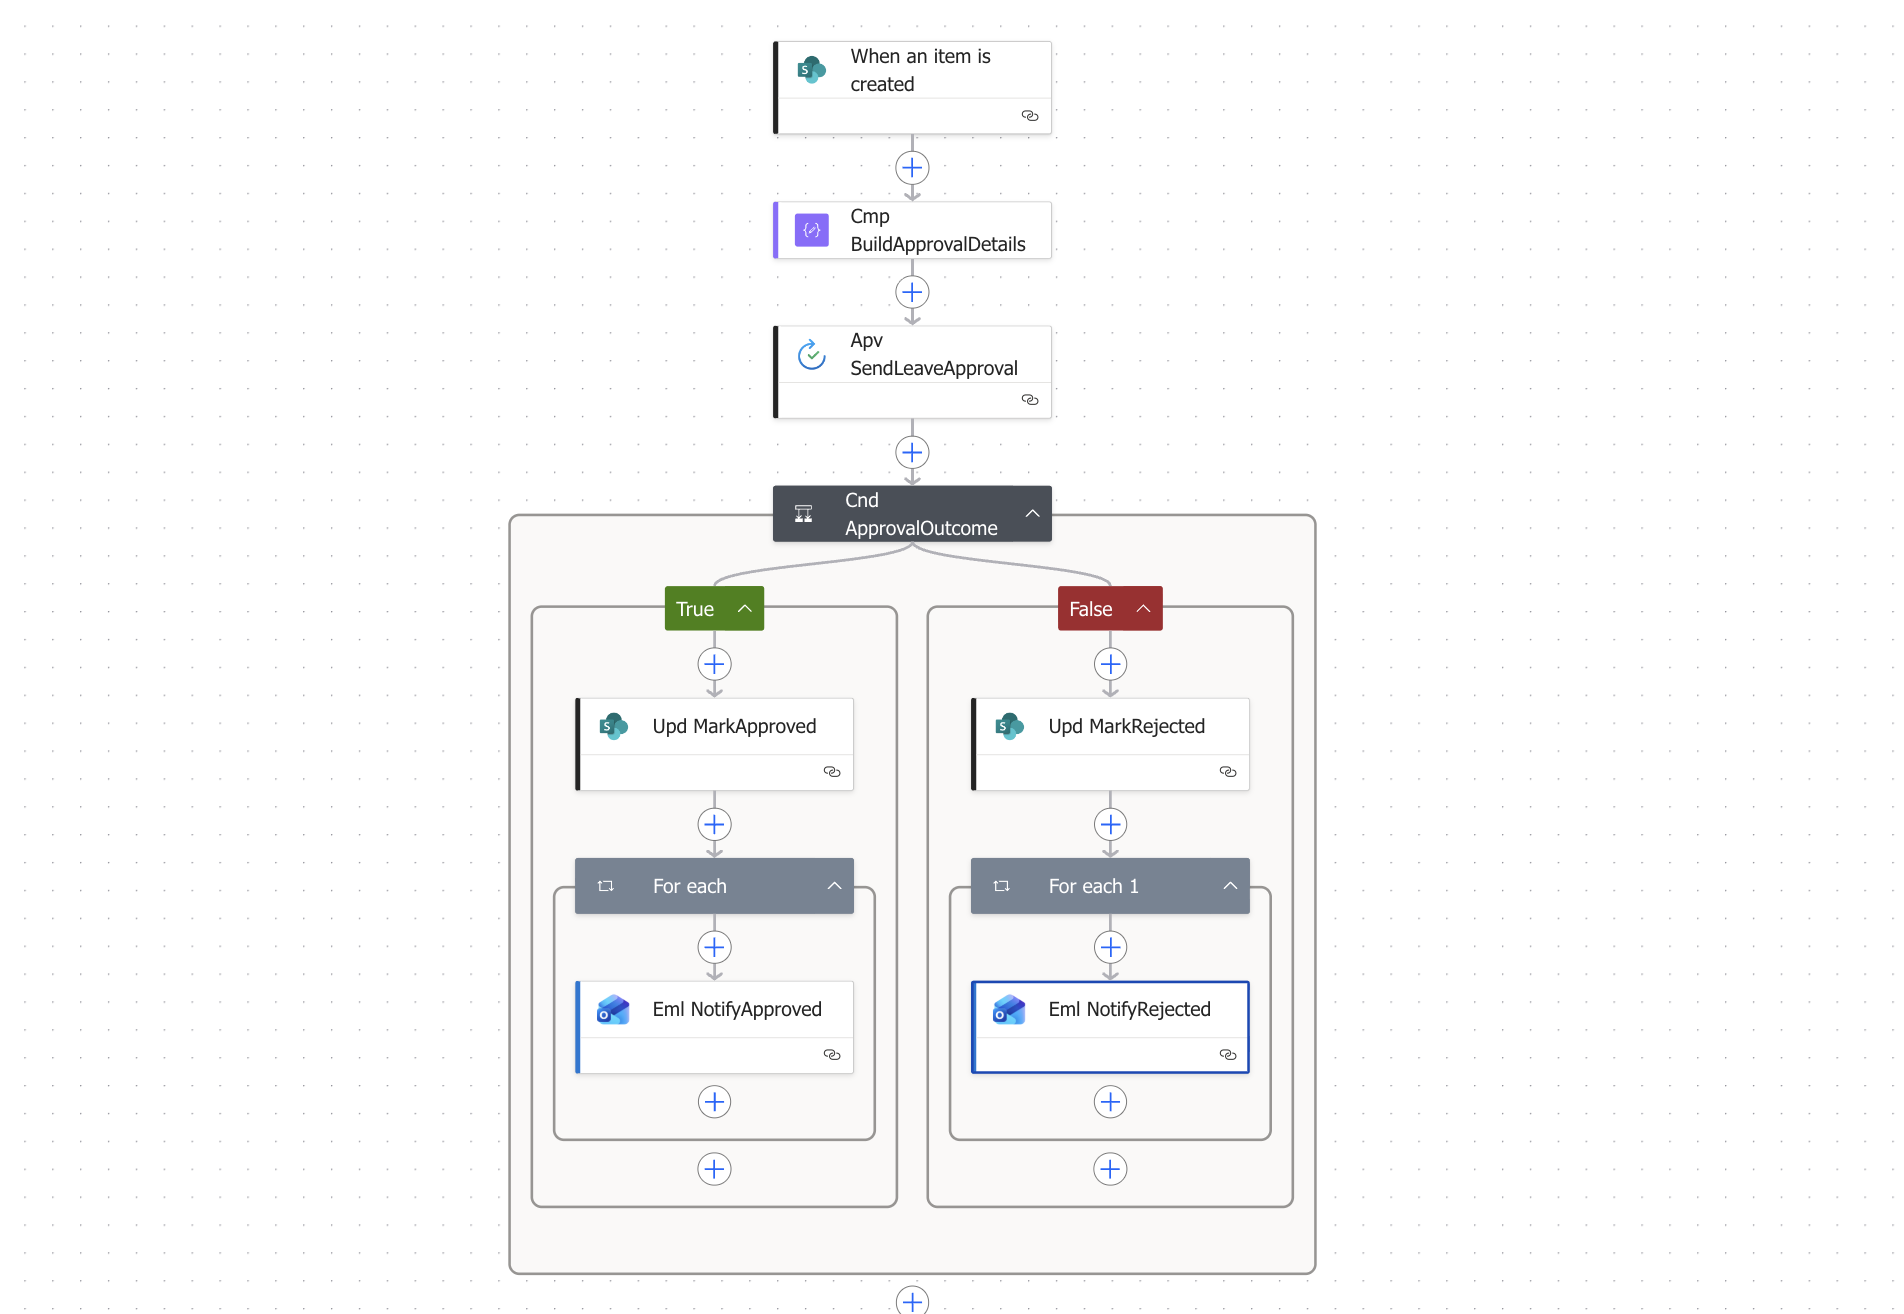
HR AutomationYour completed Power Automate approval flow SharePoint canvas should now show all actions in this order:
- When an item is created → SharePoint trigger (cannot be renamed)
- Cmp_BuildApprovalDetails → Compose action
- Apv_SendLeaveApproval → Approval action
- Cnd_ApprovalOutcome → Condition (branches into True and False)
- True: Upd_MarkApproved → For each → Eml_NotifyApproved
- False: Upd_MarkRejected → For each 1 → Eml_NotifyRejected
Note : When you have option “first to respond” avoid using “Apply to each and use the first() expression to access the initial response
Step 9 — Save and Test the Power Automate Approval Flow SharePoint
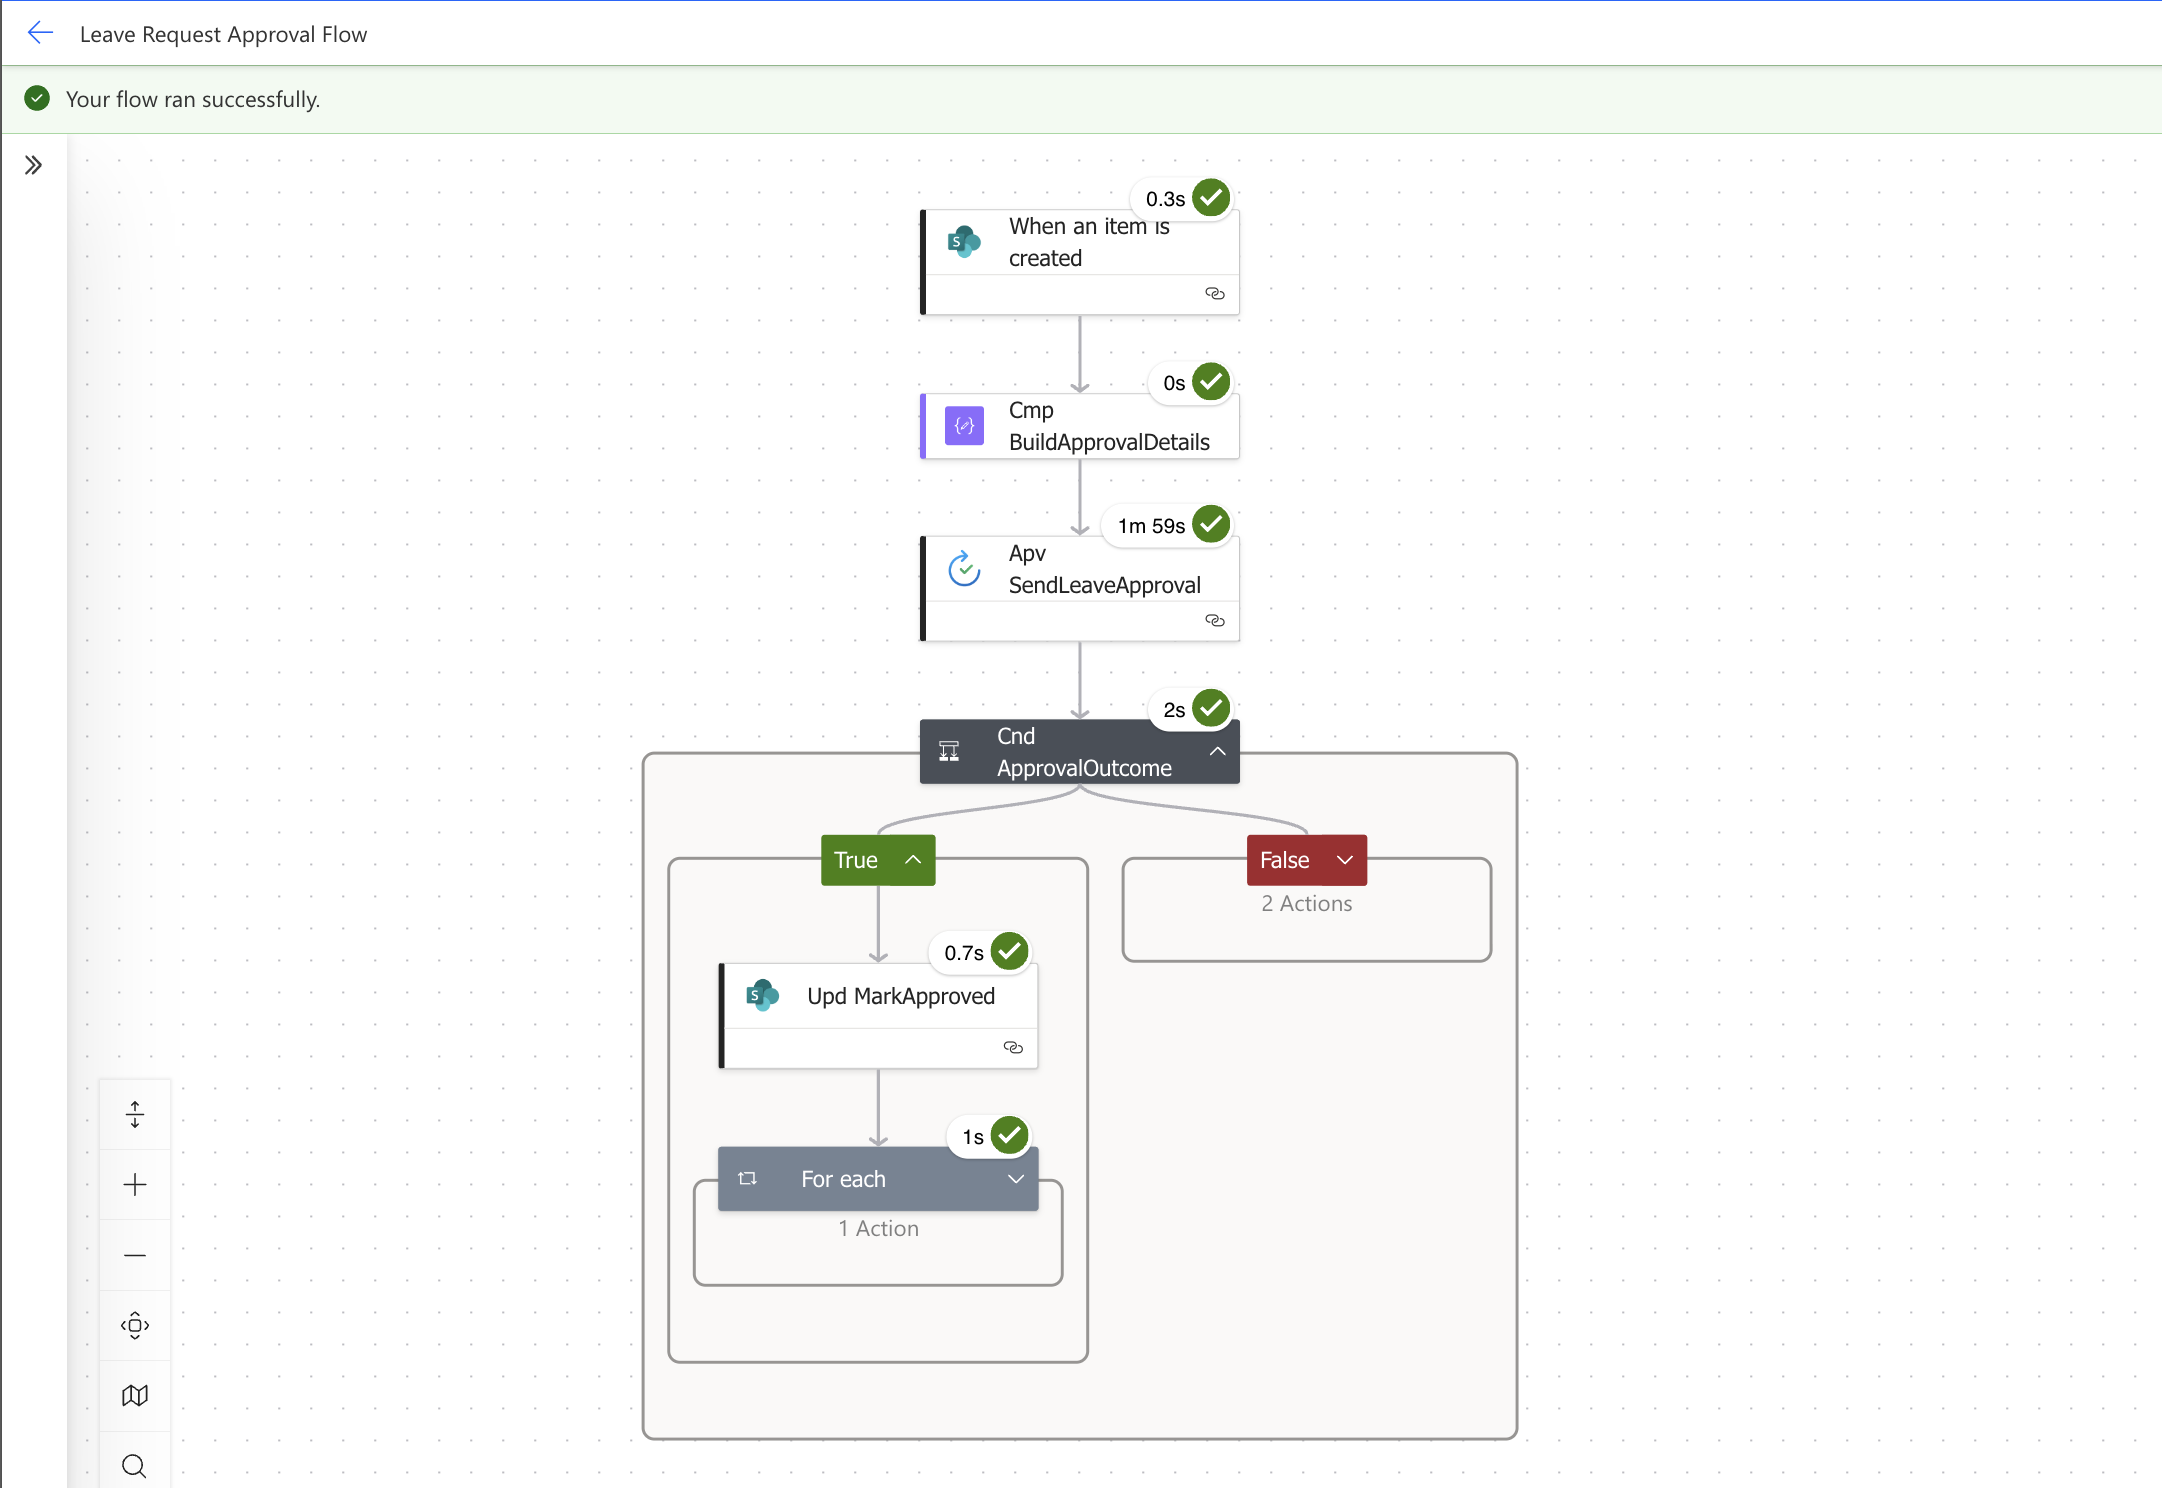
- Click Save in the top right of the flow designer. Wait for the save to complete — you will see a confirmation message.
- Go to your LeaveRequests SharePoint list and create a new item manually. Fill in all fields including a valid Manager_Email — use your own email address so you can act as the manager during testing.
- Go back to Power Automate. Click the back arrow to return to the flow detail page. Under 28 day run history, you should see a new run appear within a minute or two with status Running.
- Check the inbox of the email address you used as Manager_Email. You should receive an approval request email with the leave details and Approve / Reject buttons.
- Click Approve and add a short comment. Go back to Power Automate — the run status should change from Running to Succeeded.
- Check the employee’s inbox (the account that created the SharePoint item). You should receive the approval notification email.
- Open the LeaveRequests SharePoint list and confirm the item’s Status column has updated from Pending to Approved.
- Repeat the test with a new item and click Reject this time to verify the rejected branch works correctly.
Testing tip: If the flow does not appear in the run history after a minute, check that the flow is switched on. Go to the flow detail page and look for the toggle at the top — it should read On. If it reads Off, click it to turn the flow on before testing again.
Checking for errors: If the run shows a status of Failed, click on the run to expand the detail view. Each action shows a green tick (succeeded) or a red X (failed). Click the failed action to see the error message — this is the fastest way to diagnose what went wrong.
Download the Flow
You can download the ready-made solution package for this Power Automate Approval Email Notificationand import it directly into your environment — no need to build from scratch.
📦 Download: Head over to GitHub to download ApprovalEmail_1_0_0_1.zip
Common Mistakes to Avoid
- Condition value typed as “Approved” instead of “Approve” — The Outcome token returns the text Approve, not Approved. If you type Approved in the condition, the True branch will never run and every request will follow the rejected path. Double-check this value carefully.
- Title field left blank in the Update item action — SharePoint’s Update item action requires the Title field even if you are not changing it. Leaving it blank will overwrite the existing reason for leave with an empty value. Always map the Title dynamic content token from the trigger into this field.
- Using the wrong ID token in Update item — Make sure you select the ID token from the trigger (When an item is created) and not from any other action. Using the wrong ID will either fail or update the wrong list item.
- Dynamic content not appearing in the panel — If you cannot find a token in the dynamic content panel, click See more next to the action name to expand the full list. Tokens from earlier steps are sometimes hidden by default.
- Flow not firing when a new item is created — Check three things: (1) the flow is switched on, (2) the Site Address and List Name in the trigger match exactly, and (3) the account that created the flow still has access to the SharePoint list.
- Manager receiving the approval email from an unexpected sender — The approval email is sent by the Power Automate service account, not from your personal email. The sender will appear as flow-noreply@microsoft.com on behalf of your tenant. This is expected behaviour.
- Status column showing blank instead of Approved or Rejected — This happens when the value in the Status Value field does not match a valid Choice option exactly. Check that Approved and Rejected match the Choice options in your SharePoint Status column character-for-character, including capitalisation.
- Title and Status Value not visible in Update item — These fields are hidden under Advanced parameters by default. Click Advanced parameters → Show all to reveal them before configuring.
Related Power Platform Tutorials on VishPowerLabs
If you found this Power Automate approval flow SharePoint guide useful, these posts cover the tools and concepts that connect directly to what you have built here:
- SharePoint List setup and management guides — Covers list design, column types, and permissions for Power Automate integration
- Power Platform beginner tutorials — The full series this flow belongs to, including the Canvas App and SharePoint list built in earlier guides
- Microsoft Copilot for Power Platform — Using Copilot to accelerate flow building and troubleshooting
What’s Next
With this Power Automate approval flow SharePoint solution in place, every leave request submitted to your list now goes through a structured approval process automatically. The manager gets notified, the SharePoint item is updated based on the outcome, and the employee receives a personalised email either way. No manual tracking, no missed approvals.
Some natural ways to extend this flow:
- Add a second approver to Apv_SendLeaveApproval — change the approval type to Approve/Reject — Everyone must approve to require sign-off from both a direct manager and an HR representative
- Add a reminder action using a Do until loop that sends a follow-up email to the manager if they have not responded within 48 hours
- Post a Microsoft Teams notification to a channel after approval so the wider team is aware of upcoming leave without needing to check SharePoint
I love the efforts you have put in this, thankyou for all the great articles.
Thank you for another informative blog. Where else could I get that type of info written in such an ideal way? I’ve a project that I am just now working on, and I have been on the look out for such information.