The Power Apps Expense Tracker App built in this guide connects directly to a SharePoint list and handles the full expense submission and approval workflow. You describe what you want to Claude Code in plain English. It generates all three screens, wires up the SharePoint data, and syncs everything into your live Power Apps Studio session.
No dragging controls. No writing Power Fx formulas. Just a working app at the end of the process.
This guide covers every step, including the parts the official Microsoft documentation skips. The build was tested on a real Mac using Claude Code 2.1.141, Power Apps Studio with co-authoring enabled, and a live SharePoint site. Follow each step in order and you will have a usable app.
For more Power Platform content written from an architect’s view, browse the Power Platform articles on this site.
What the Power Apps Expense Tracker App Includes
The finished app has three screens. The Browse screen lists all expenses from SharePoint in a gallery with status filter tabs and a live search bar. The Detail screen shows every field for a selected expense in read-only view. The Edit screen is the submission form, with today’s date and the logged-in user’s name already filled in when it opens.
All data lives in a SharePoint list. No Dataverse licence is needed. A standard Microsoft 365 Business Basic subscription covers everything.
Before You Start
- Microsoft 365 account with SharePoint and Power Apps access
- Permission to create lists on a SharePoint site
- Claude Pro at $20 per month — Claude Code is included
- A Mac, Windows, or Linux machine with a terminal
Step 1: Create the SharePoint List
The Power Apps Expense Tracker App reads from and writes to a SharePoint list. Set up the list and columns before starting the build. Claude Code uses the column names you provide in the prompt to generate the app, so they need to exist in SharePoint first.
- Open your SharePoint site in a browser.
- Click New in the toolbar and choose List.
- Select Blank list and name it ExpenseTracker with no spaces.
- Click Create.
The list opens with a built-in Title column. Keep it as the expense title field. Add the remaining columns by clicking + Add column.
Columns to Add
ExpenseDate — Date and Time, date-only format.
Amount — Number, two decimal places. Use Number rather than Currency. Currency columns behave inconsistently inside Power Apps form controls.
Category — Choice column. Options: Travel, Accommodation, Meals, Equipment, Software, Training, Marketing, Other. The app renders this as a dropdown automatically.
Description — Multiple lines of text.
SubmittedBy — Person or Group, single selection. Links to your Microsoft 365 directory for automatic name and email resolution.
Status — Choice column, default value Draft. Options: Draft, Submitted, Approved, Rejected.
ManagerComments — Multiple lines of text.
ReceiptAttached — Yes/No, default No.
Add two or three sample rows with realistic values before moving on. You want real data in the gallery the first time you preview the app.
Copy your SharePoint site URL from the browser address bar. It looks like https://yourorg.sharepoint.com/sites/YourSiteName.
Step 2: Install Claude Code
Check Your Claude Subscription
Go to claude.com/pricing and confirm you are on the Pro plan. Claude Code is included in Pro at $20 per month. If you already subscribe, nothing extra is needed.
Run the Installer
Open a terminal and run the command for your operating system.
Mac or Linux:
curl -fsSL https://claude.ai/install.sh | bashWindows PowerShell:
irm https://claude.ai/install.ps1 | iexWindows Command Prompt:
curl -fsSL https://claude.ai/install.cmd -o install.cmd && install.cmd && del install.cmdMac PATH Fix
After installing on Mac, type claude and press Enter. If you see “command not found”, the shell cannot locate the binary. Run these two commands to fix it:
echo 'export PATH="$HOME/.local/bin:$PATH"' >> ~/.zshrcsource ~/.zshrcHomebrew path warnings in the output are safe to ignore. Confirm the fix worked:
claude --versionStill not working? Close the terminal completely, open a new window, and try again.
Log In to Claude Code
Type claude to start. On the first run a login menu appears:
1. Claude account with subscription - Pro, Max, Team, or Enterprise
2. Anthropic Console account - API usage billing
3. 3rd-party platform - Amazon Bedrock, Microsoft Foundry, or Vertex AI
Select option 1. Your browser opens to complete sign-in. Return to the terminal when done.
Step 3: Install the .NET 10 SDK
The canvas app plugin runs on .NET 10. Download the SDK from dotnet.microsoft.com/download/dotnet/10.0, install it, then run:
dotnet --versionA version starting with 10, such as 10.0.102, confirms the install worked.
Step 4: Create a Blank Canvas App
- Go to make.powerapps.com and sign in.
- Select Create, then Blank app, then Blank canvas app.
- Name it Expense Tracker, pick Tablet format, and click Create.
- Go to Settings, then Updates, and turn on Coauthoring.
- Save using Ctrl+S on Windows or Cmd+S on Mac.
Copy the full URL from the browser address bar while the app is open. Do not close or reload this tab during the build. A dropped session disconnects Claude Code from the app.
Step 5: Install the Canvas Apps Plugin
In Claude Code, run these two commands:
/plugin marketplace add microsoft/power-platform-skills/plugin install canvas-apps@power-platform-skillsThen run:
/reload-pluginsThe confirmation should include 1 plugin MCP server. That MCP server is the live connection between Claude Code and Power Apps Studio.
Step 6: Connect to Power Apps Studio
In Claude Code, type this with your actual Power Apps Studio URL:
I want to create a canvas app in Power Apps. My Power Apps Studio URL is [your URL here]Do not use the /configure-canvas-mcp slash command. It does not work in the current plugin version. The plain English prompt above triggers the same setup automatically.
When a skill permission dialog appears, choose Yes, and don’t ask again. This keeps the build running without interruptions.
If the terminal says the MCP server is not active, run /reload-plugins and repeat the prompt. This is expected on first setup.
Step 7: Build the Power Apps Expense Tracker App
Paste this build prompt into Claude Code. Replace the SharePoint URL with your real one:
Create a canvas app for expense tracking connected to a SharePoint list called ExpenseTracker on our SharePoint site at https://yourorg.sharepoint.com/sites/YourSiteName. The list has these columns: Title, ExpenseDate (Date), Amount (Number), Category (Choice: Travel, Accommodation, Meals, Equipment, Software, Training, Marketing, Other), Description (Multiple lines of text), SubmittedBy (Person), Status (Choice: Draft, Submitted, Approved, Rejected), ManagerComments (Multiple lines of text), and ReceiptAttached (Yes/No). Build three screens: a browse screen showing all expenses in a gallery with title, category, amount, date, and status per row with a Status filter tab and a search bar; a detail screen showing all fields for a selected record; and an edit form where users can create or update expenses with SubmittedBy pre-filled from the logged-in user.
Design Questions
Claude Code asks two questions. For aesthetic direction, pick 1 — Clean and Professional. For the reference image question, pick 1 — No, pick a direction for me.
Planning Takes 4 to 5 Minutes
Claude Code reads its reference docs and plans the screen layout. The terminal shows a timer counting up. This is not frozen — it is working. Give it the time it needs.
Plan Approval
Claude presents a plan summary and asks how to proceed. Pick 1 — Yes, auto-accept edits to run the full build without stopping for individual file confirmations.
Screen Generation Takes 45 to 60 Minutes
Three parallel agents build Browse, Detail, and Edit screens at the same time. Total build time including error fixing runs between 60 and 90 minutes. Keep the terminal open throughout.
Step 8: Add Data Sources in Power Apps Studio
After all screens generate, Claude Code flags that the data sources need connecting before the final compile. This step requires manual action in the browser — Claude Code cannot add connectors programmatically.
In your Power Apps Studio tab:
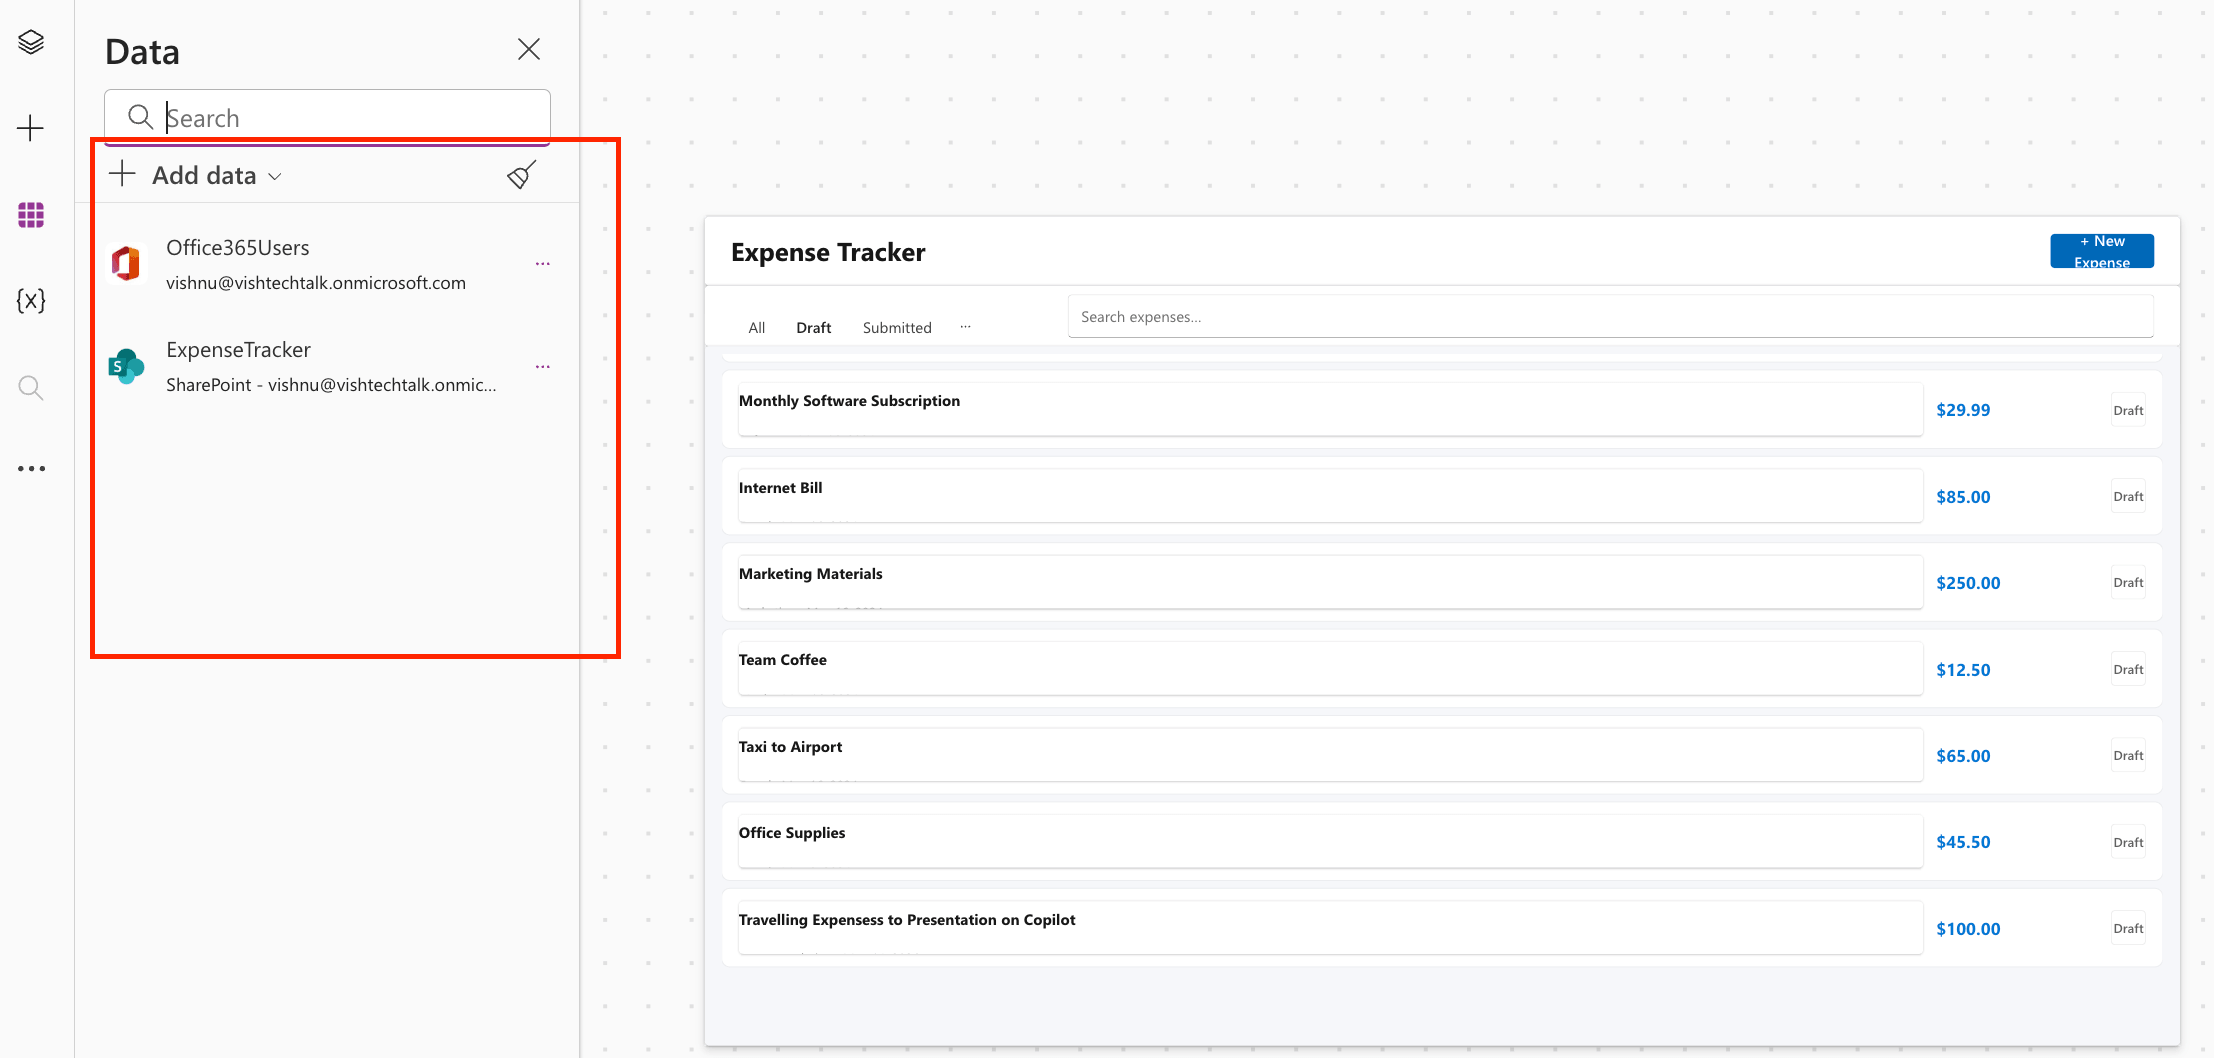
- Click the Data icon in the left sidebar. It looks like a cylinder.
- Click + Add data, search SharePoint, enter your site URL, select the ExpenseTracker list, and click Connect.
- Click + Add data again, search Office 365 Users, and click Connect.
Go back to Claude Code and confirm both connectors are in place. Claude Code verifies them, fixes remaining formula errors, and runs the final compile. A successful result shows:
Clean compile. App generation complete.
Compiled clean after 4 passes. | Screens: 3 | Data: SharePoint ExpenseTracker + Office365Users
Step 9: Preview and Test the App
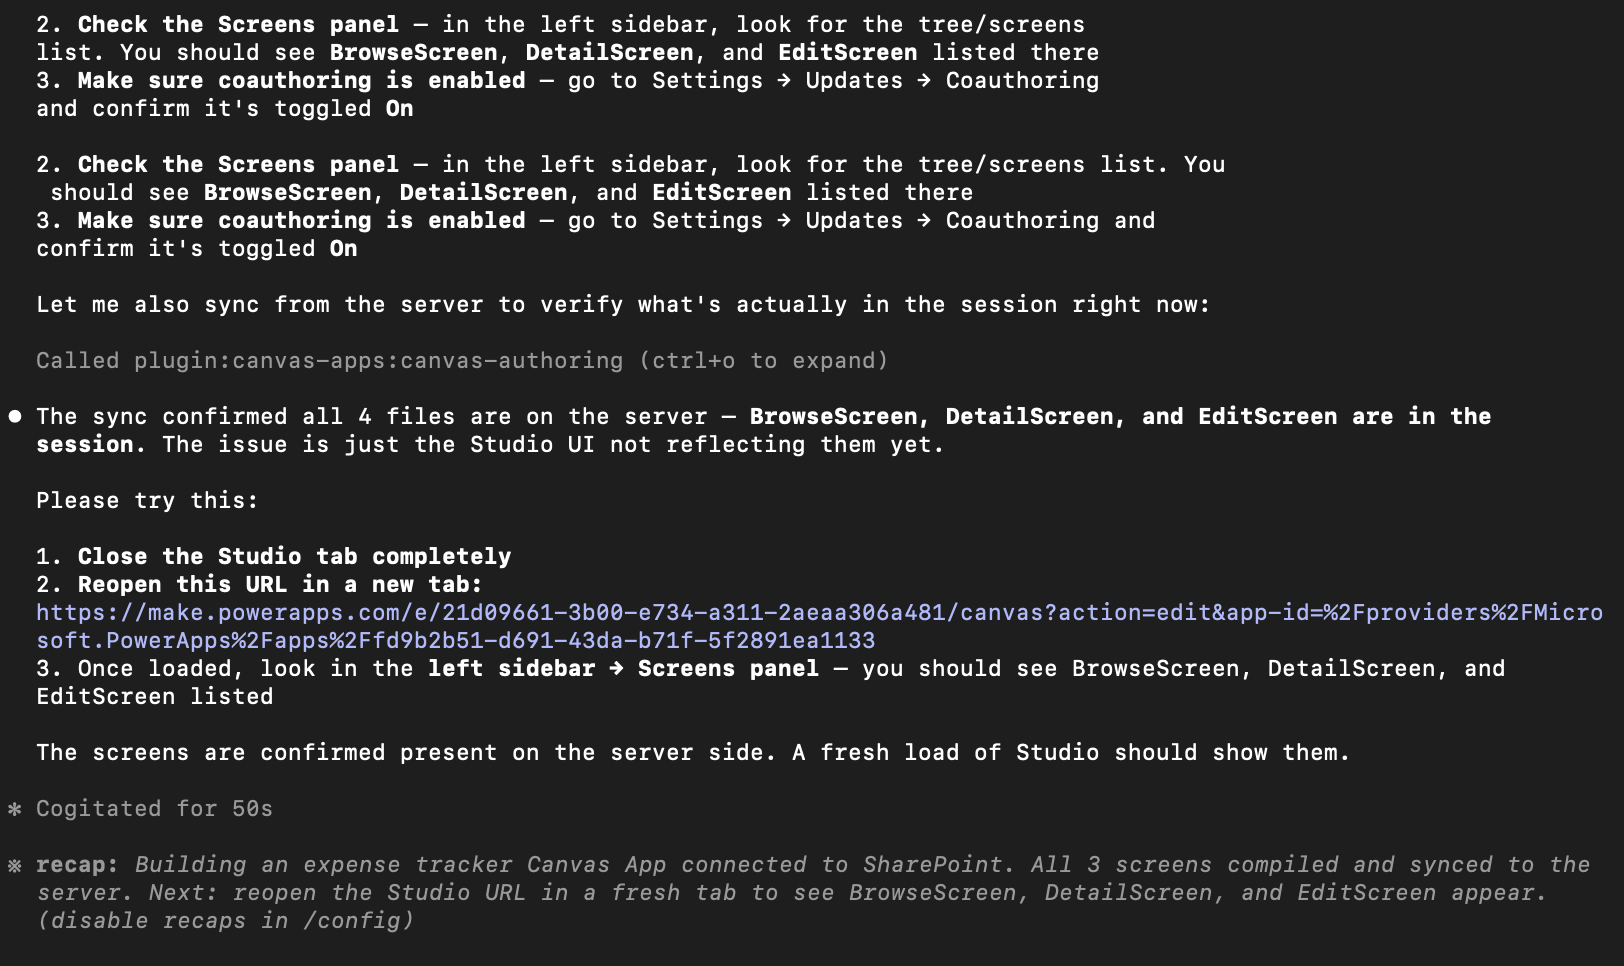
Switch to Power Apps Studio. If the three screens are not showing in the left Screens panel yet, do a hard refresh. Hold Shift and click the browser refresh button, or press Ctrl+Shift+R on Windows or Cmd+Shift+R on Mac. A standard refresh is not enough after a co-authoring sync.
Click the play button and verify these all work:
- Gallery shows the sample rows from SharePoint.
- Status filter tabs filter the list correctly.
- Tapping a row opens the Detail screen.
- The New Expense button opens the form with today’s date and your name filled in.
- Submitting a new expense adds a row to the SharePoint list.
Troubleshooting
Command not found on Mac after install — Run the two PATH fix commands in Step 2. Close the terminal and reopen a fresh window if the error persists.
MCP server not active after plugin install — Run /reload-plugins then repeat the plain English prompt with your Studio URL. The /configure-canvas-mcp slash command does not work in the current version.
Screens not visible after compile — Hard refresh the Power Apps Studio tab using Shift+refresh. A regular refresh does not pull co-authoring updates.
SharePoint list not showing as a data source — Add it manually through the Data panel. Claude Code cannot add connectors for you.
Session dropped during build — Reopen the app at its URL, confirm co-authoring is on, and run the plain English prompt again with the new URL.
What to Add Next
The Power Apps Expense Tracker App built in this guide is a solid base. Two common extensions are a Power Automate flow that pings the manager when an expense moves to Submitted status, and a manager-only filtered view showing only claims waiting for approval.
Both can be described to Claude Code the same way you described the original app — in plain English, no formula writing involved.
The official Microsoft documentation for AI canvas app building is at learn.microsoft.com. For more AI tooling guides on the Power Platform, visit the Copilot section on this site.
If any step gave you trouble, or if you extended this Power Apps Expense Tracker App further, drop a comment below.