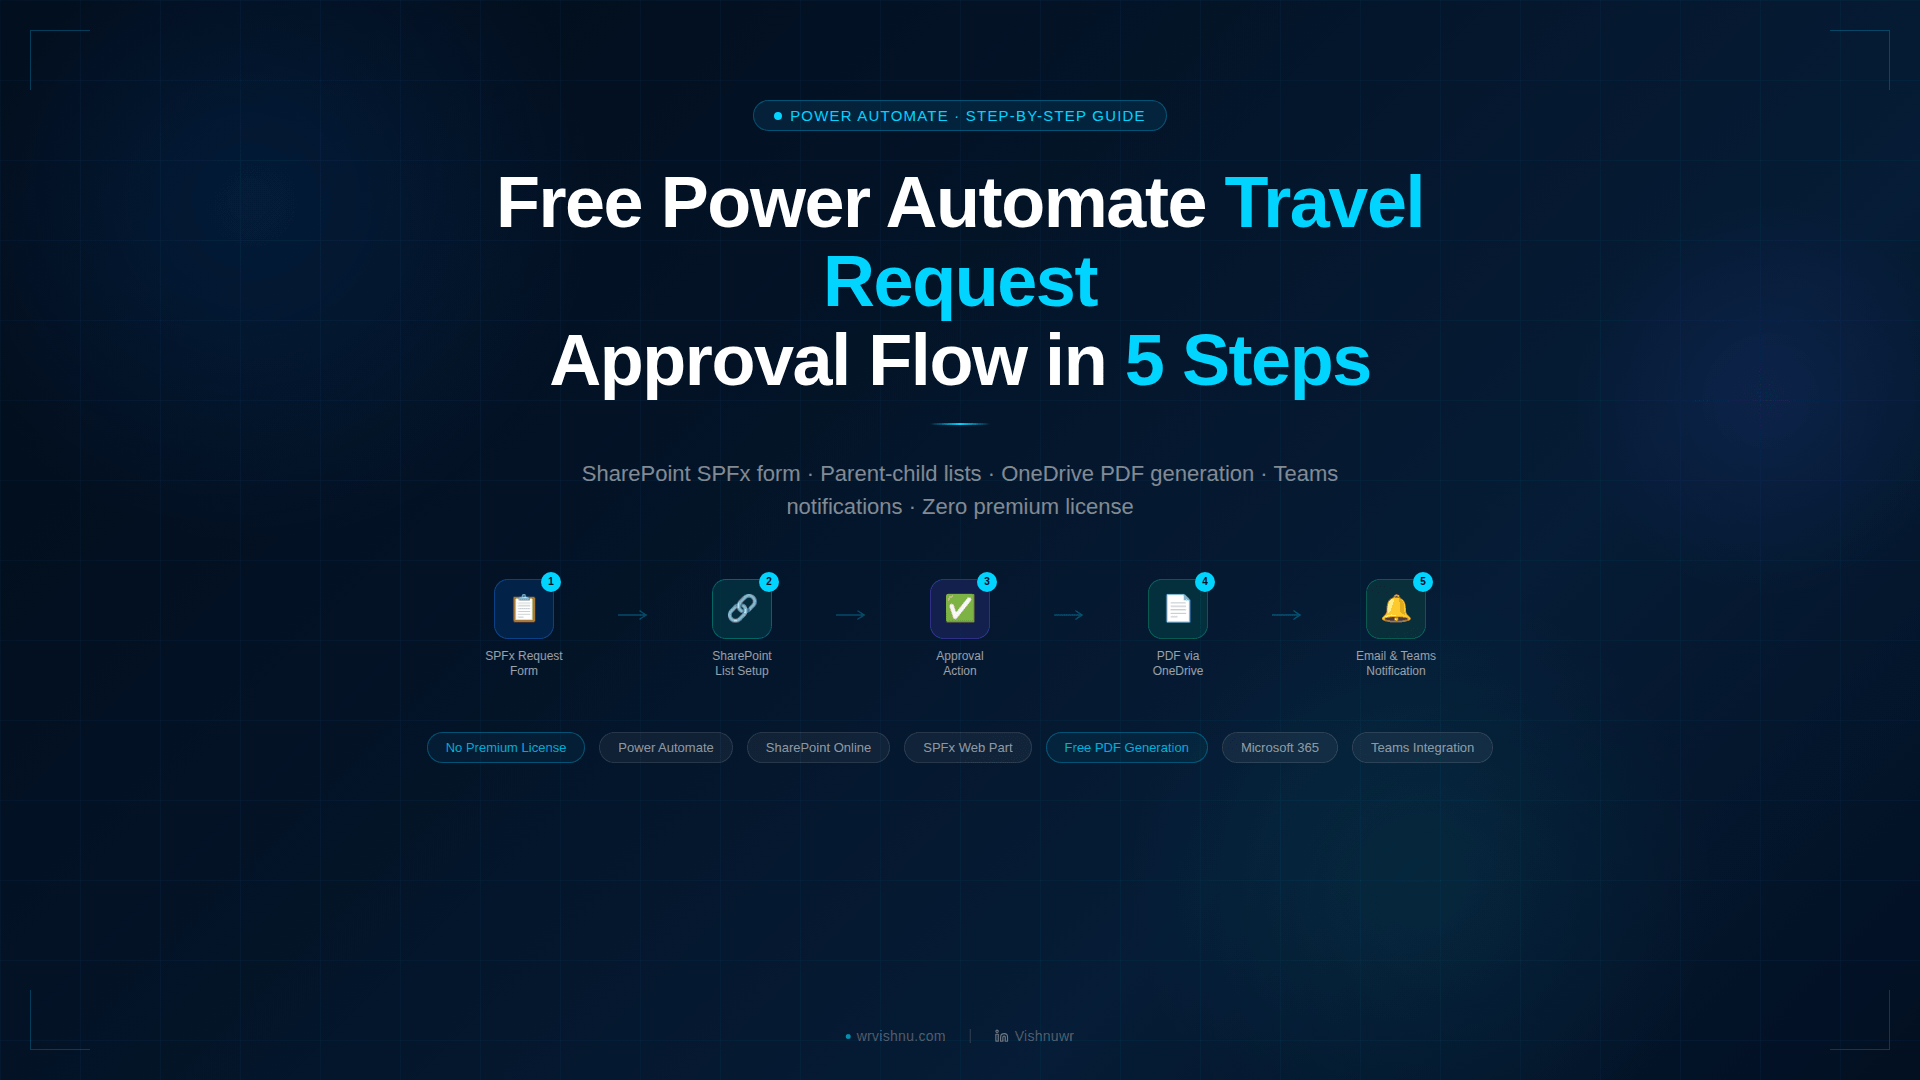
Building a Power Automate travel request approval flow is the best way to automate your company’s travel bookings for free, without paying for expensive third-party tools or premium Power Platform licenses. By combining native Microsoft 365 features, you can build a fully automated, enterprise-grade solution in just 5 steps using a custom SPFx web part, relational SharePoint lists, and automated PDF generation.
Whether you need to capture itemized flights, hotels, and meal costs, or require a clean PDF receipt sent to travelers upon approval, this solution handles it all for free. Let’s walk through how to build your own free travel request approval SharePoint system from scratch.
Why This M365 Setup is Completely Free
Many developers assume that building a travel request approval workflow Microsoft 365 requires premium licensing (like Power Apps premium or Adobe PDF connectors). This Power Automate travel request approval flow setup remains 100% free by using:
- A custom SPFx travel request web part to render a rich, responsive interface inside SharePoint. You can learn more in the official SharePoint Framework documentation.
- A relational SharePoint parent-child list structure to store trip metadata and individual cost estimates without premium SQL databases.
- The standard OneDrive for Business connector for OneDrive HTML to PDF Power Automate no premium conversions — available on all M365 plans that include OneDrive for Business. Check the Microsoft Power Automate documentation for general connector limits.
- A dynamic attachment variable to handle SharePoint approval email attachments without flow errors.
Step 1: Provision the SharePoint Parent-Child List Schema
The first step in building your Power Automate travel request approval flow is setting up the relational SharePoint lists. We must establish a SharePoint parent-child list design where the parent list tracks general trip details and the child list tracks itemized cost estimates linked via a Lookup Column.
[Travel Request (Parent)] ──(ID Link)──► [Travel Request Details (Child)]
Parent List: Travel Request
Create a list named Travel Request with the following columns:
Title(Single line of text) — Trip purpose (e.g. “Annual Conference”).TravelID(Single line of text) — Auto-generated tracking ID.Traveler(Person or Group) — Submitter.TravelerEmail(Single line of text) — Submitter’s email.Destination(Single line of text) — City and Country.FromDate(Date and Time) — Departure date.ToDate(Date and Time) — Return date.EstimatedCost(Currency) — Total trip budget.TravelStatus(Choice) — Submitted, Pending Approval, Approved, Rejected.Approver(Single line of text) — Approving manager’s email.Comments(Multiple lines of text) — Reviewer comments.ApprovalDate(Date and Time) — Decision timestamp.
Child List: Travel Request Details
Create a list named Travel Request Details with these columns: Title (description), ExpenseDate (date), Category (Choice: Flight, Hotel, Meals, Train, Other), and Amount (Currency). Then add a Lookup Column named TravelRequest pointing to the ID column of the parent Travel Request list.
Admin Options List: Admin Options
Create a list named Admin Options to store company branding metadata: Title, CompanyName, CompanyAddress (Multi-line text), FooterText (Multi-line text), and App (Choice: TravelRequest, ExpenseClaim).
Step 2: Deploy the Custom SPFx Travel Request Web Part
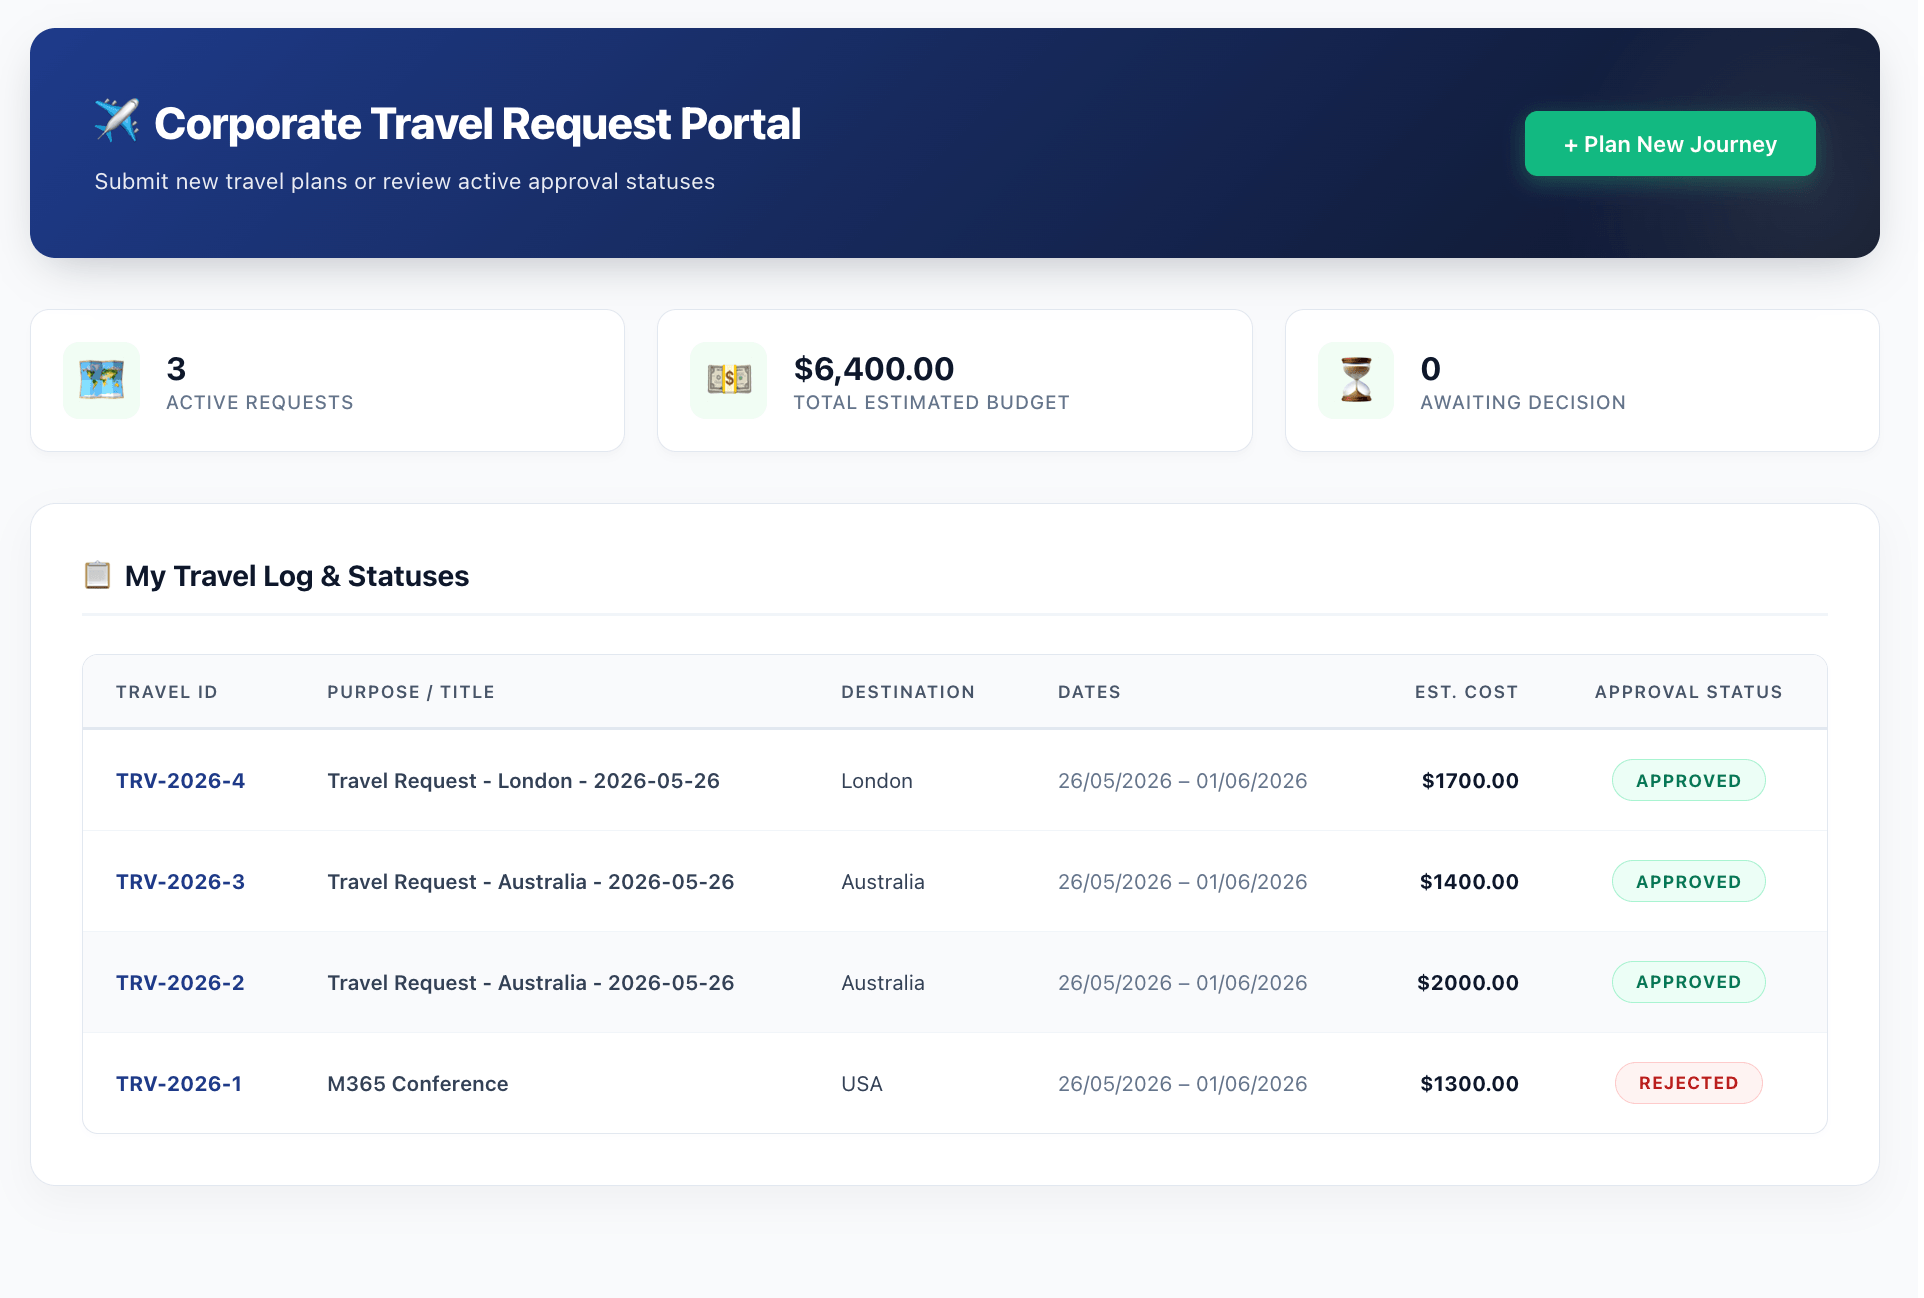
To let users submit data into the Power Automate travel request approval flow, deploy the custom React SPFx travel request web part. This front-end component provides auto-completion for traveler profiles, performs live departure/return date validation, and calculates live budget totals.
The SPFx component queries Azure Active Directory (AAD) to automatically resolve the traveler’s manager. If a manager is registered, the form displays the manager as a read-only value, ensuring requests route directly to them. If no manager is found in AAD, the form dynamically renders a dropdown selection showing the fallback approvers configured in the web part properties. Upon submission, the app performs a two-stage transaction to save the parent request first and then write the child cost lines, linking them using the parent item’s ID.
Step 3: Configure Your Power Automate Travel Request Approval Flow
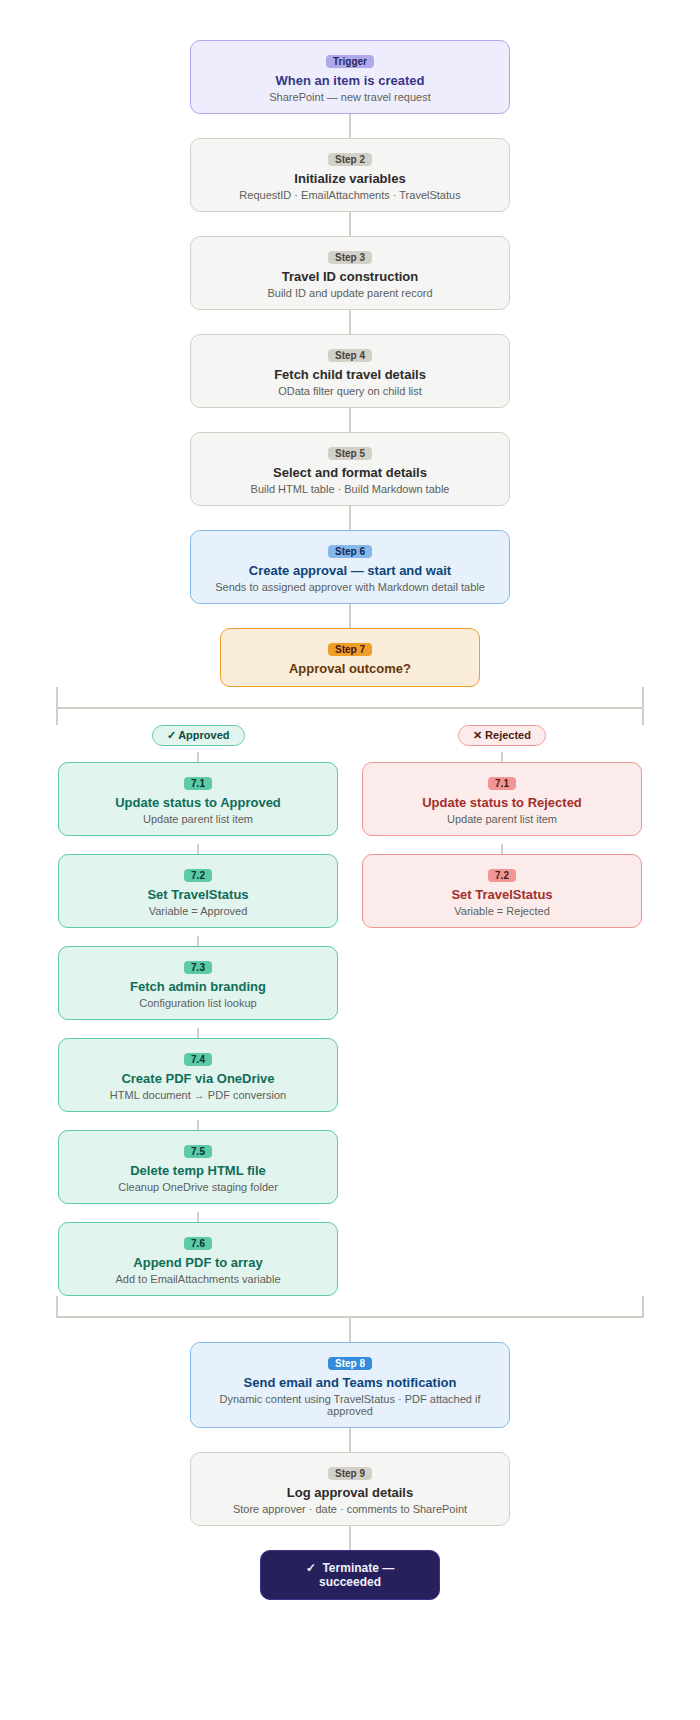
Now, let’s configure the Power Automate travel request approval flow. Create an Automated cloud flow triggered When an item is created in your parent Travel Request list.
Directly below the trigger block, add three Initialize variable actions. These variables must reside at the root level of the flow to prevent validation errors:
RequestID(String) — Mapped to the formatted tracking code.EmailAttachments(Array) — Holds the PDF file attachments dynamically.TravelStatus(String) — Stores the final decision status.
Add a Compose block to generate your corporate request ID:
concat('TRV-', formatDateTime(utcNow(), 'yyyy'), '-', triggerBody()?['ID'])
Store this composed output in RequestID and use SharePoint’s Update item action to write it back to the parent item’s TravelID column.
Step 4: Fetch Child Details and Format Markdown Data Tables
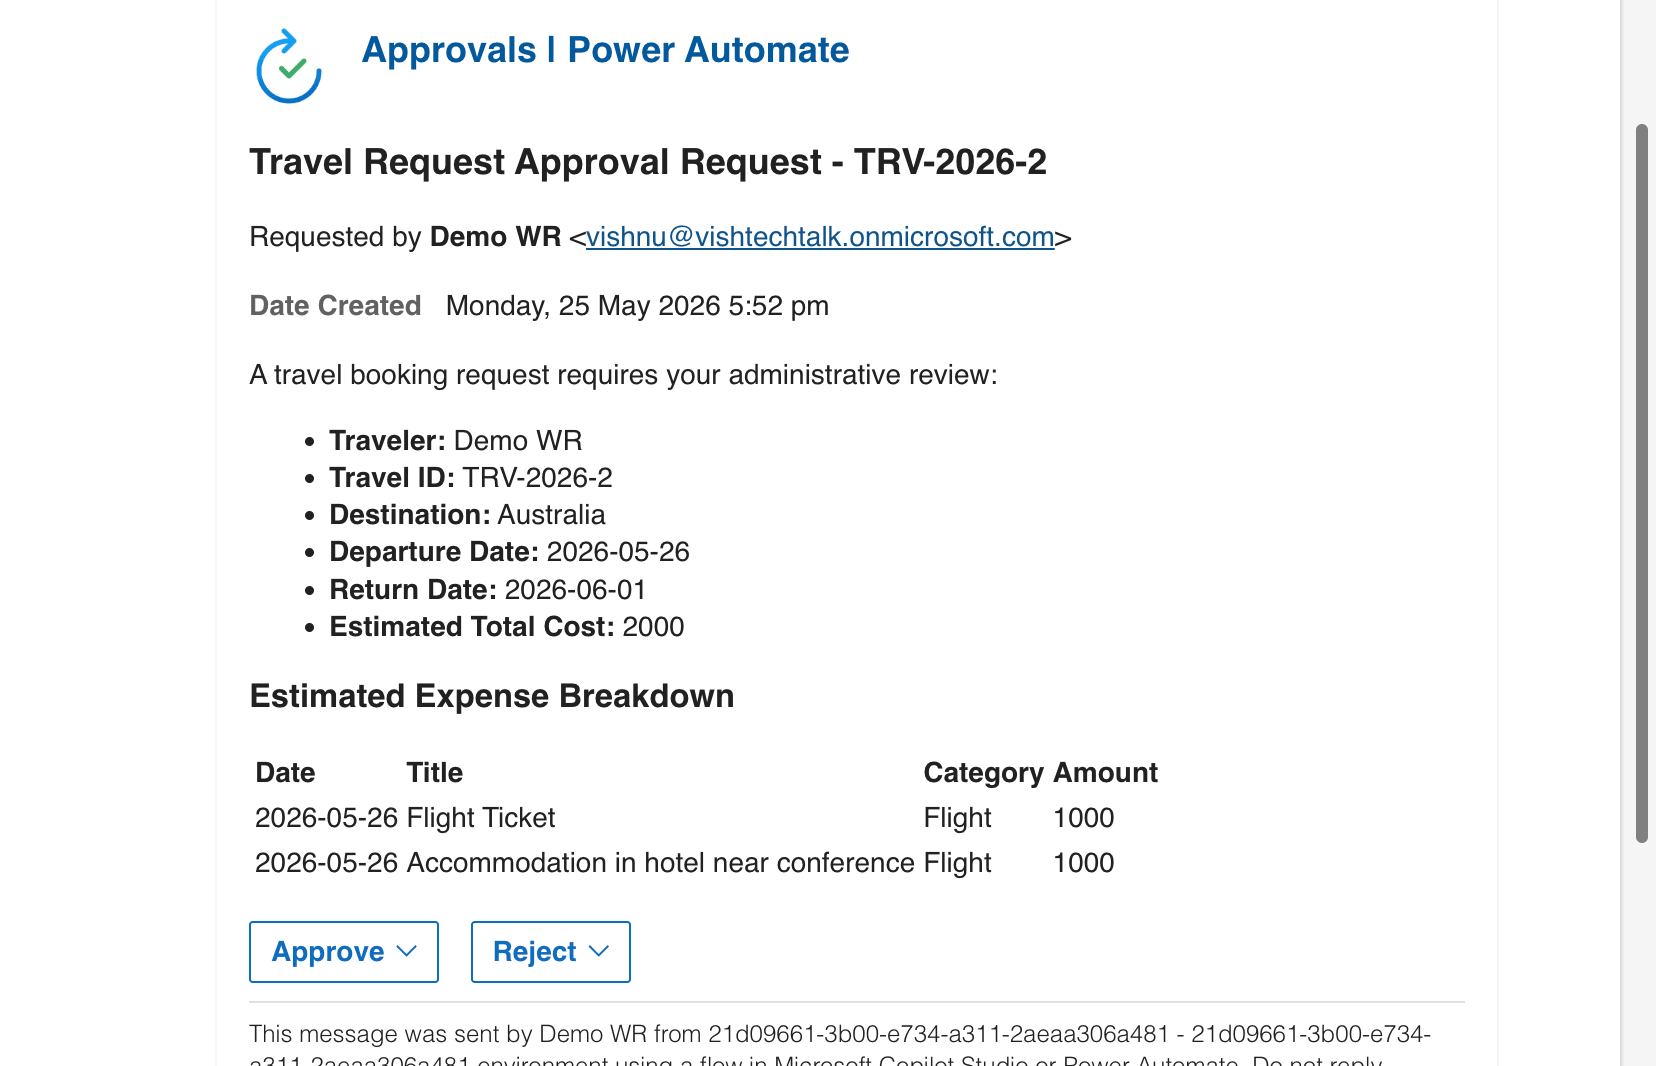
To display all trip items inside the Power Automate travel request approval flow cards, we need to query child records. Add a SharePoint Get items action named Get Items – Travel Details targeting the child list. To query linked records, use this OData filter query:
TravelRequestID eq @{triggerBody()?['ID']}
Next, format the child costs using Data Operations actions:
- Select (PDF Mapping): Map Date, Title, Category, and Amount. Map choice fields using the path
item()?['Category']?['Value']. - Create HTML Table: Generate the raw HTML table from the PDF select outputs.
- Select (Markdown Mapping): Convert rows to markdown for the approval card. Switch Map to text mode and paste the concat expression to build pipe-separated rows.
- Join Markdown: Join the markdown select output using
decodeUriComponent('%0A')(newline). Combine it with a header Compose block to form the final markdown breakdown table.
Add the Start and wait for an approval action. Set the type to Approve/Reject – First to respond, assign it to triggerBody()?['Approver'], and embed your composed Markdown table in the Details field.
Step 5: Route Approvals & Send Dynamic Email Notifications
This is the final routing step in the Power Automate travel request approval flow. Add a Condition check: Outcome is equal to Approve. This splits the flow logic based on the manager’s response.
Branch A: If Yes (Approved Path)
- Update the parent status to “Approved” and set the
TravelStatusvariable to “Approved”. - Query configuration metadata from the Admin Options list where
App eq 'TravelRequest'. - Compose the HTML layout containing traveler info and the dynamic HTML table:
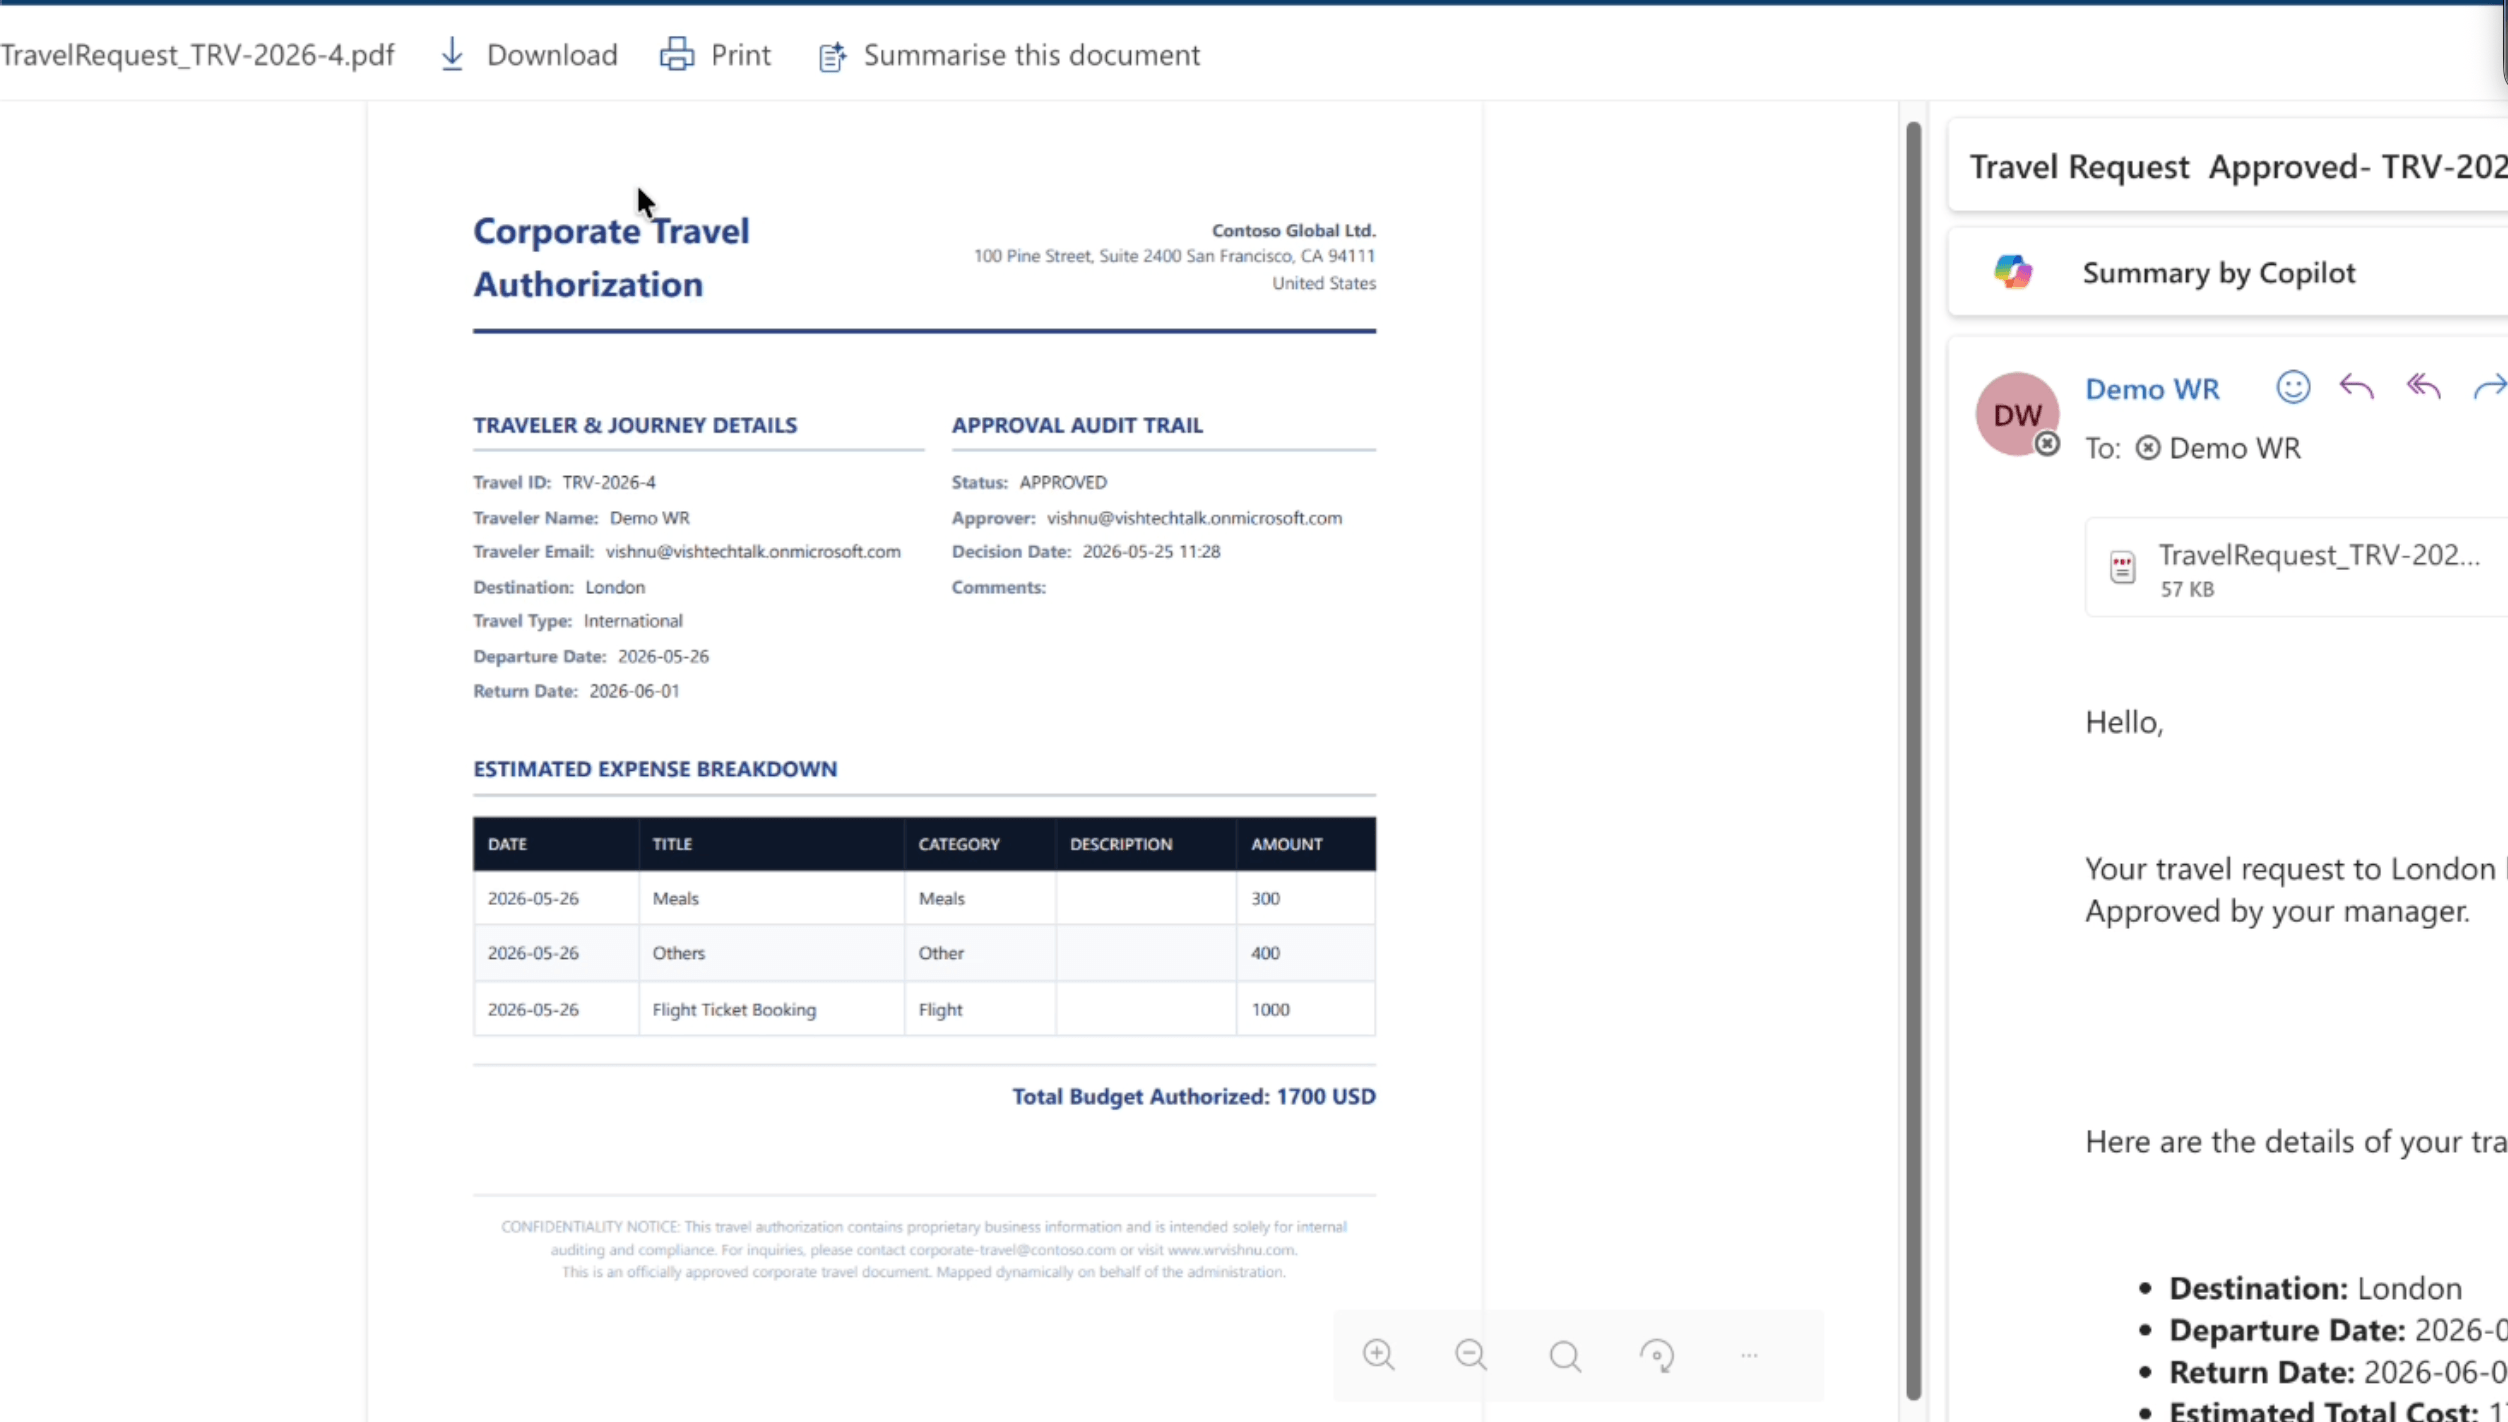
@{body('Create_HTML_table')}. - This step lets you Power Automate generate PDF from SharePoint list free — no Plumsail, no Adobe connector, no premium licence at any point. Use OneDrive to execute the OneDrive HTML to PDF Power Automate conversion: Create file to save the HTML, Convert file (Preview) to generate the PDF, then Delete file to clean up the temp HTML.
- Append the converted PDF to the
EmailAttachmentsarray variable using the Name and ContentBytes from the Convert file output.
Branch B: If No (Rejected Path)
- Update the parent status to “Rejected” and set the
TravelStatusvariable to “Rejected”.
Outside the Condition: Dynamic Notification & Auditing
At the root level below the condition block, add a single Send an email (V2) action. This architecture handles SharePoint approval email attachments dynamically:
- To:
triggerBody()?['TravelerEmail'] - Subject:
Travel Request @{variables('TravelStatus')} - @{variables('RequestID')} - Body: Paste the HTML email template including dynamic comments and the HTML breakdown table.
- Attachments: Click Switch Map to input entire array on the Attachments header and bind it to
variables('EmailAttachments').
Add an Update item action to write the approver’s email, decision timestamp, and comments back to the parent item, and end the flow with a Terminate action set to Succeeded.
Optional Enterprise Enhancements
Once the core Power Automate travel request approval flow is running, you can extend it with these optional improvements:
- Microsoft Teams Notifications: Add a Teams Post message in a chat or channel card before the logging step to send real-time alerts to the traveler.
- Try-Catch Error Scoping: Wrap your actions inside a “Main Processing” scope, and build a “Catch Error Handler” scope configured to run after failure to write exceptions to your
Flow Error Logslist. - Font Icons in PDF: Add a
FontIconfield to the Admin Options list, load Font Awesome inside the HTML head, and render dynamic icons in the PDF report header.
Full Source Code on GitHub
Everything you need to deploy this Power Automate travel request approval flow is in the open-source repository. No piecing together — it is all there and ready to clone.
- Complete SPFx web part TypeScript and React source code
- Power Automate flow export (.zip) ready to import directly into your environment
- SharePoint list CSV schemas for all three lists
- HTML PDF template with inline CSS
- Step-by-step
Implementation-Guide.mdcovering every action card with screenshots
WRVish / TravelRequestApp
Open-source · SPFx + Power Automate + SharePoint · Full implementation guide included
⭐ Star and Clone on GitHub💬 Ask a question in Discussions
If this solution saved you time or licensing cost, a ⭐ star on the repository helps other Power Platform developers find it when they need it.
Frequently Asked Questions
Does this Power Automate travel request approval flow work without a Premium license?
Yes. The entire solution runs on standard Microsoft 365 licensing. The OneDrive for Business connector’s Convert file action is available on all M365 plans that include OneDrive for Business. No Power Automate Premium, no Adobe connector, and no third-party PDF tools are required.
What SharePoint permissions do travelers need to submit a request?
Travelers need Contribute access to the Travel Request parent list and the Travel Request Details child list. The SPFx web part handles the two-stage write transaction, so users never interact with the lists directly through the SharePoint UI.
Can the approver reject a request and add comments from Microsoft Teams?
Yes. The Start and wait for an approval action renders natively inside the Teams Approvals app. The approver can approve or reject and add comments directly from Teams or Outlook. The comments are captured via the approval outcome object and written back to the parent list item by the Update item action at the end of the flow.
What happens if the OneDrive PDF conversion fails?
If you implement the optional Try-Catch error scoping from the Enterprise Enhancements section, any failure in the conversion step gets caught by the Scope_ErrorHandler block and logged to your Flow Error Logs SharePoint list. Without error scoping, the flow run will show as failed in the Power Automate run history with the specific action highlighted.
Can this Power Automate travel request approval flow pattern be reused for expense claims?
Yes. The SharePoint parent-child list structure, OneDrive HTML to PDF pipeline, and dynamic email attachment variable are all reusable patterns. The Admin Options list is already designed with an App choice column so you can extend it to ExpenseClaim or PurchaseOrder without duplicating the branding configuration.
Continue learning on VishPowerLabs
⚡ Power Platform guides · 🗂 SharePoint guides · 🤖 Copilot guides