This Power Apps IT Asset Management App handles the full equipment lifecycle from request through approval, assignment, and quarterly attestation. It comes in two versions depending on what your Microsoft 365 licence covers, and the whole thing runs on SharePoint Online, Power Automate, and Power Apps with no third-party tools involved.
Managing IT assets across a mid-size organisation sounds simple enough until you are six months in and the team is juggling three spreadsheets, an email thread nobody has opened since March, and a quarterly audit that mostly involves walking around asking if anyone has seen the MacBook Pro from 2022. This power apps asset management solution is built to replace that with a single app. You can use it as a standard Canvas App if you are on a basic M365 plan, or as the richer Code App version if you hold a premium licence.
The complete asset management system solution including Power Apps source files, SPO schema files, PowerShell provisioning script, and screen designs is available on GitHub for both versions.
Two versions to pick from depending on your licence
Canvas App
✅ NO PREMIUM LICENCE REQUIRED
Works on any standard Microsoft 365 plan. If your organisation already has M365, you can deploy this today at zero additional cost with no per-app or per-user premium licence needed.
- Standard Power Apps licence (included with M365)
- SharePoint, Outlook, Approvals connectors (all standard)
- Tablet layout (1366×768), clean functional UI
- Full asset lifecycle: request, approve, assign, attest
- Role-based access via SharePoint list with no Azure AD groups
Power Apps Code App
⚡ PREMIUM LICENCE REQUIRED
A rebuilt version of the same solution with a significantly richer UI, built using Power Apps Code Components, Fluent 2 design tokens, and a custom component library. Worth considering if your organisation already holds a premium licence and wants a polished, production-grade experience.
- Requires Power Apps premium per-user or per-app licence
- Fluent 2 design tokens for a consistent, modern UI
- Custom component library for reusable controls
- Mobile-responsive layout across devices
- Enhanced dashboard with richer data visualisation
What the Power Apps IT Asset Management App does
This IT asset management app is built around four processes that most IT teams are handling manually in some form. Here is how each one works inside the app.
Asset requests
Staff browse a live catalogue of available assets, pick what they need, write a business justification, and submit. The request goes into a SharePoint list and kicks off a Power Automate approval flow (Note: the required flow will be added in next updates or the developer needs to build it; refer to the Asset Management System.md for the required flow spec). The whole thing happens without anyone touching a shared inbox or sending a chase email.
Approval and assignment
The IT admin gets an approval notification, reviews the request with the full justification and urgency context, and approves or denies with one click. When a request gets approved, the flow (Note: the required flow will be added in next updates or the developer needs to build it; refer to the Asset Management System.md for the required flow spec) creates an assignment record, updates the stock count in the catalogue, and sends a notification to the requester. The admin never has to go into SharePoint directly to do any of that.
My Assets view
Every user has a personal screen that shows all equipment currently assigned to them, including serial number, asset tag, warranty expiry, and attestation status. If someone wants to know what is registered under their name, they open the app instead of sending IT an email.
Quarterly attestation
Once a quarter the app surfaces every unattested asset for each user. They pick a condition for each item and tap Confirm, and the app writes directly to the Attestations list. IT can watch completion rates update in real time on the admin review screen as people work through their lists. The quarterly spreadsheet and the email campaign that normally goes with it are not needed anymore.
Tech stack behind the build
Both versions of this Power Apps IT asset management app share the same SharePoint data layer and Power Automate flows. The difference between them is entirely in the front-end and what licence it needs.
🟢 Canvas App (Standard M365 Licence)
- Power Apps Canvas App (Tablet 1366×768) covering all UI and business logic with no premium licence required
- SharePoint Online for data storage across 6 lists
- Power Automate Standard running 4 flows for approval, assignment notification, attestation alerts, and quarterly reset
- Office 365 Users connector to resolve email addresses to display names throughout the app
🔵 Code App (Premium Licence Required)
- Power Apps Code App with a richer UI built using Power Apps Code Components and Fluent 2 design tokens, requiring a premium per-user or per-app licence
- Custom component library for reusable controls that keep the design consistent across every screen
- Mobile-responsive layout that works across tablet and mobile form factors
- Same SharePoint Online data layer with 6 lists and the same schema as the Canvas App version
- Same Power Automate flows compatible with both versions
Role-based access runs through a SharePoint list called AppAdmins in both versions. IT Admins, Super Admins, and Read-Only Admins are added there with their email addresses. Anyone not on the list automatically gets the standard staff view when they open the app. There are no Azure AD groups to configure, no environment variables to set up, and no additional steps once the list is provisioned. If you are new to Canvas Apps on SharePoint, the Power Platform blogs on this site cover the foundations, and the official Power Apps documentation is still the most reliable reference for control properties.
Application screens
Both versions cover the same screens and the same functionality, with admin and user sets driven by role-based navigation. The Canvas App uses a standard tablet layout. The Code App covers the same ground with a Fluent 2 UI and a mobile-responsive layout.
🟢 Canvas App Screens (Standard M365 Licence)
Admin screens
Dashboard
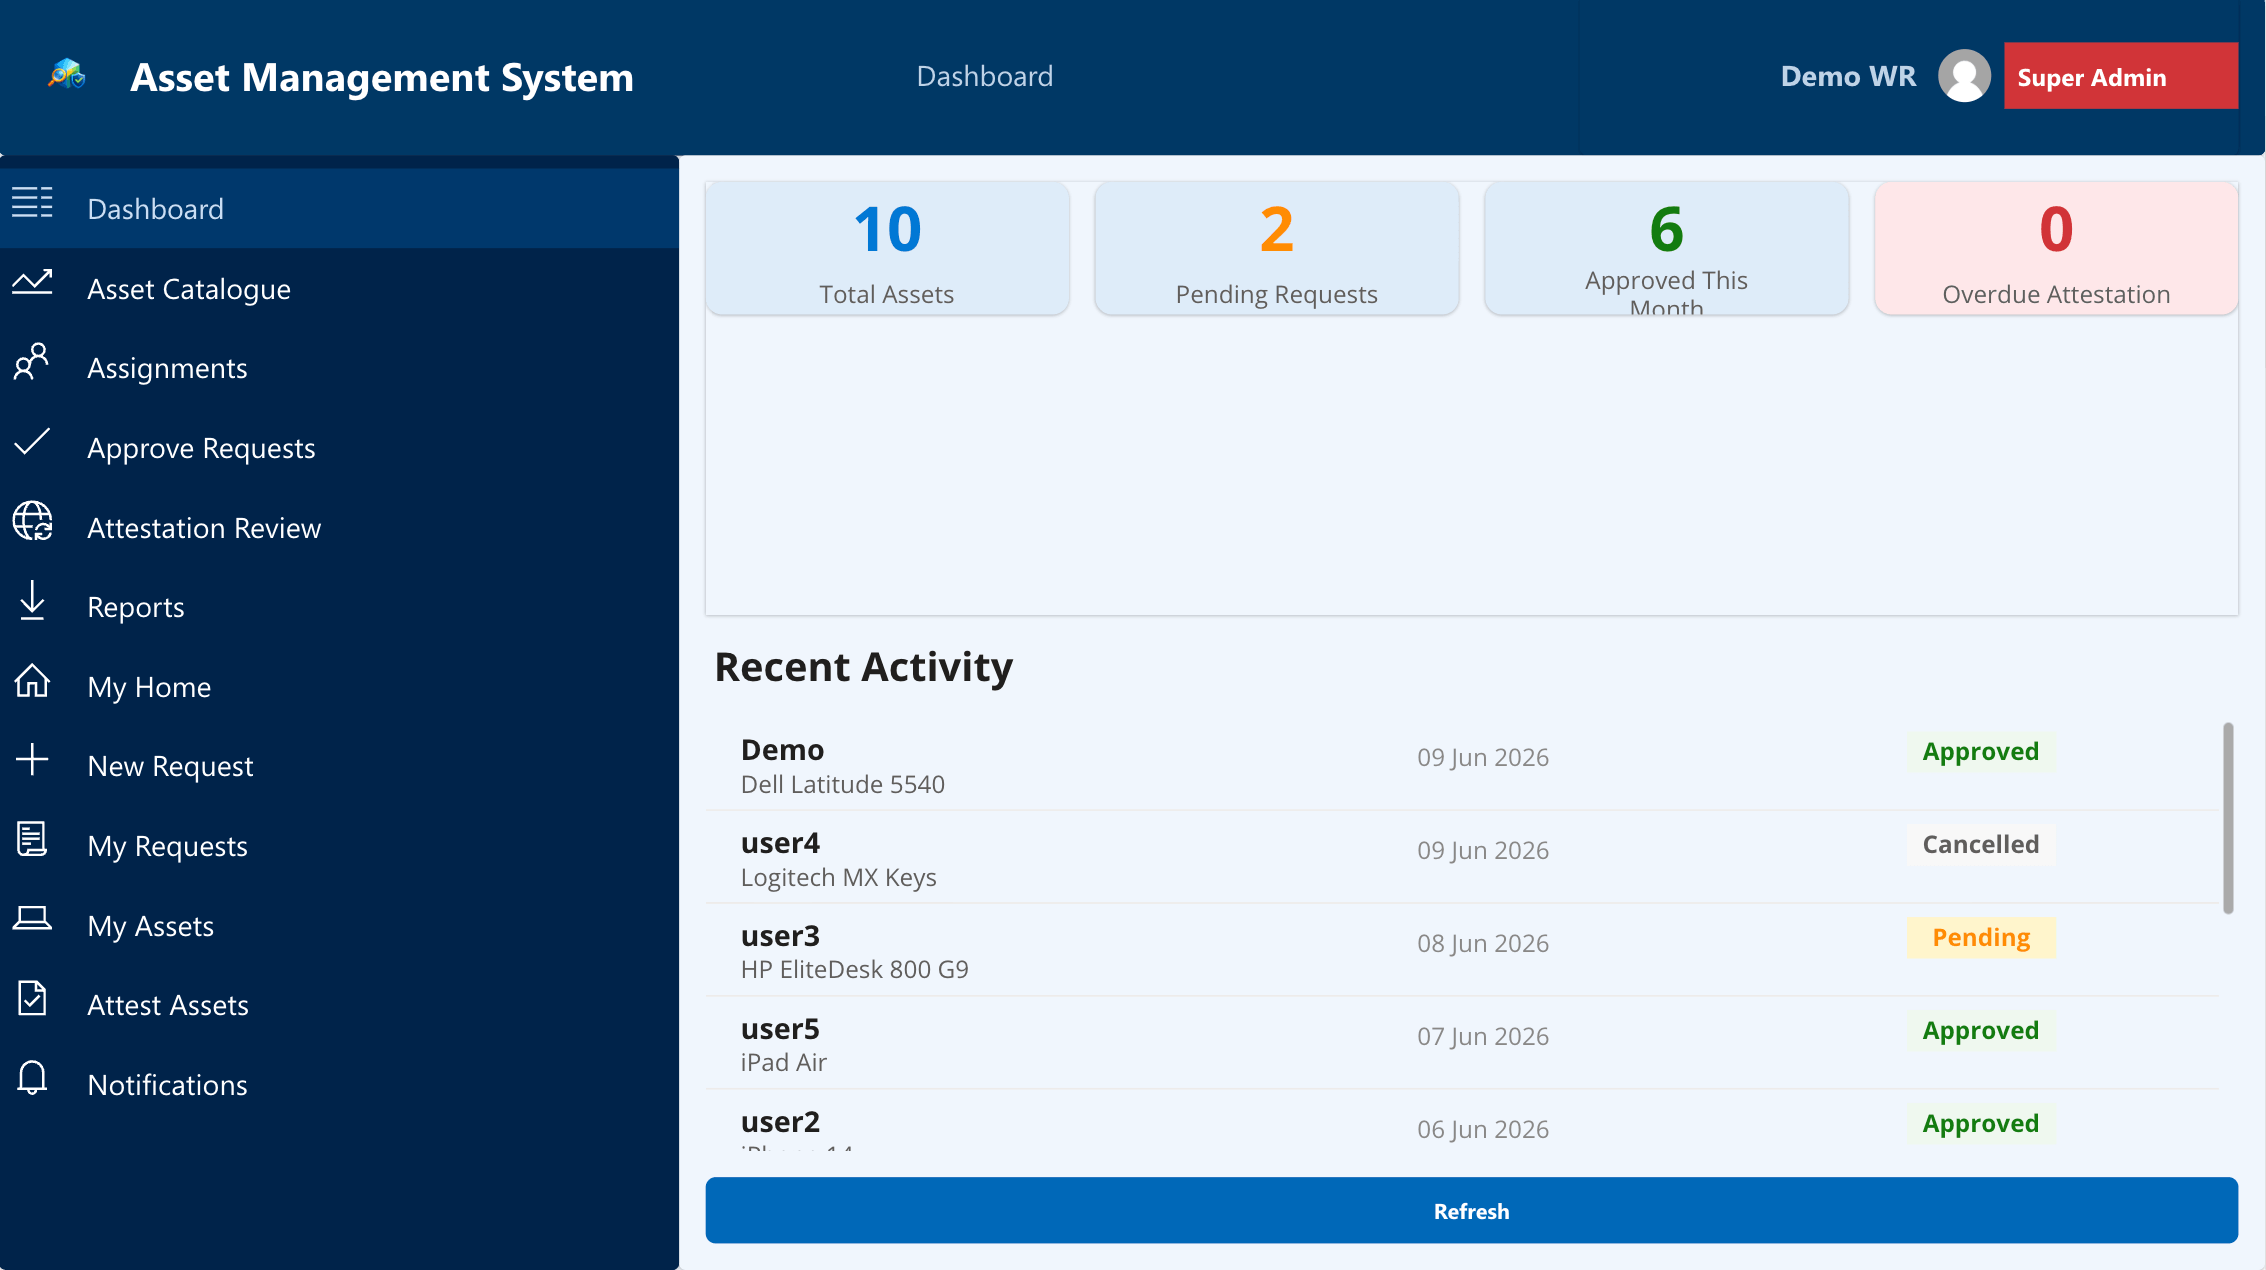
Four KPI cards sit at the top showing Total Assets, Pending Requests, Approved This Month, and Overdue Attestation. Below that is a live activity feed of recent requests. IT gets a current read on the environment from the moment the app loads without pulling any report manually.
Asset Catalogue
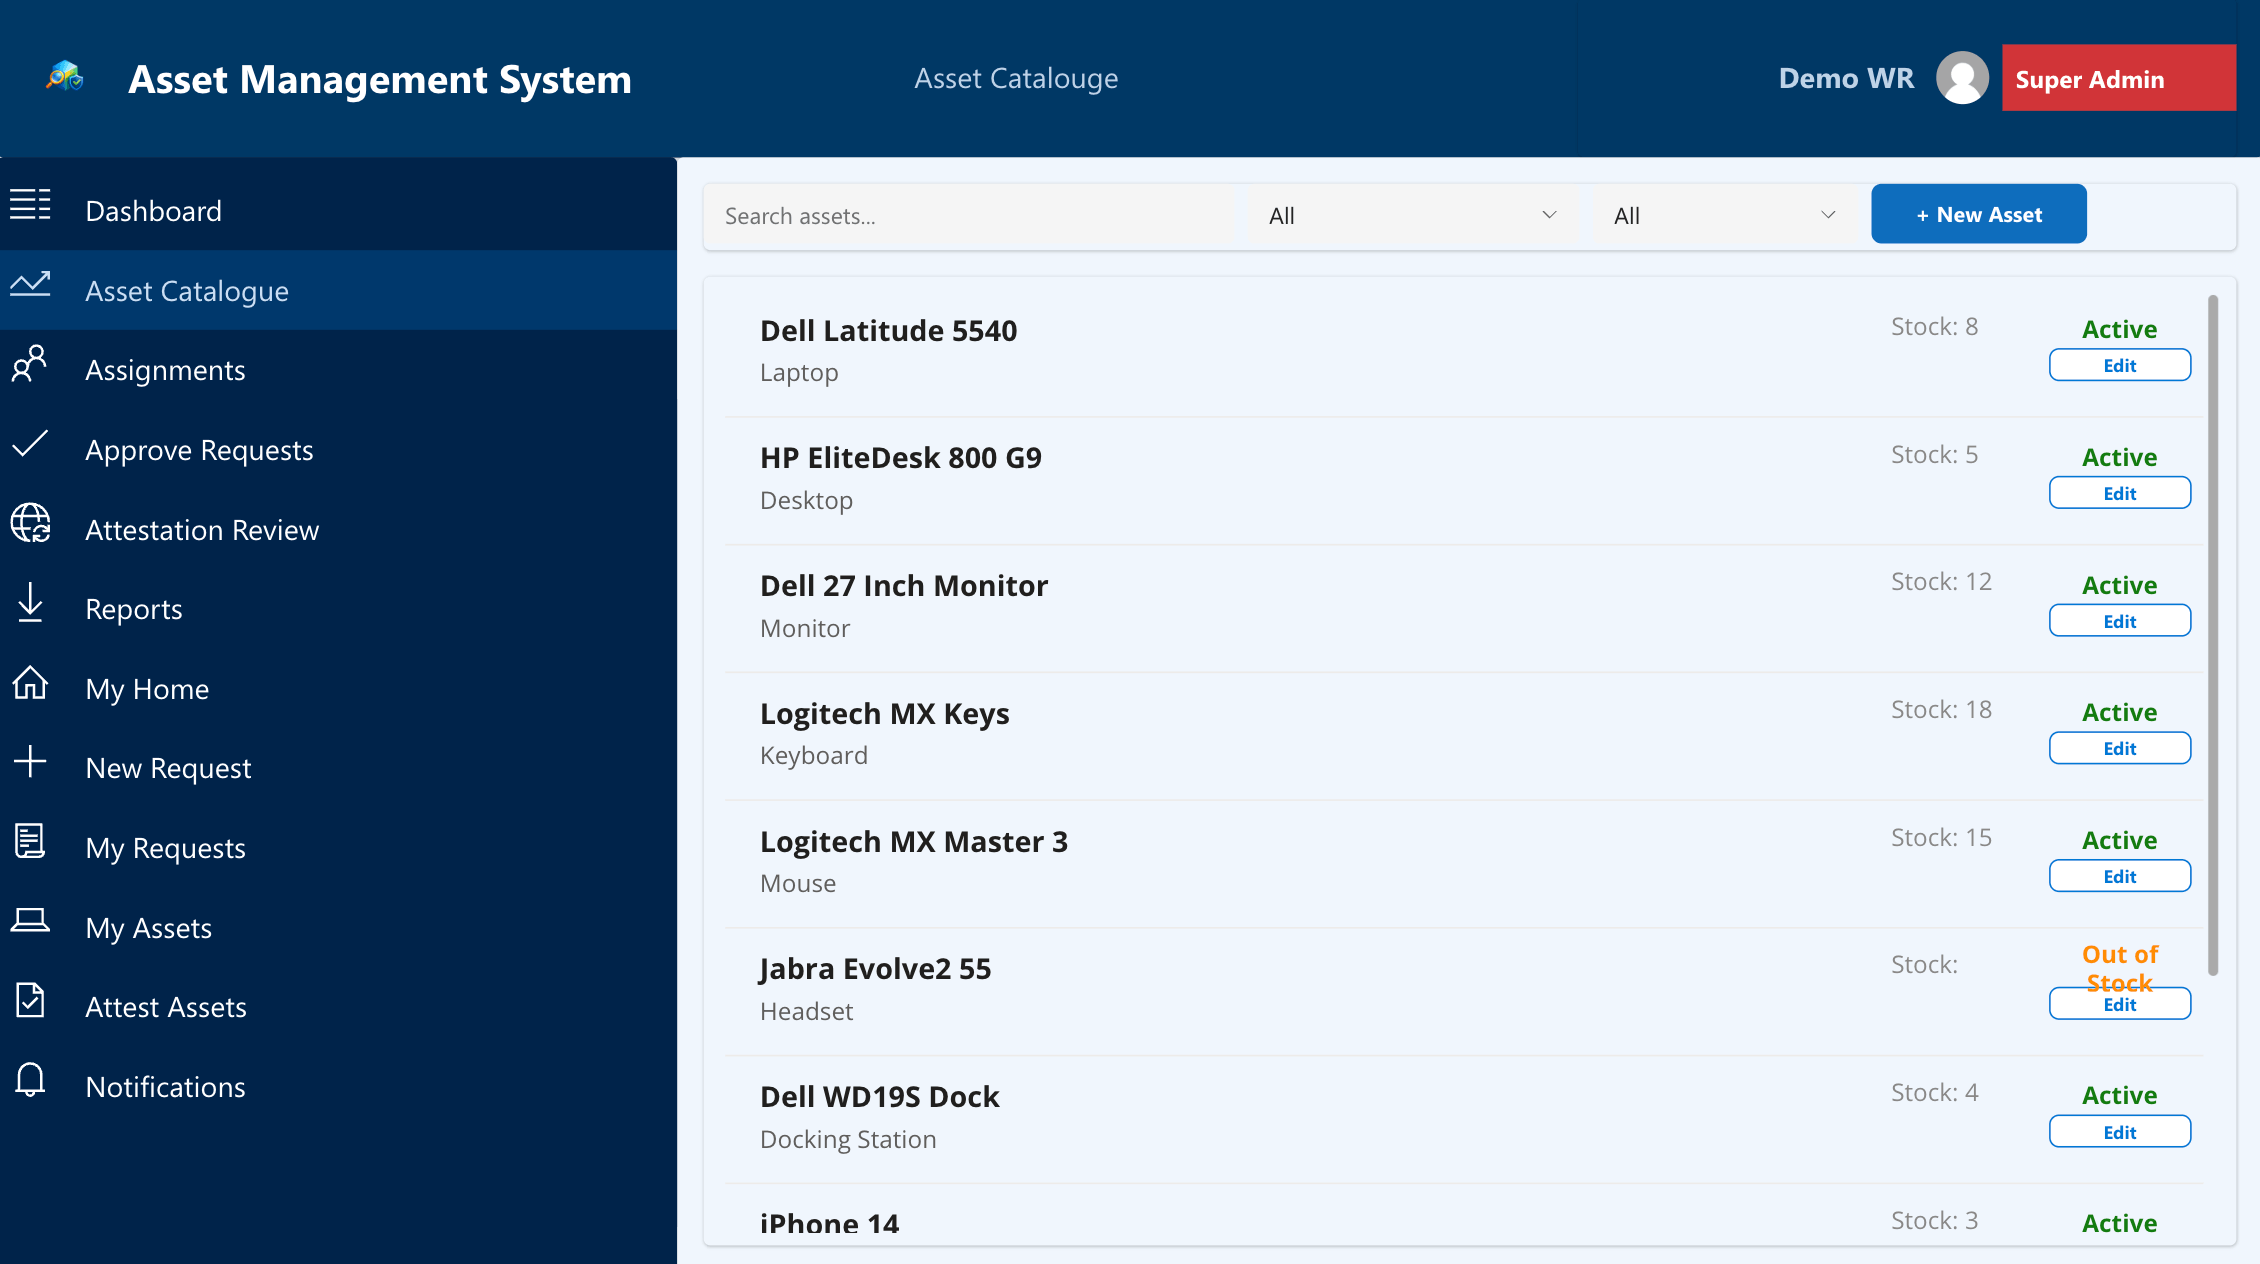
The catalogue lets you browse, search, filter by category and status, add new assets, edit existing entries, and retire equipment that has reached end of life. The edit form panel opens within the same screen rather than navigating to a separate one, which keeps the workflow tight when you are making multiple changes.
Approve Requests
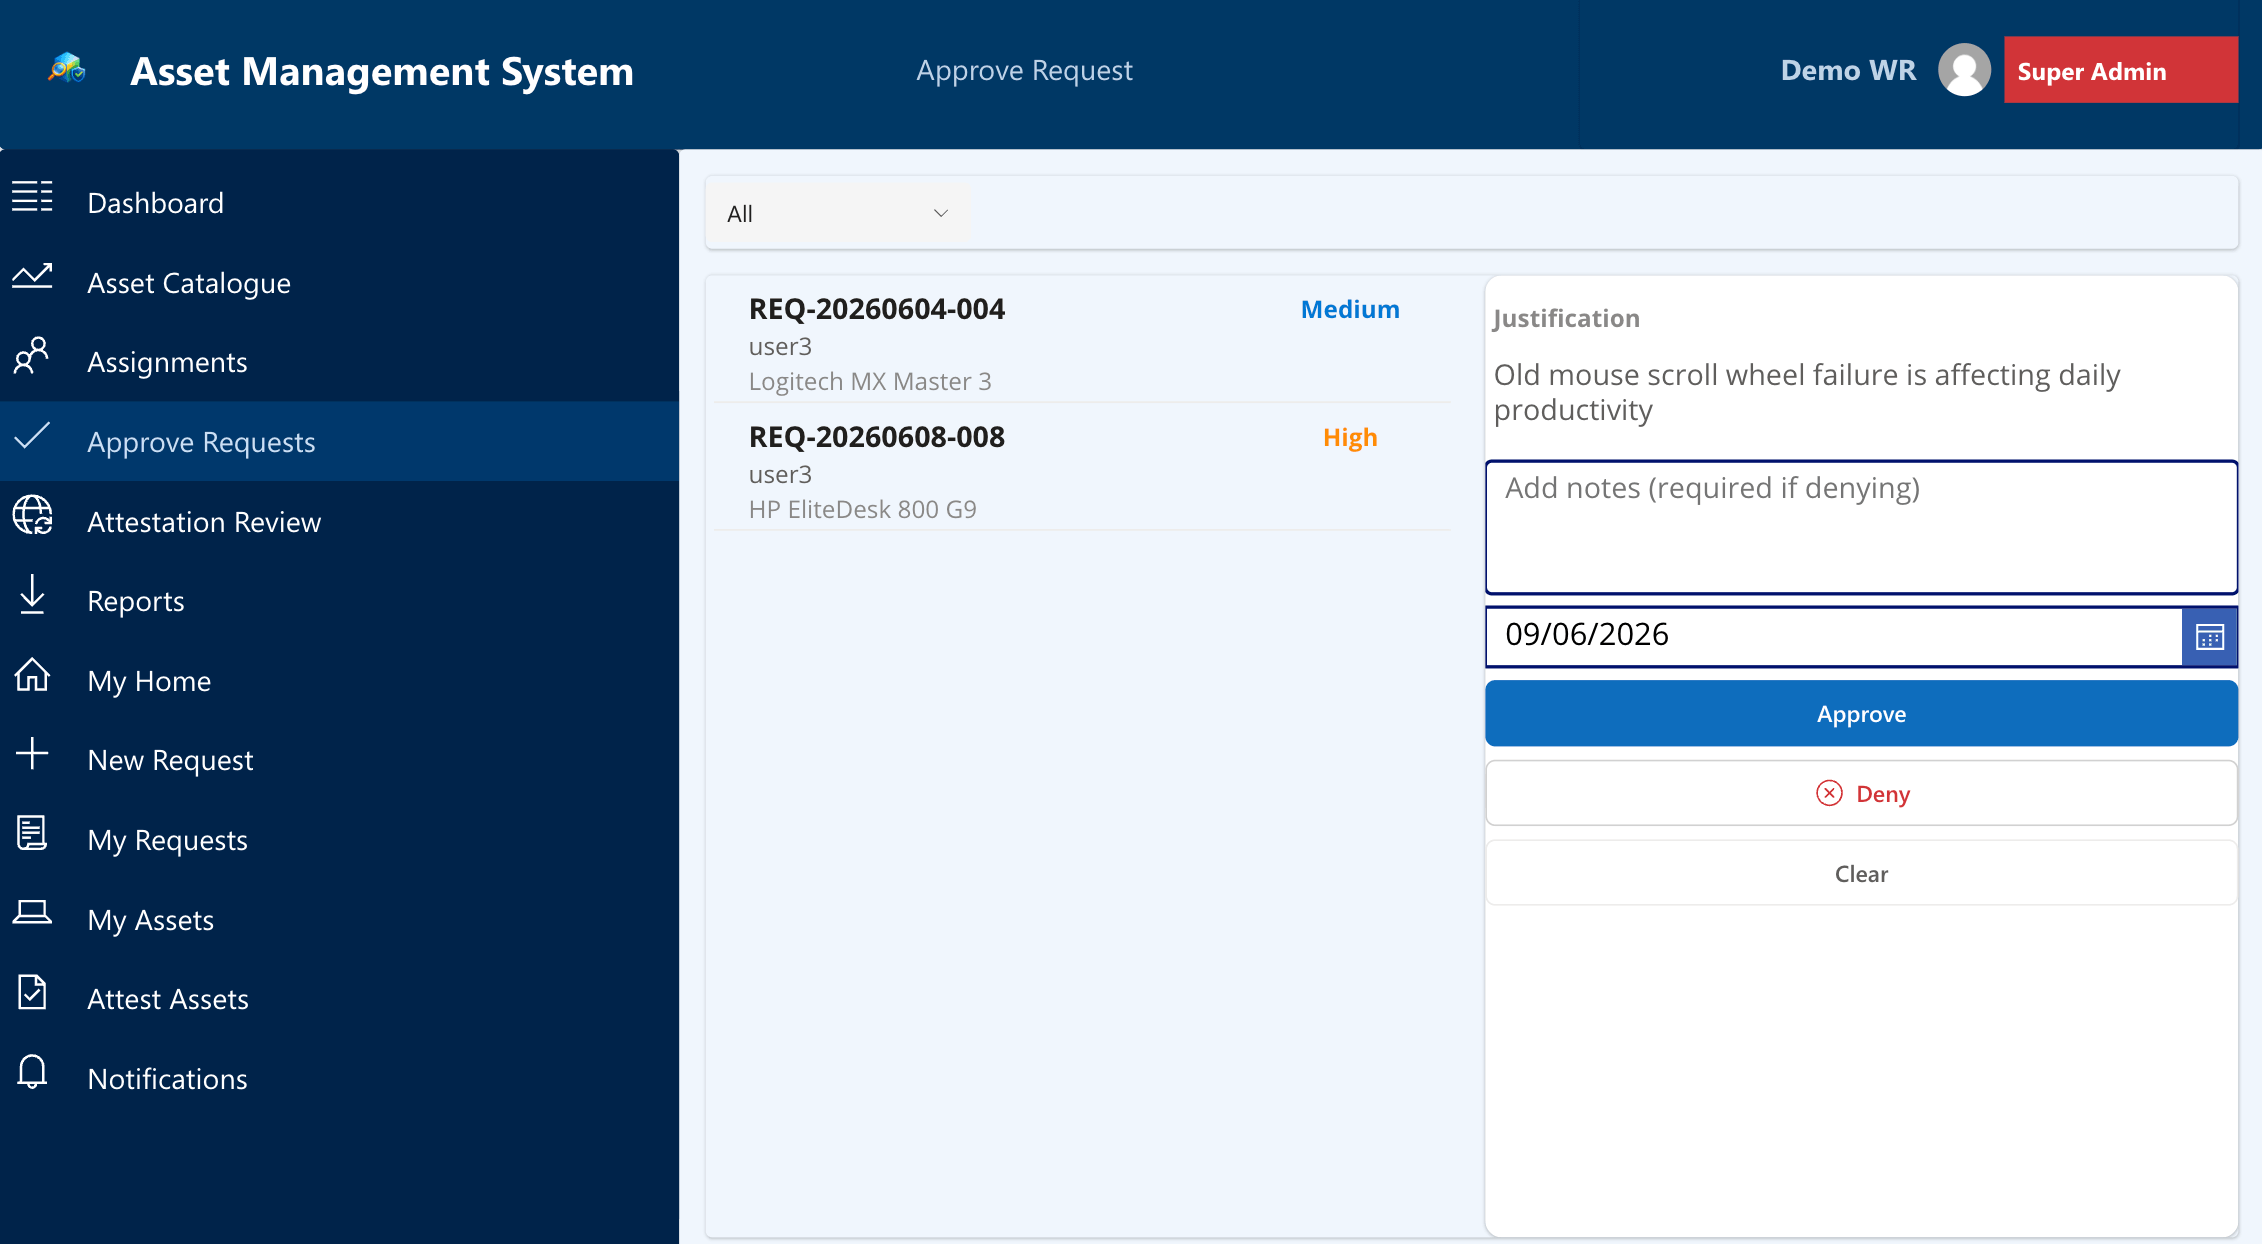
The screen splits into two panels. Pending requests are listed on the left. Clicking any row loads the full justification, IT notes field, and expected delivery date on the right side. You can approve or deny without navigating to another screen at any point.
Attestation Review
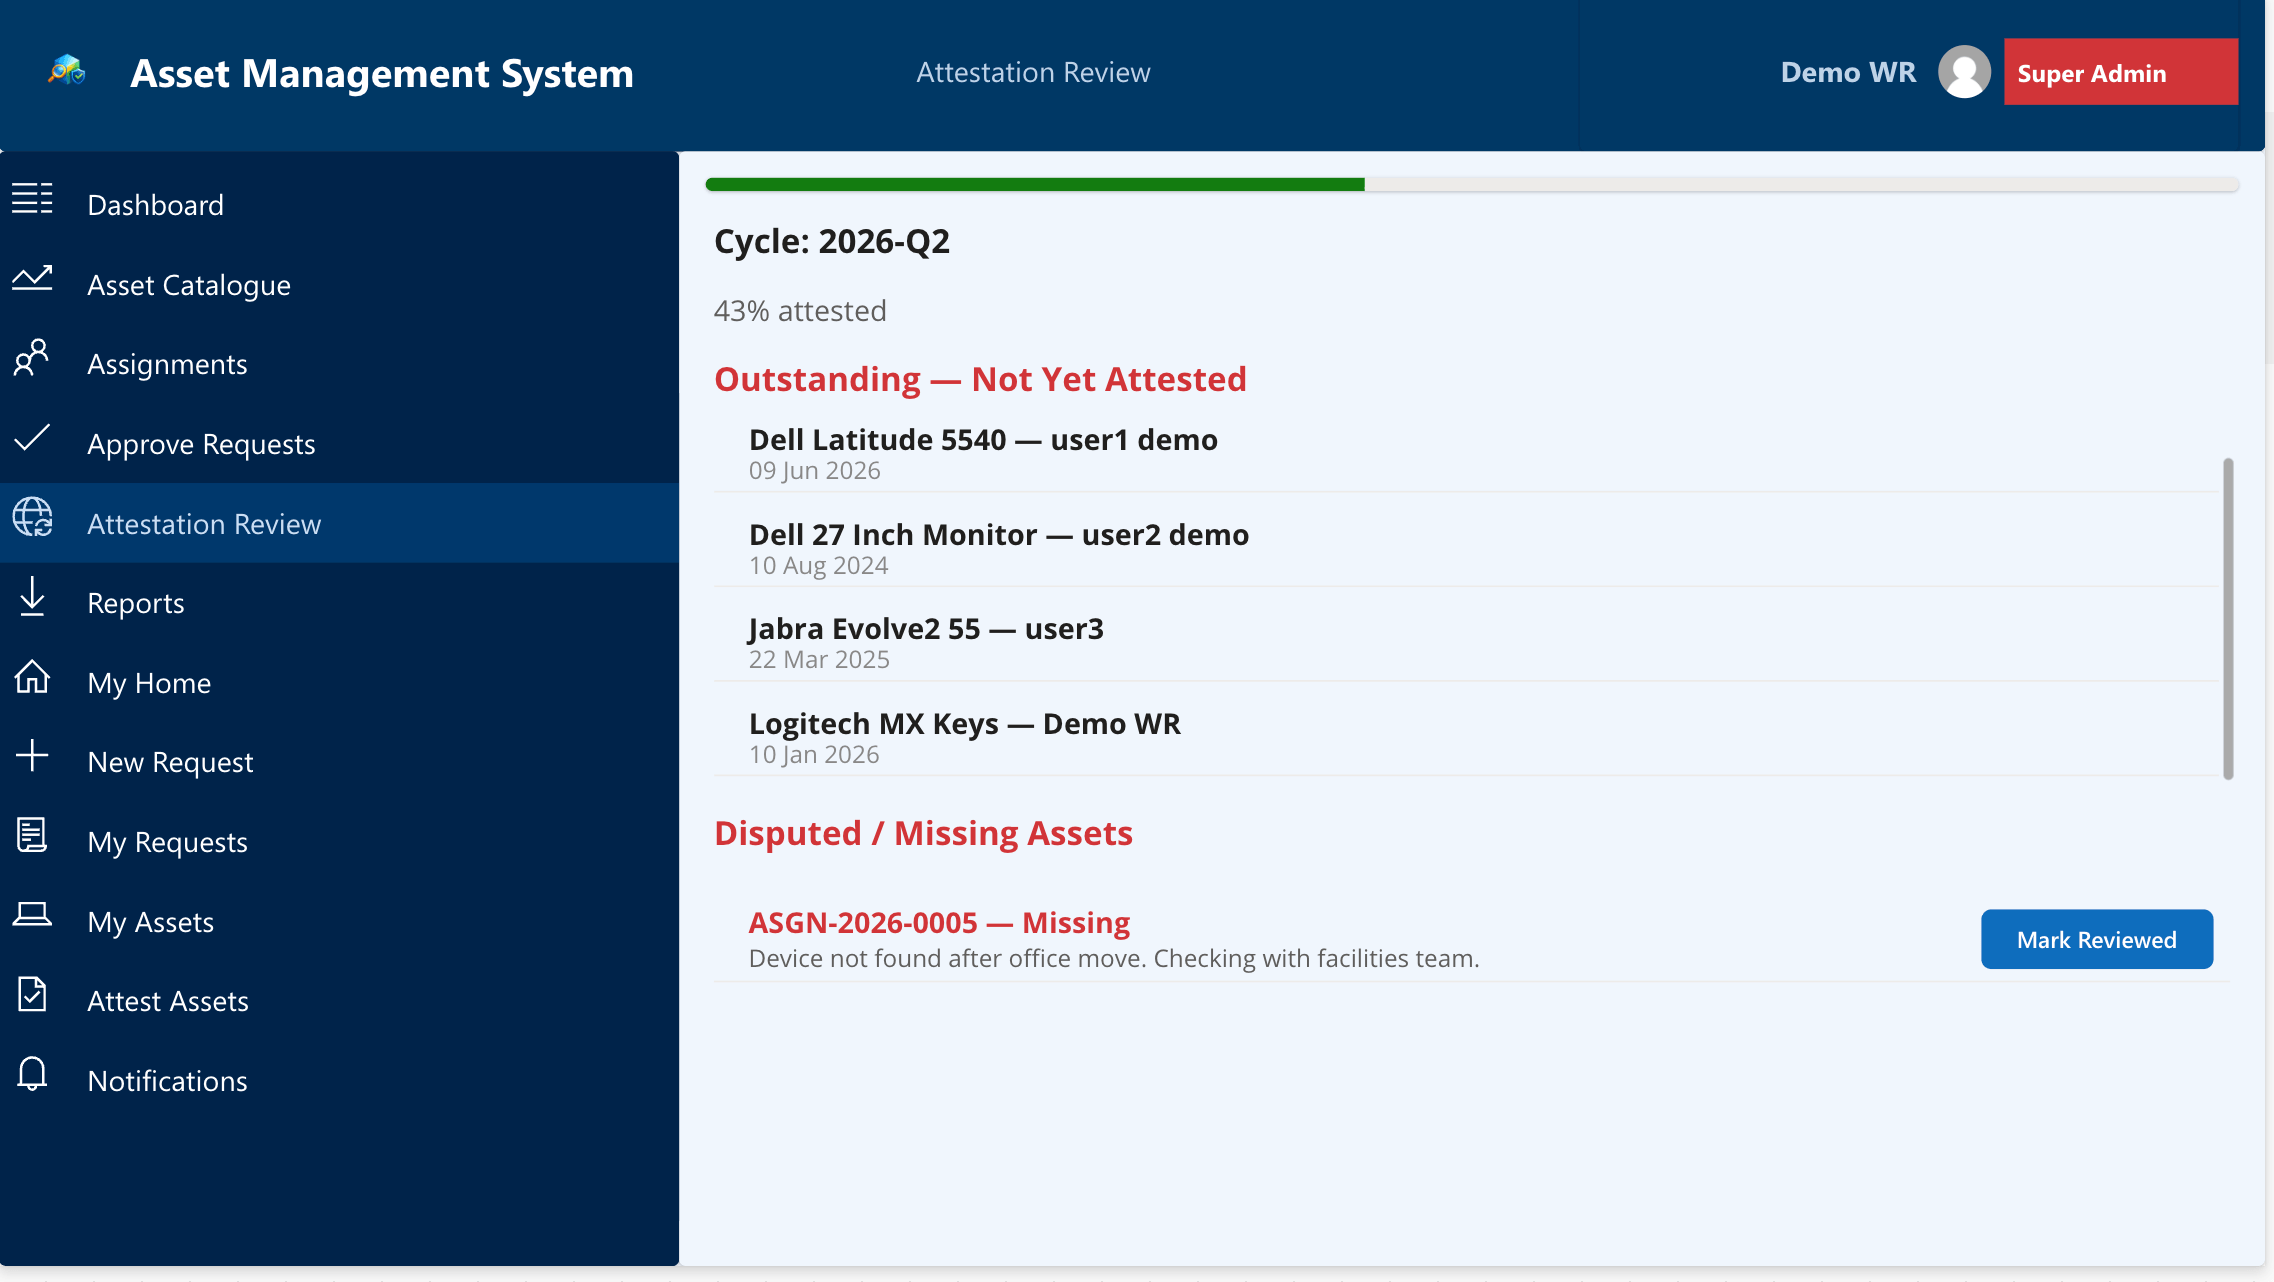
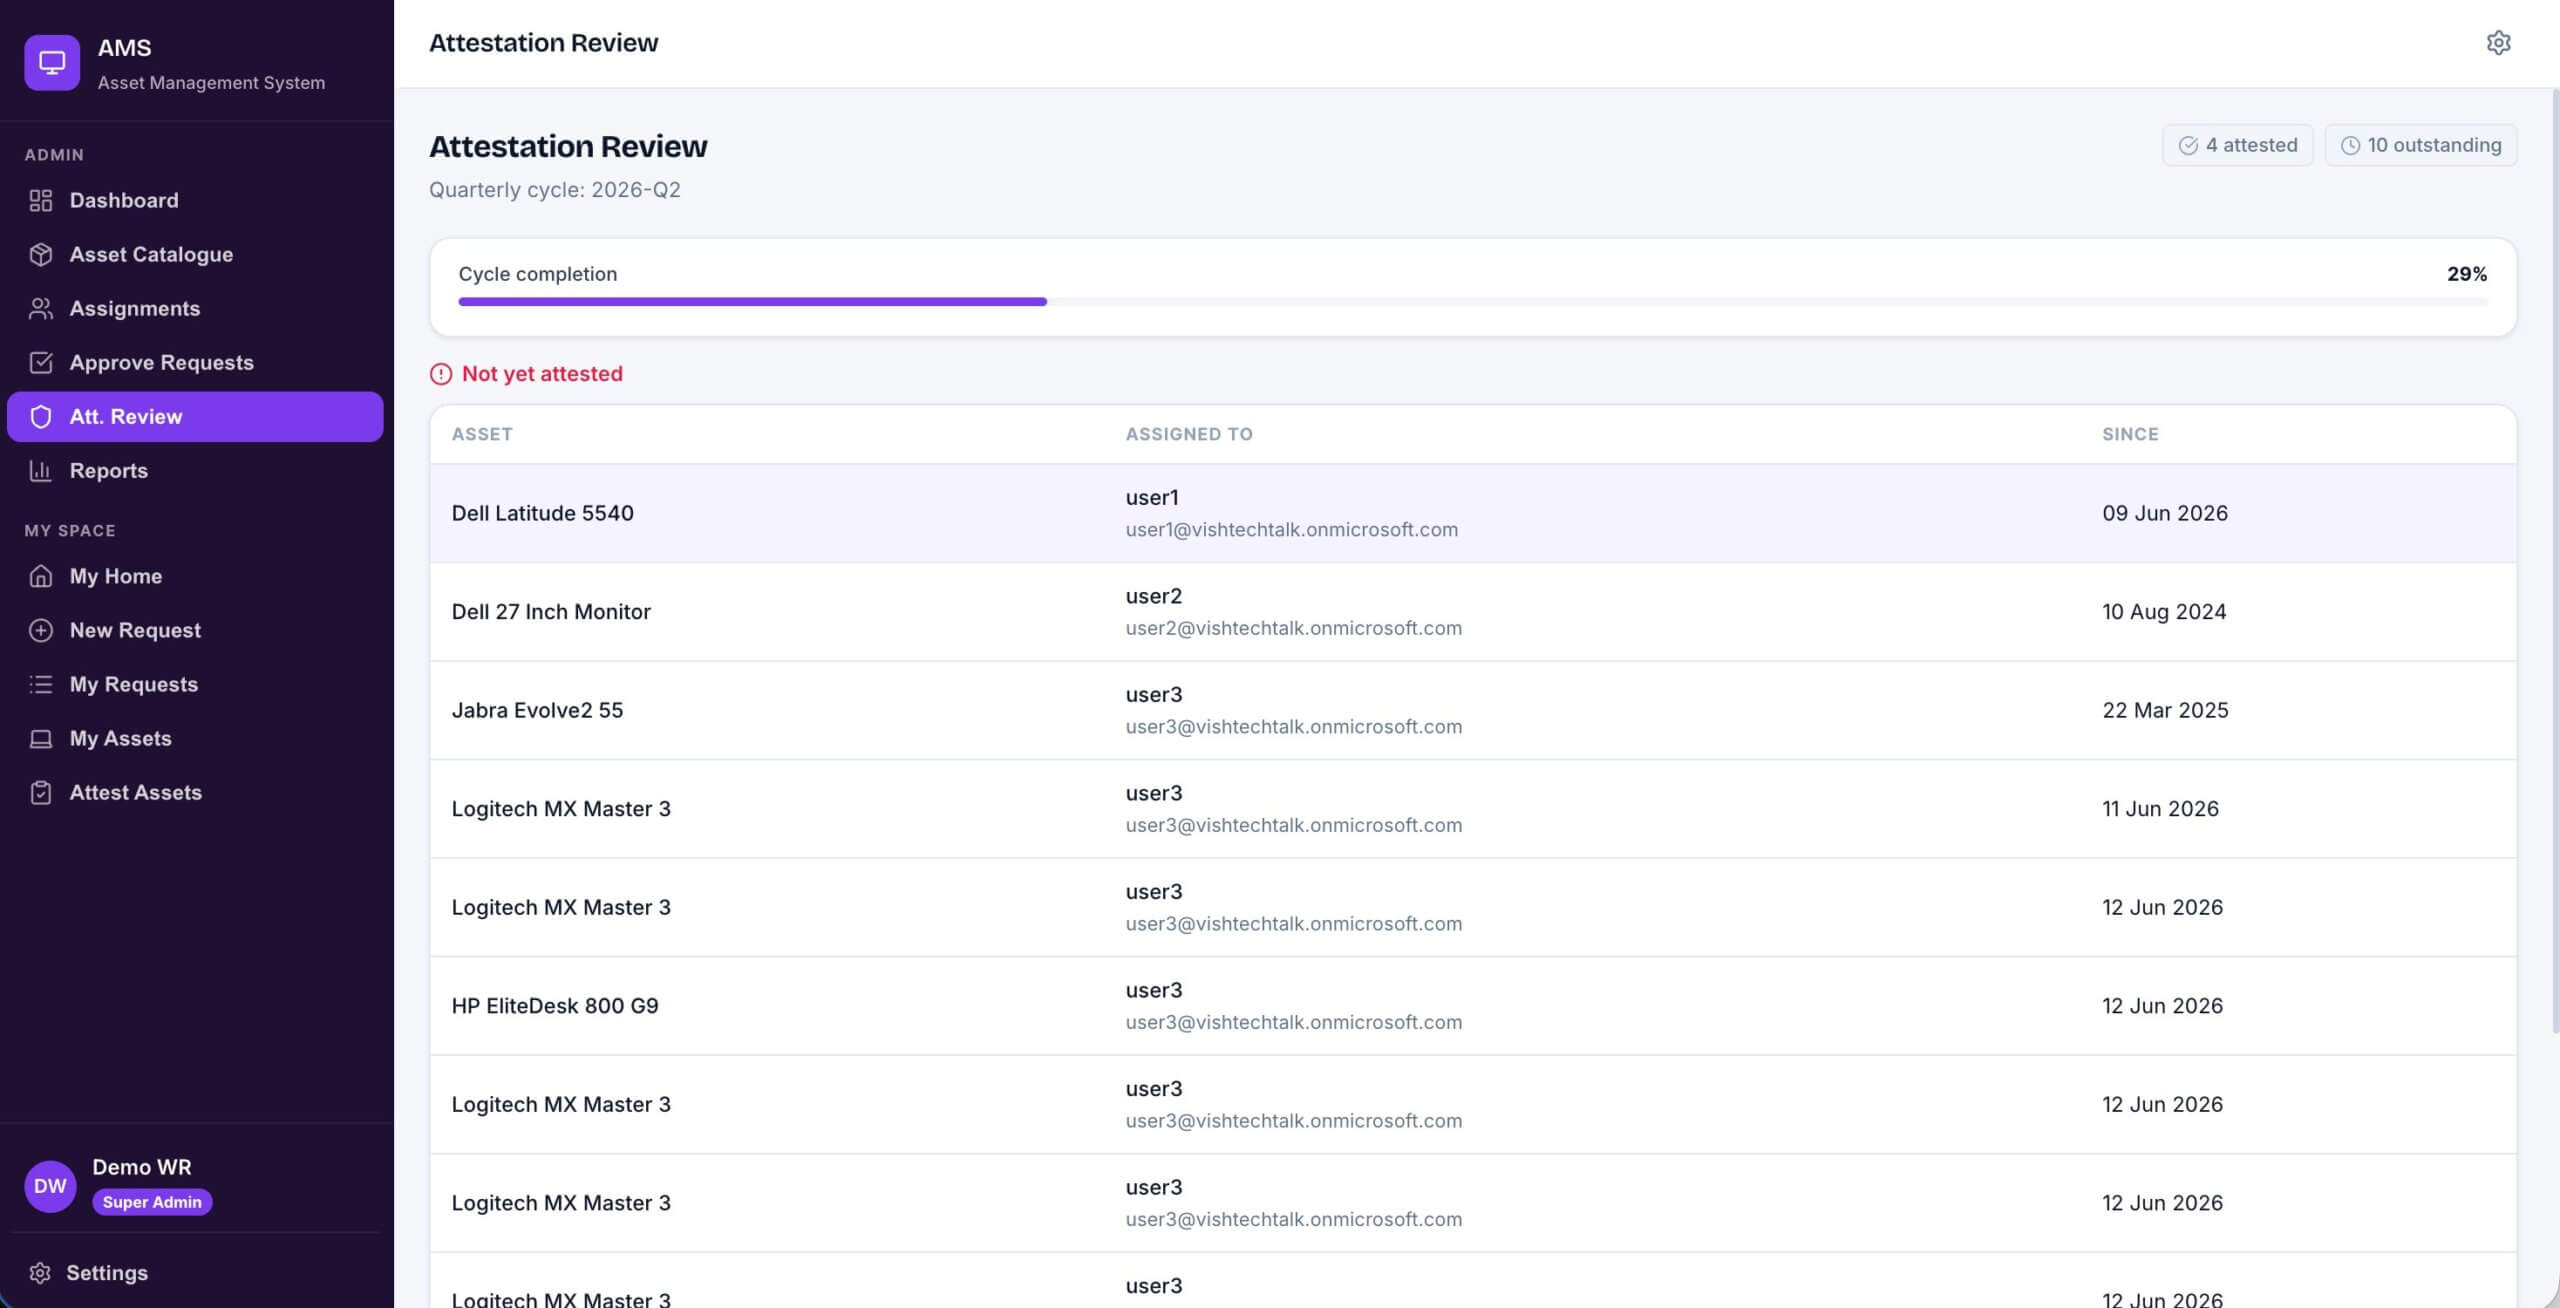
This screen shows the current quarter cycle, a completion progress bar, and two galleries. One lists staff who have not yet attested their assets for the cycle. The other shows disputed or missing items that users have flagged. IT can mark investigated items as reviewed directly from this screen rather than going into SharePoint.
User screens
New Request
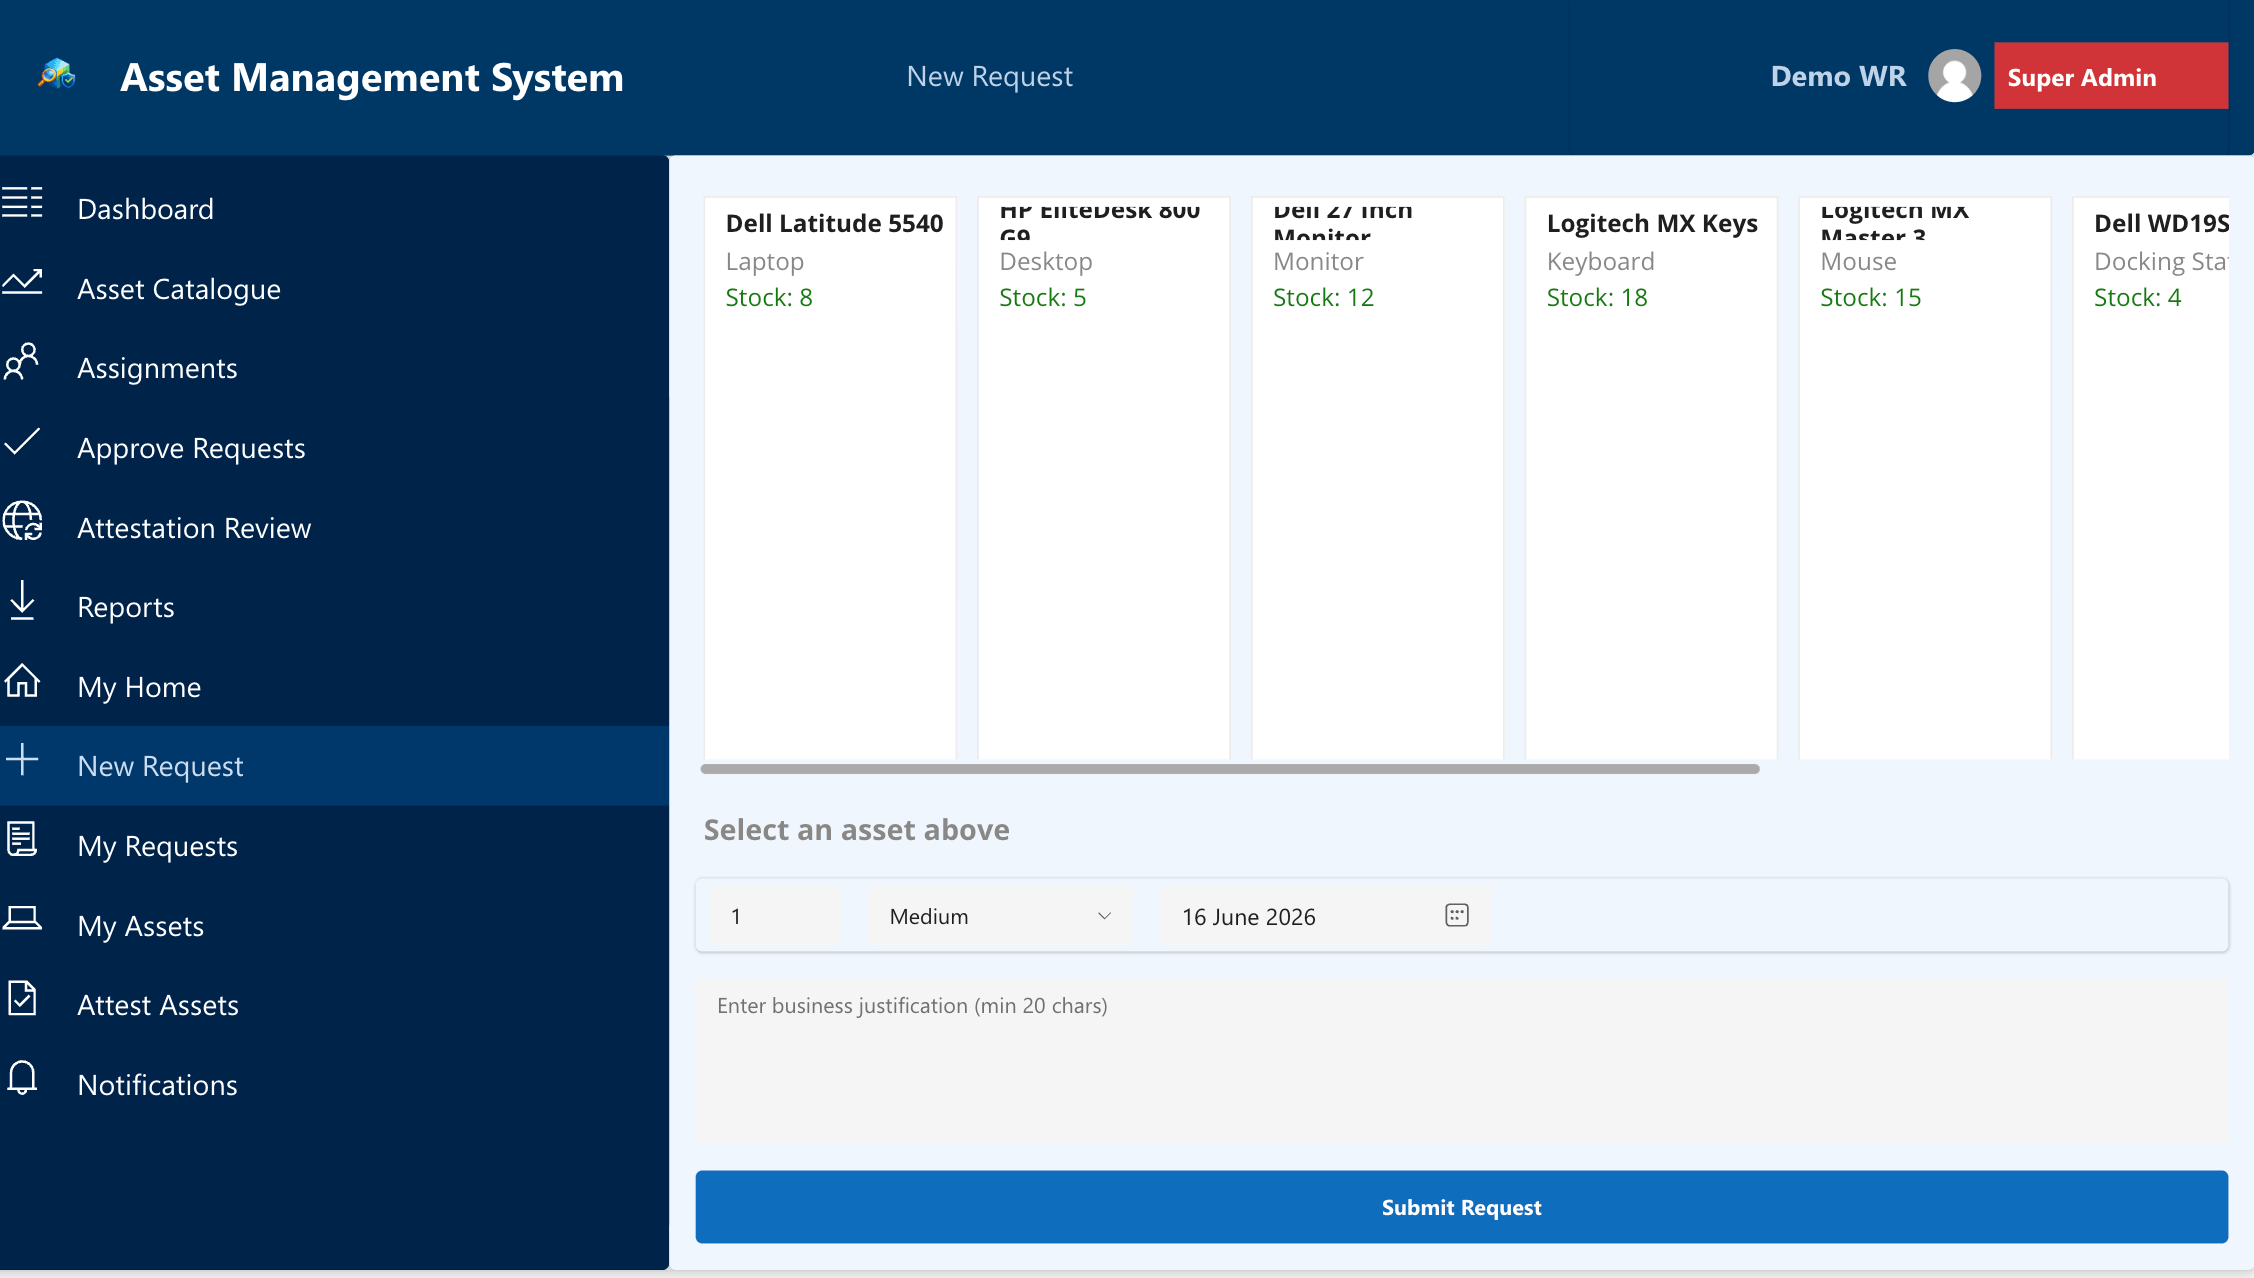
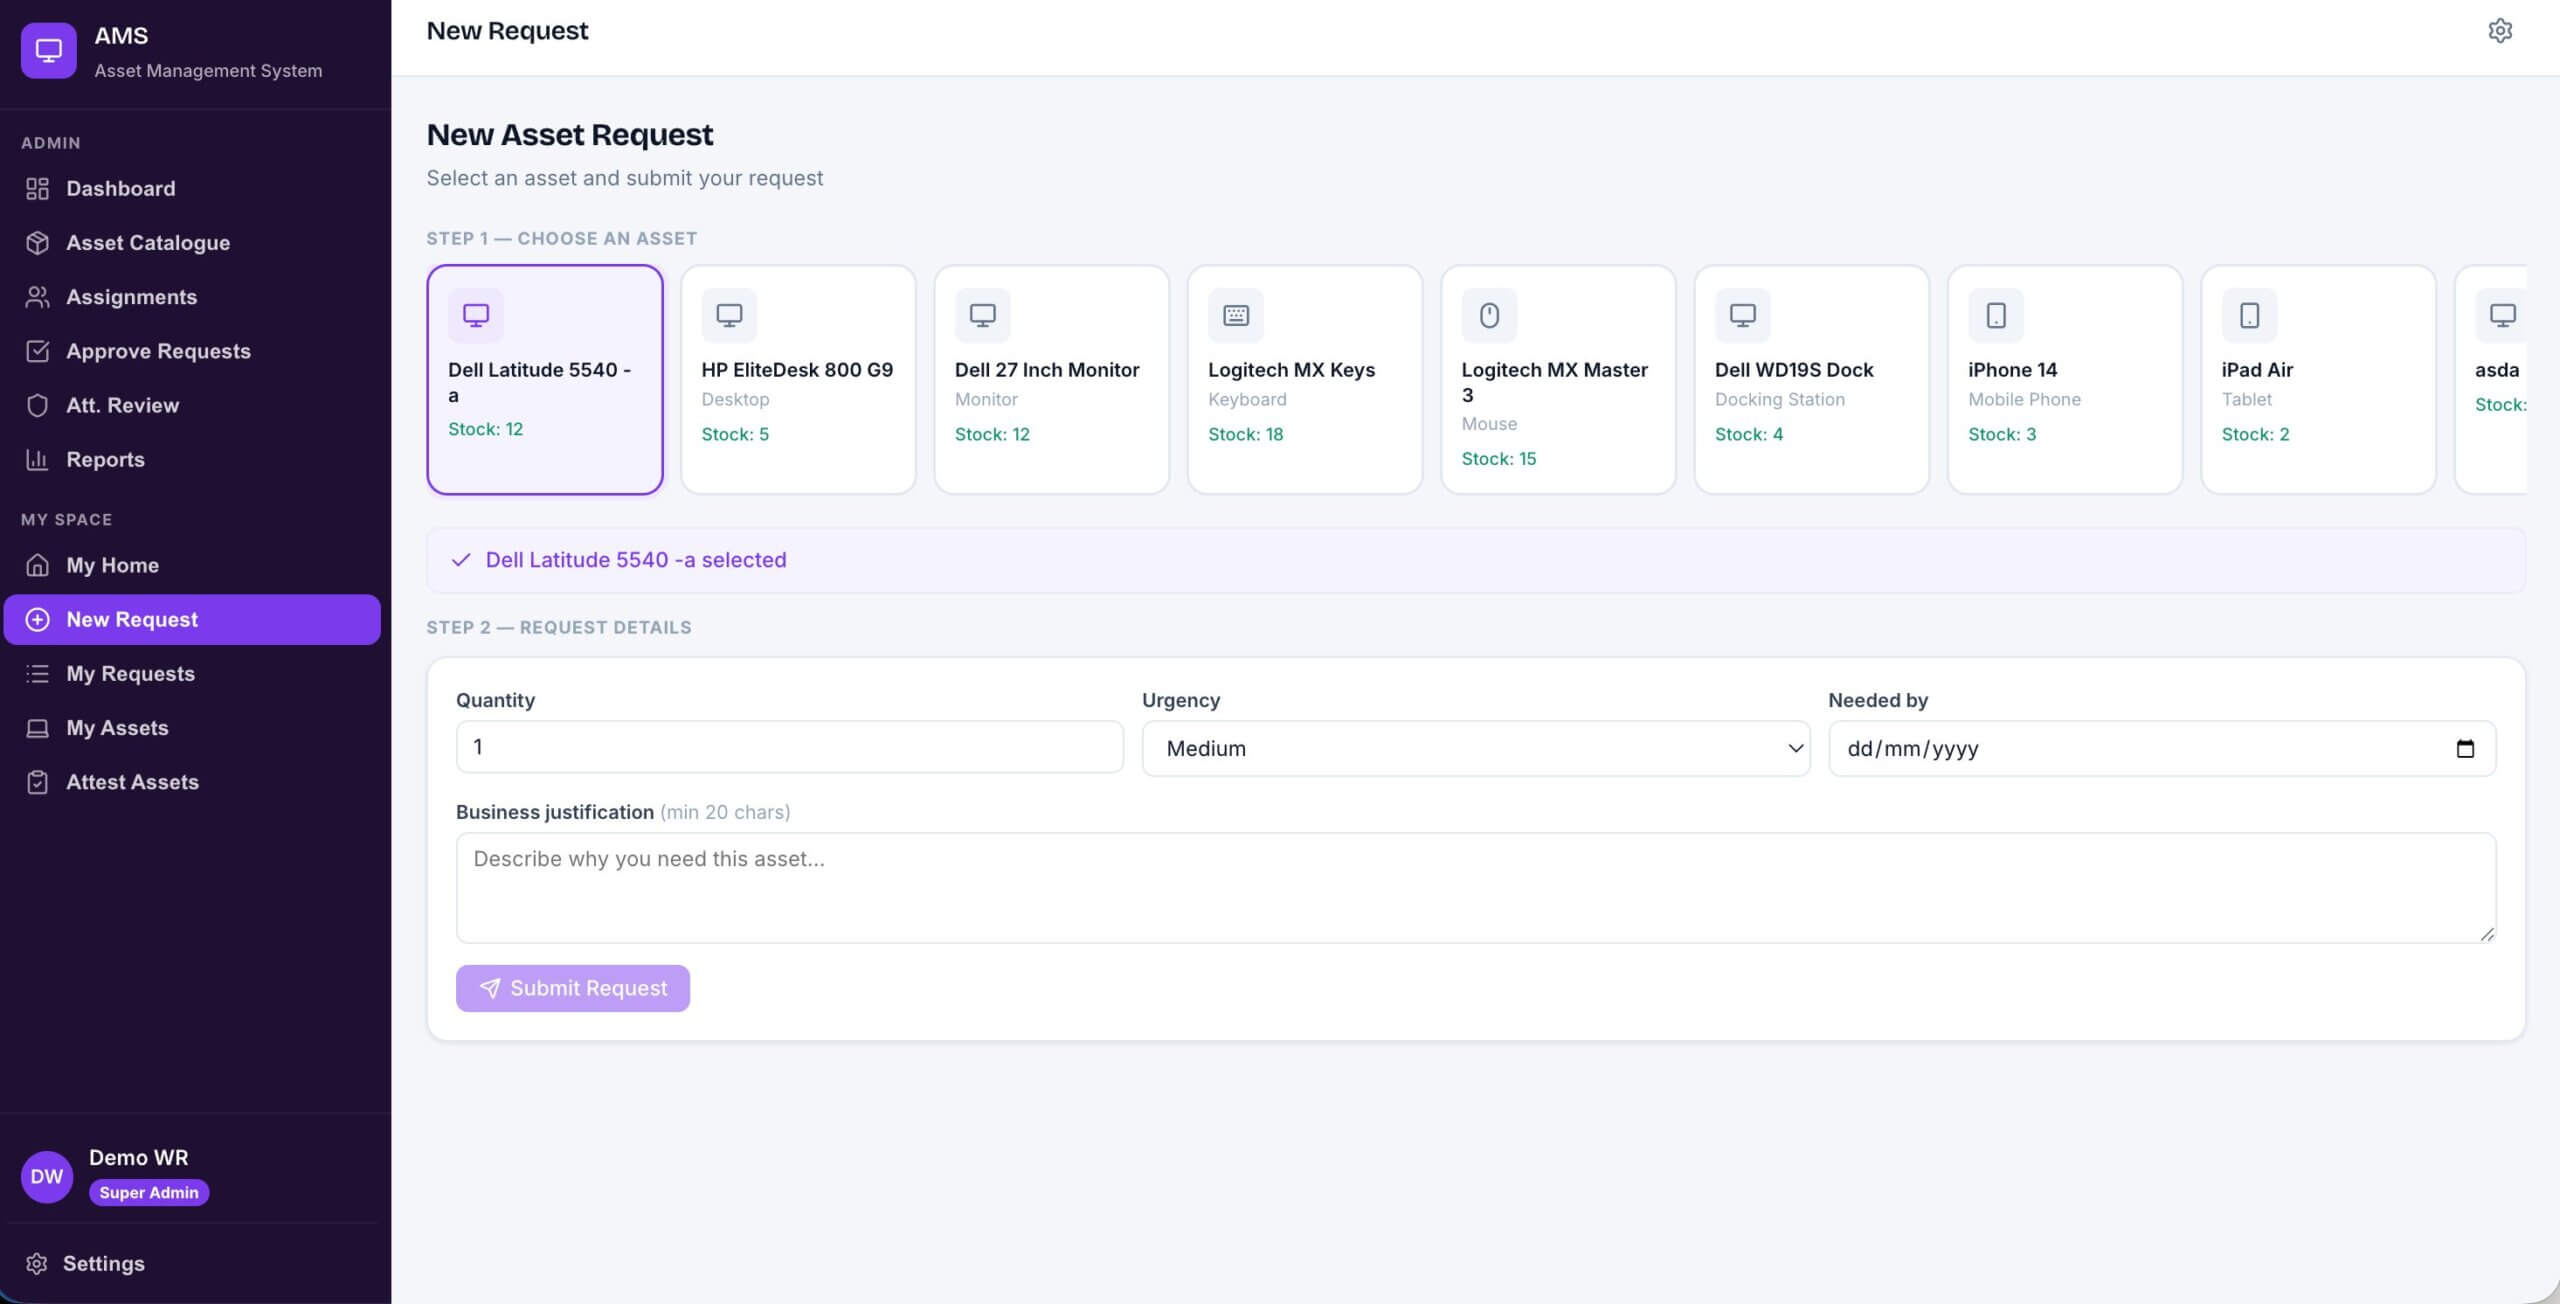
A horizontal scrollable card gallery lets staff browse active assets. Tapping a card selects it and the confirmation label below the gallery updates immediately. Below that, the user sets quantity, urgency, and a needed-by date, then writes a business justification. The Submit button validates all fields before writing anything to SharePoint.
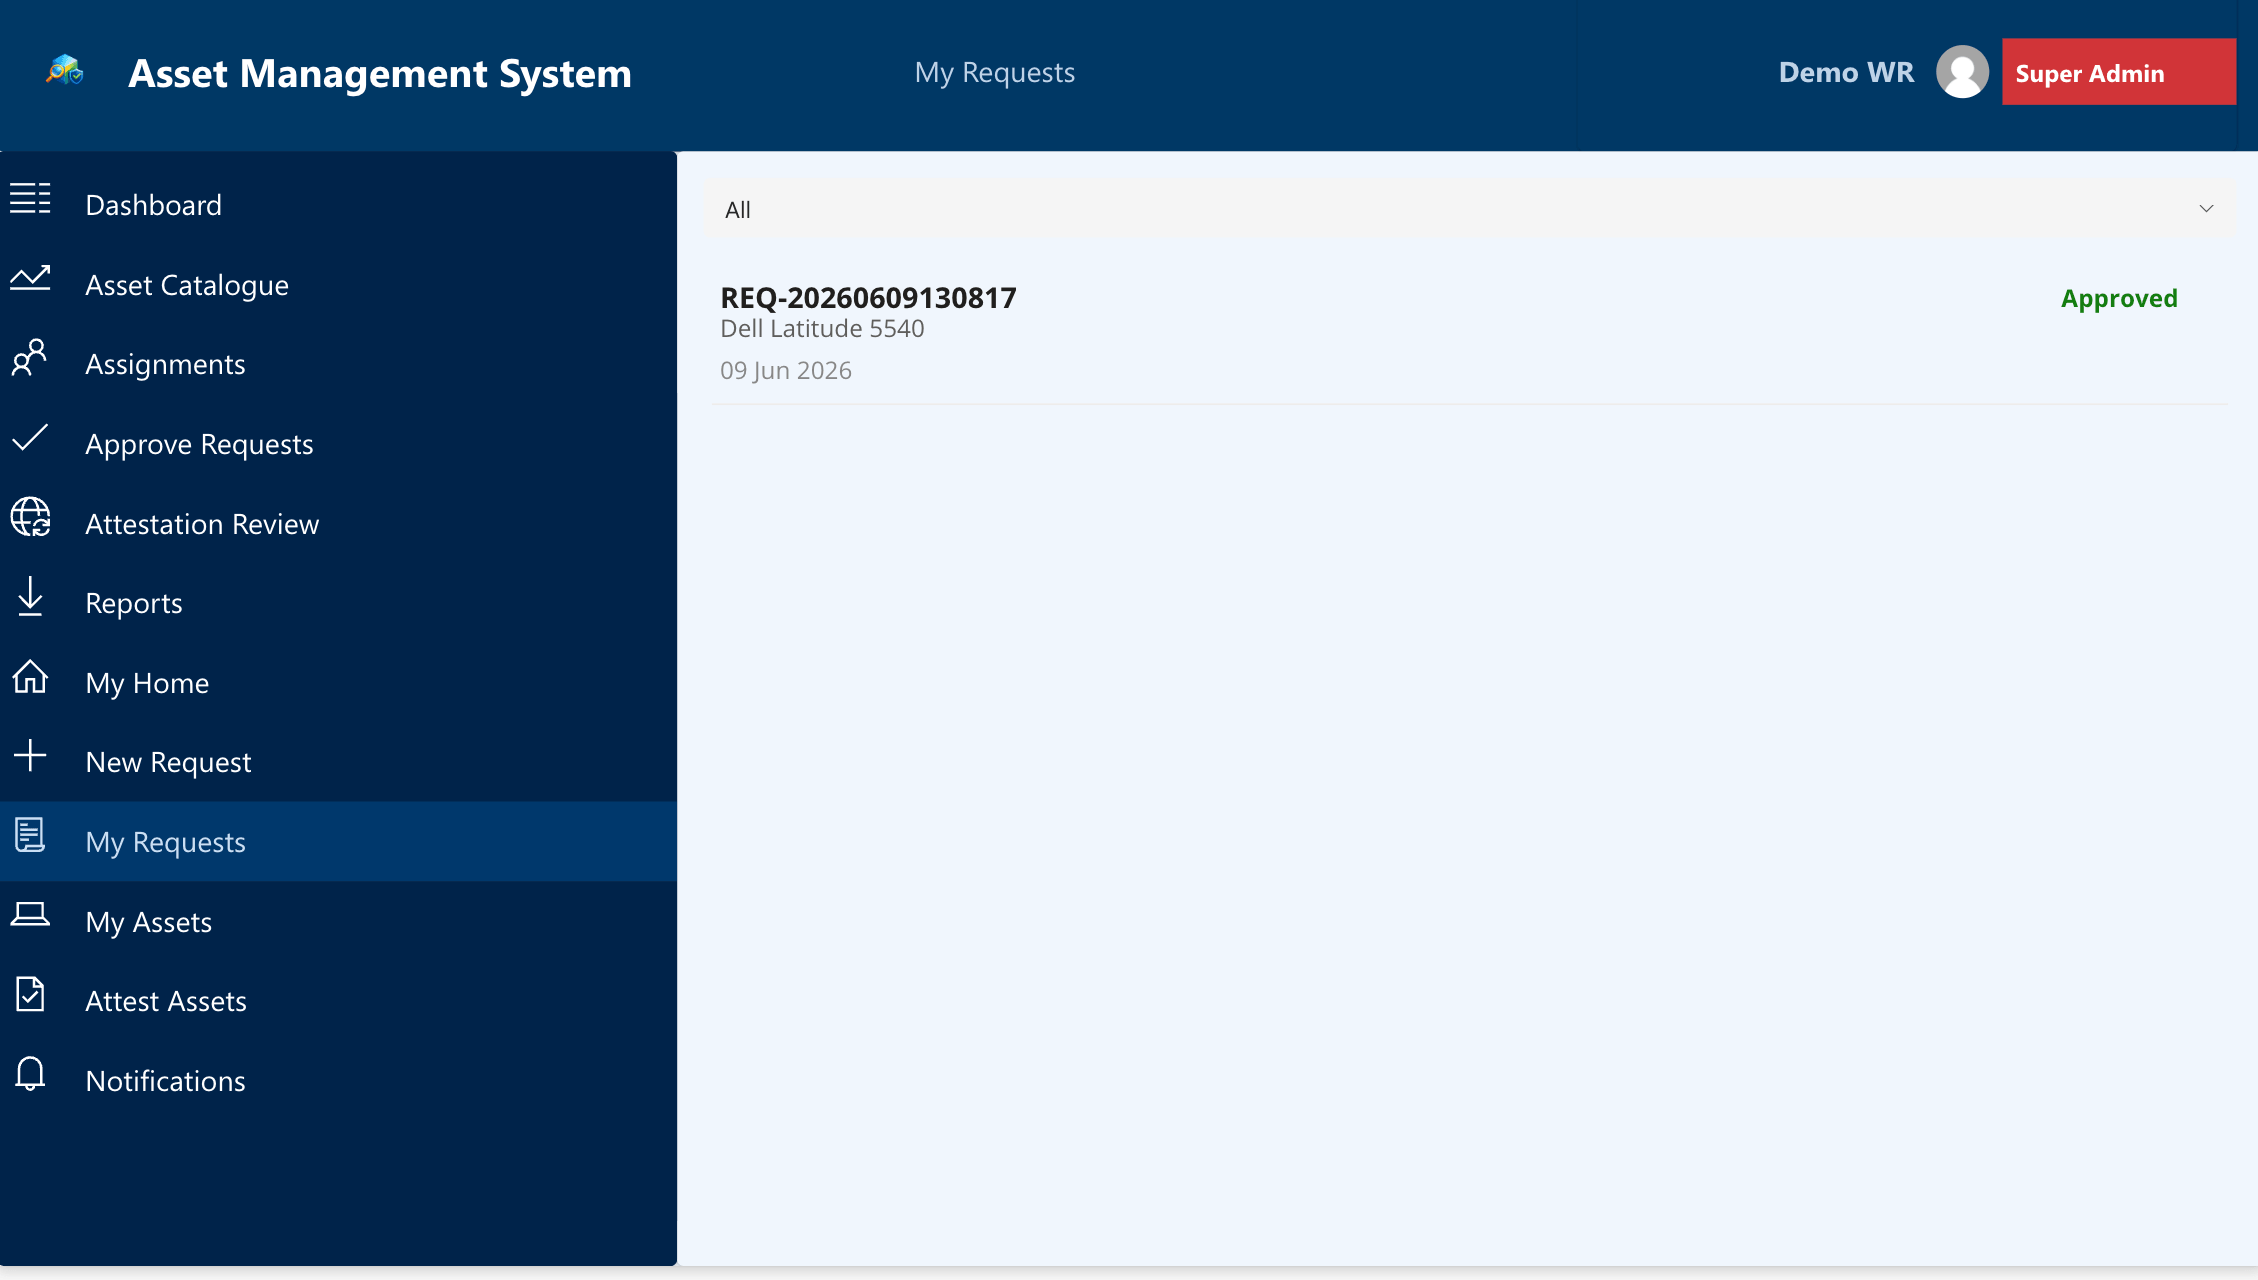
My Requests
This screen shows the full history of the user’s own requests with status badges for Pending, Approved, Denied, and Cancelled. Denied requests show a Re-submit button. Pending ones show a Cancel option. The filter dropdown at the top is useful once the history gets long enough that scrolling through everything becomes impractical.
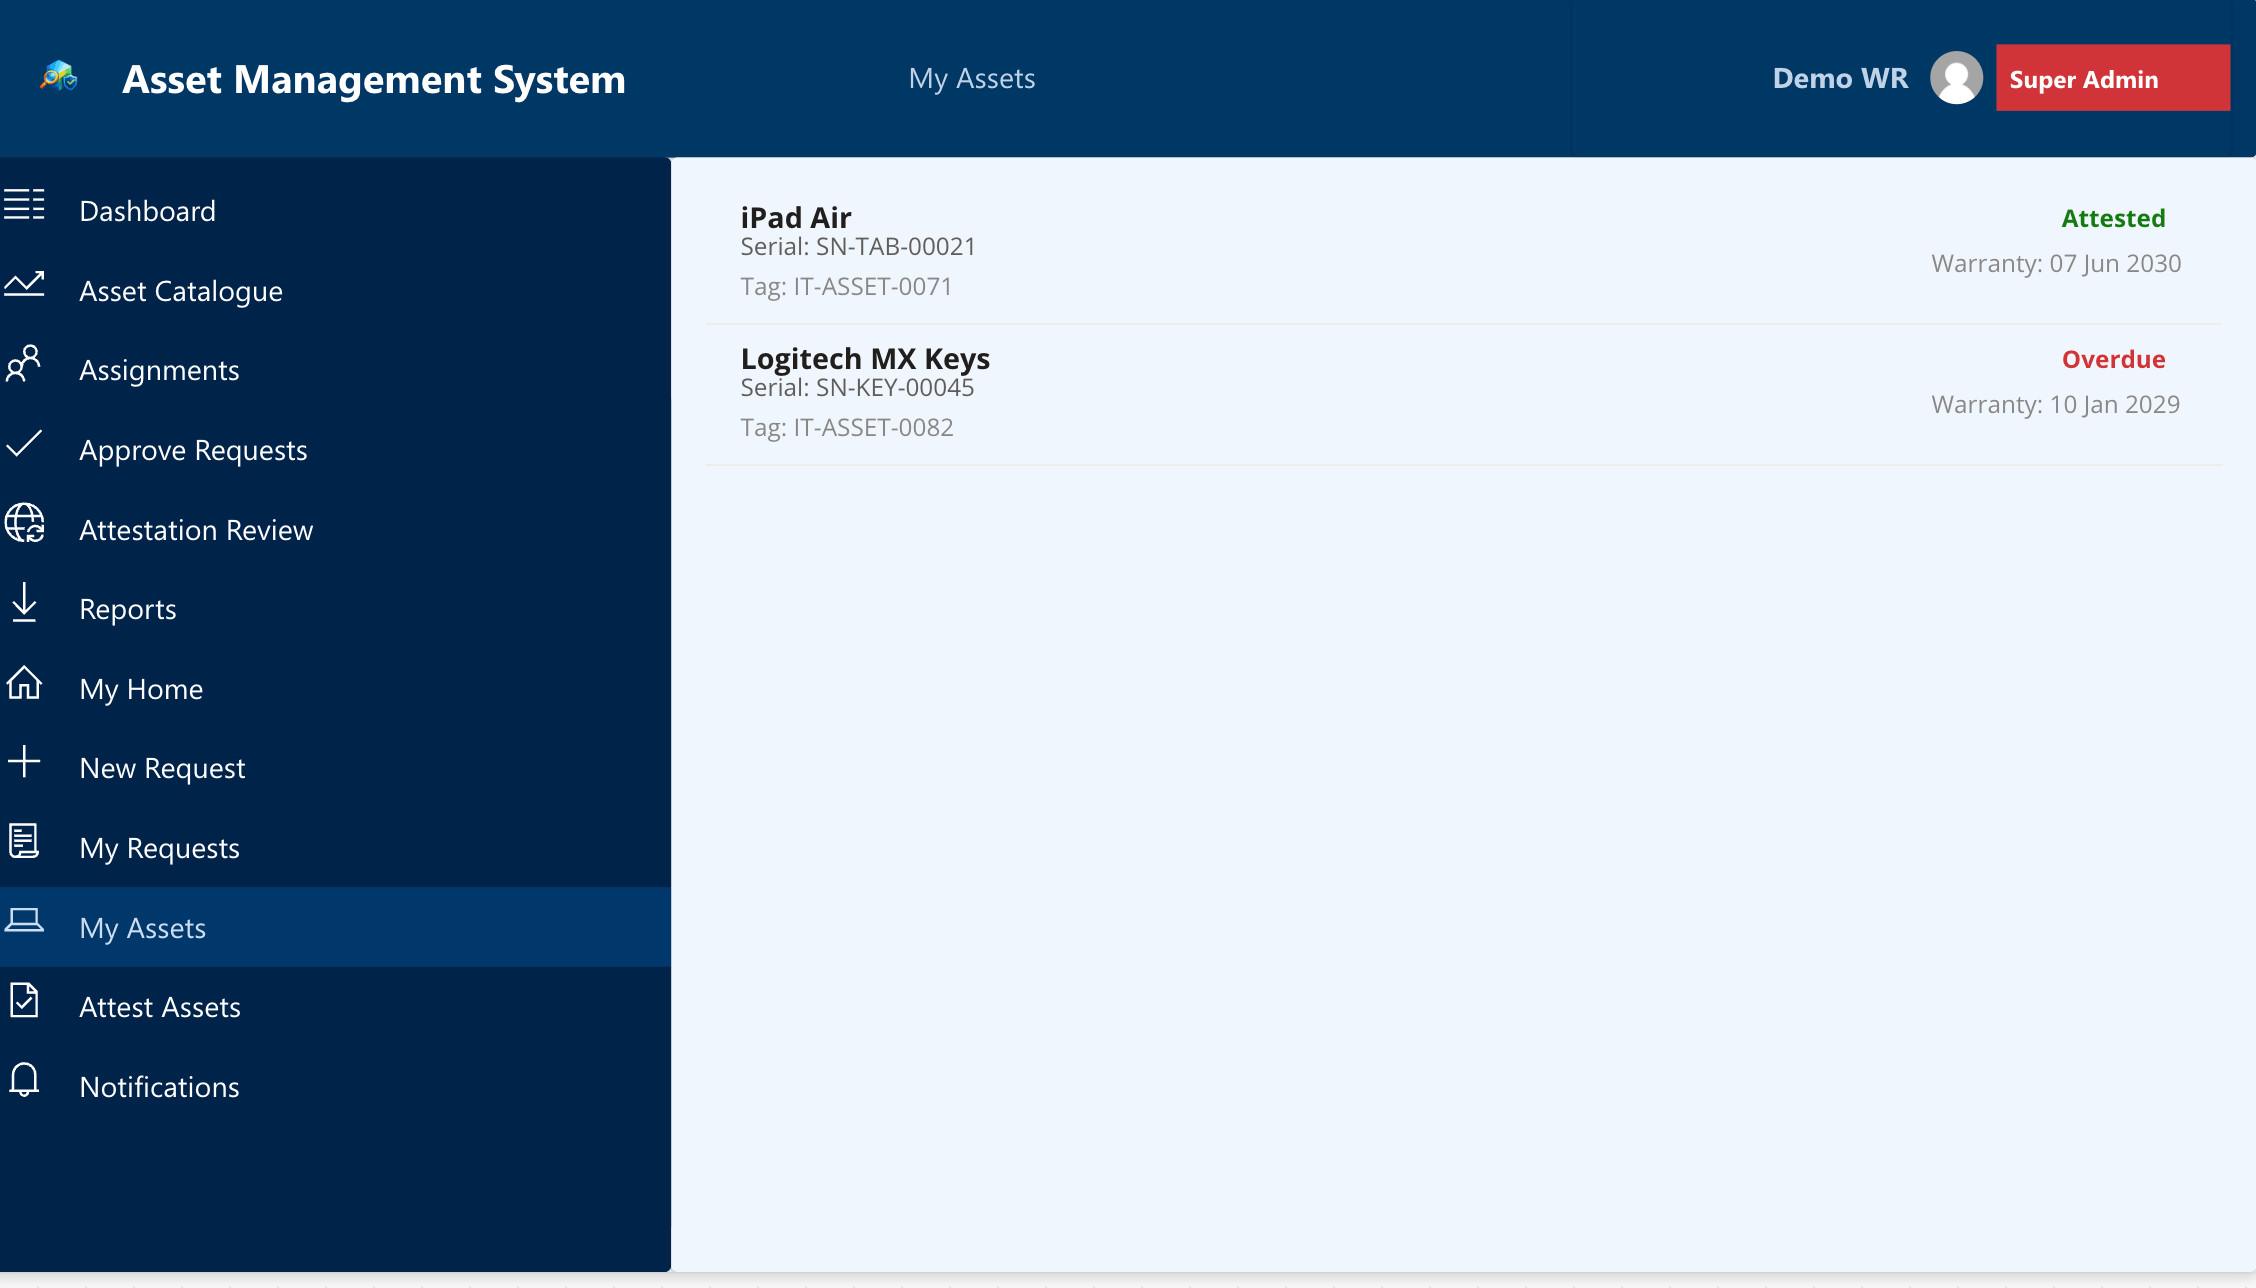
My Assets
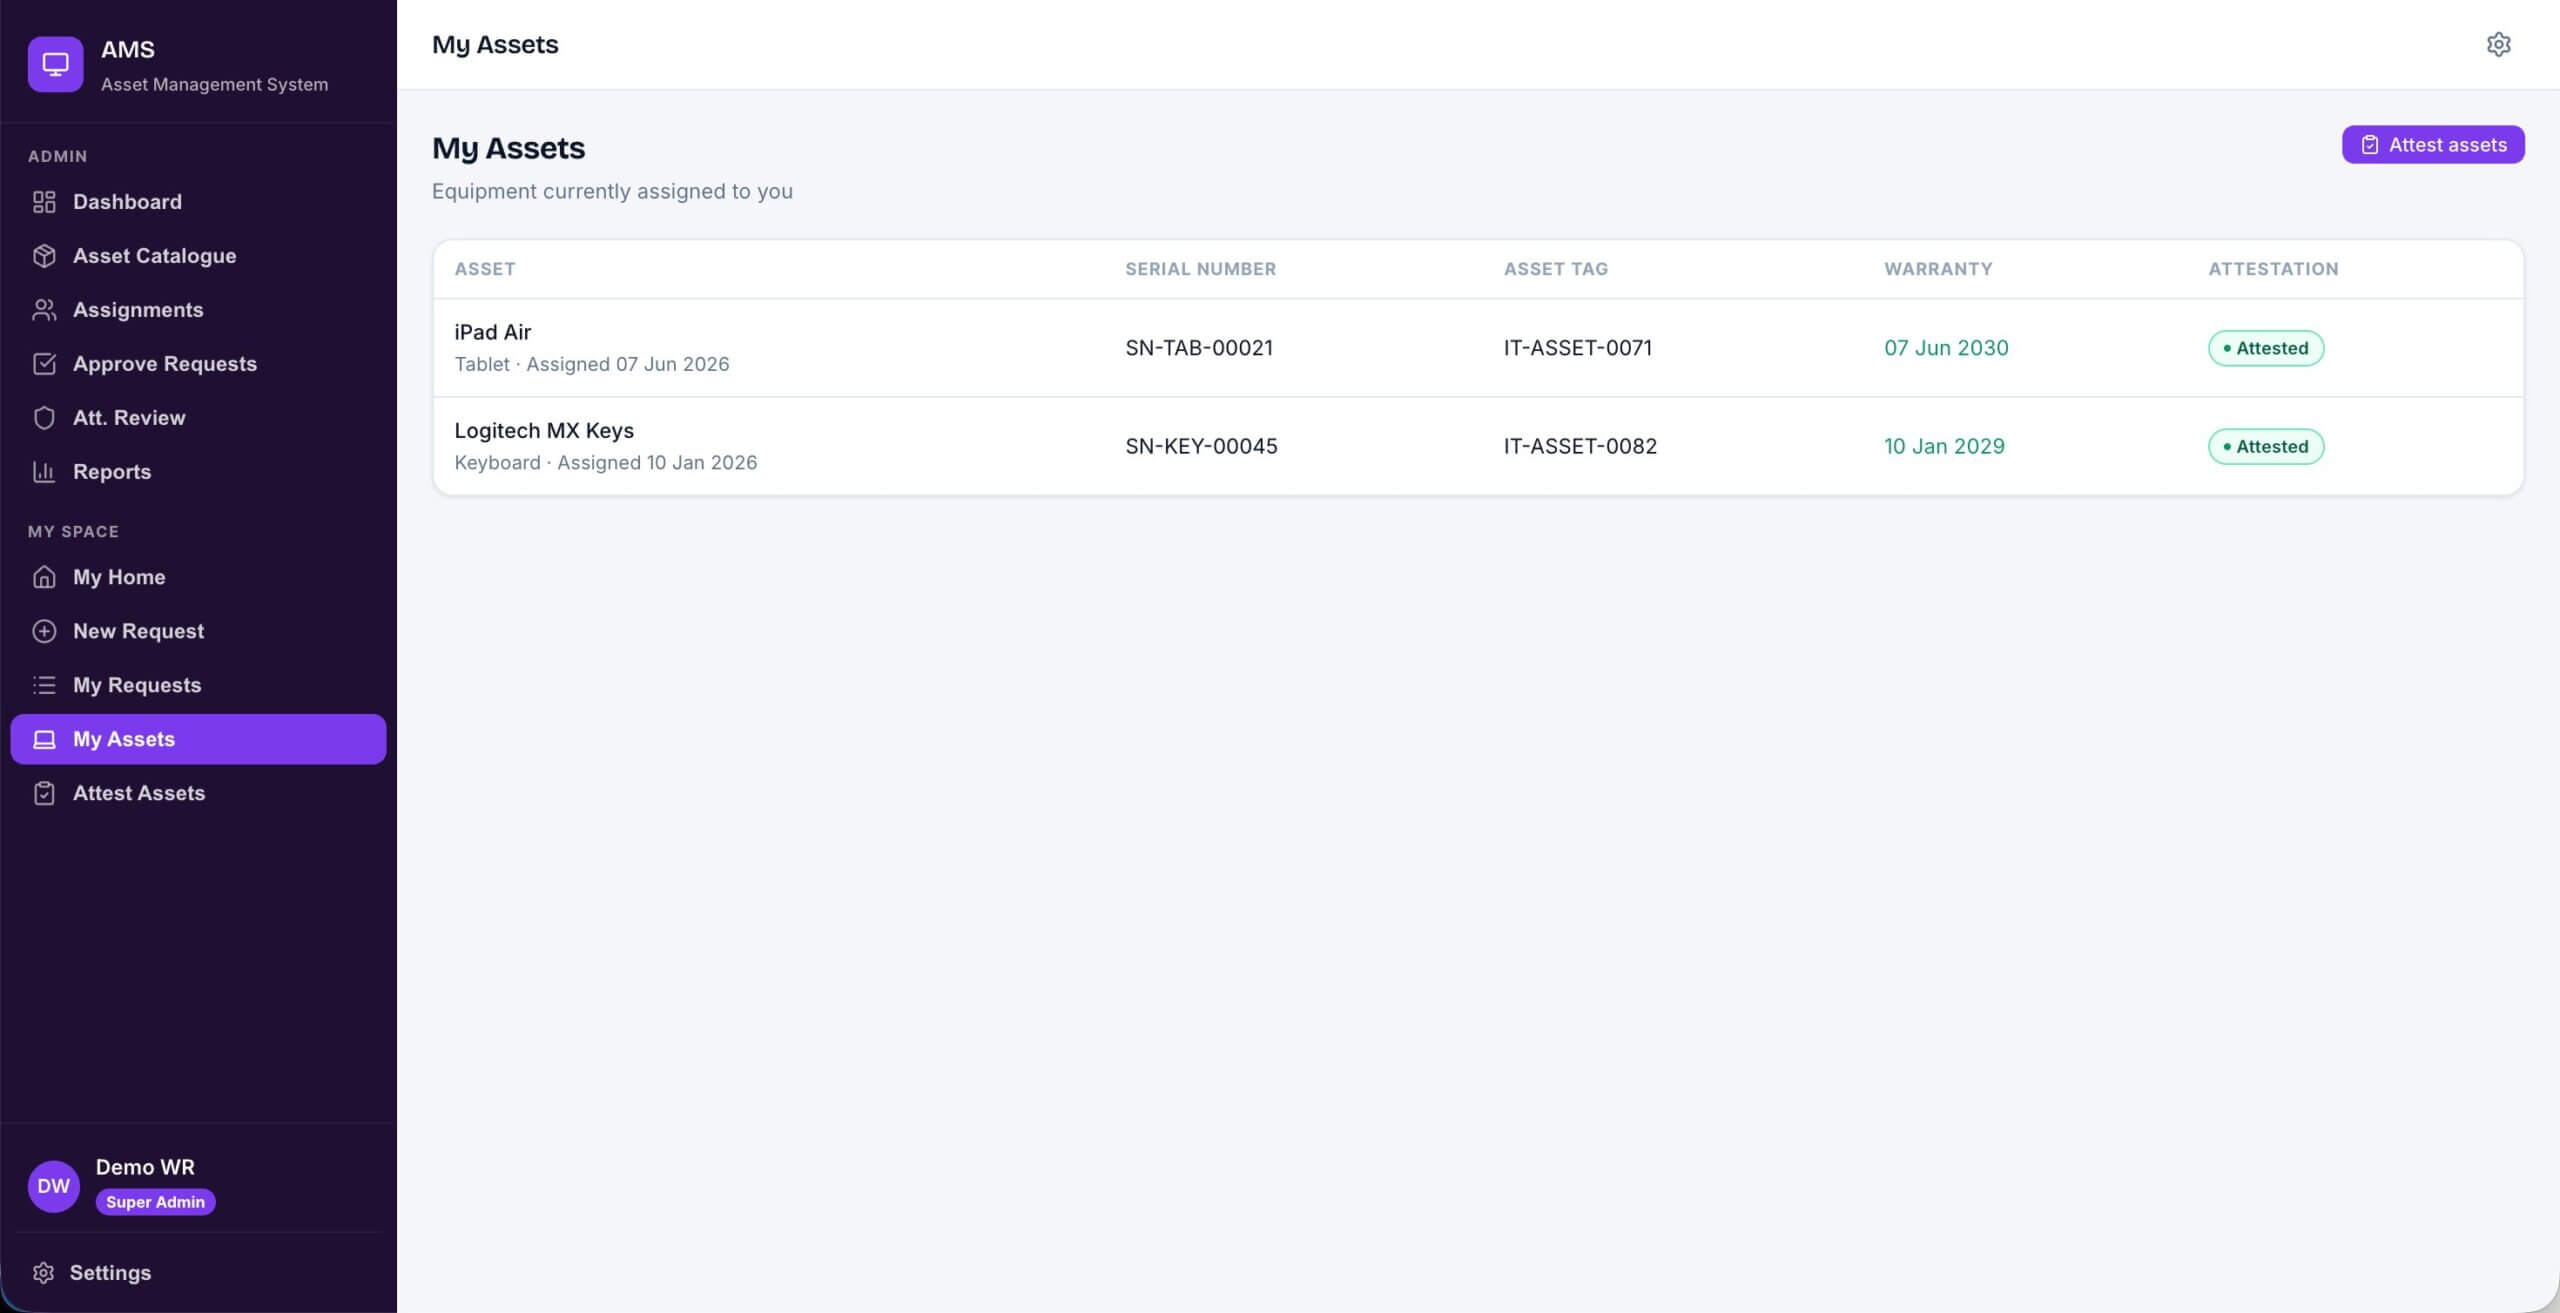
Every asset currently assigned to the logged-in user appears here with serial number, asset tag, attestation status badge (Attested or Overdue), and warranty expiry. The expiry date shows in red when it falls within 30 days so users do not need IT to tell them when something is coming up for renewal.
Attest My Assets
The attestation screen only shows assets that have not been attested in the current cycle. Each row has a condition dropdown with options for Good, Minor Wear, Damaged, Missing, and Lost. The user confirms each item individually and the app writes to the Attestations list, marking AttestedThisCycle on each assignment record. Items logged as Missing or Lost trigger an alert to IT via Flow 3 (Note: the required flow will be added in next updates or the developer needs to build it; refer to the Asset Management System.md for the required flow spec).
🔵 Code App Screens (Premium Licence)
The Code App covers the same full asset lifecycle rebuilt with Fluent 2 design tokens, a custom component library, and a mobile-responsive layout. Below is a walkthrough of each screen.
Admin screens
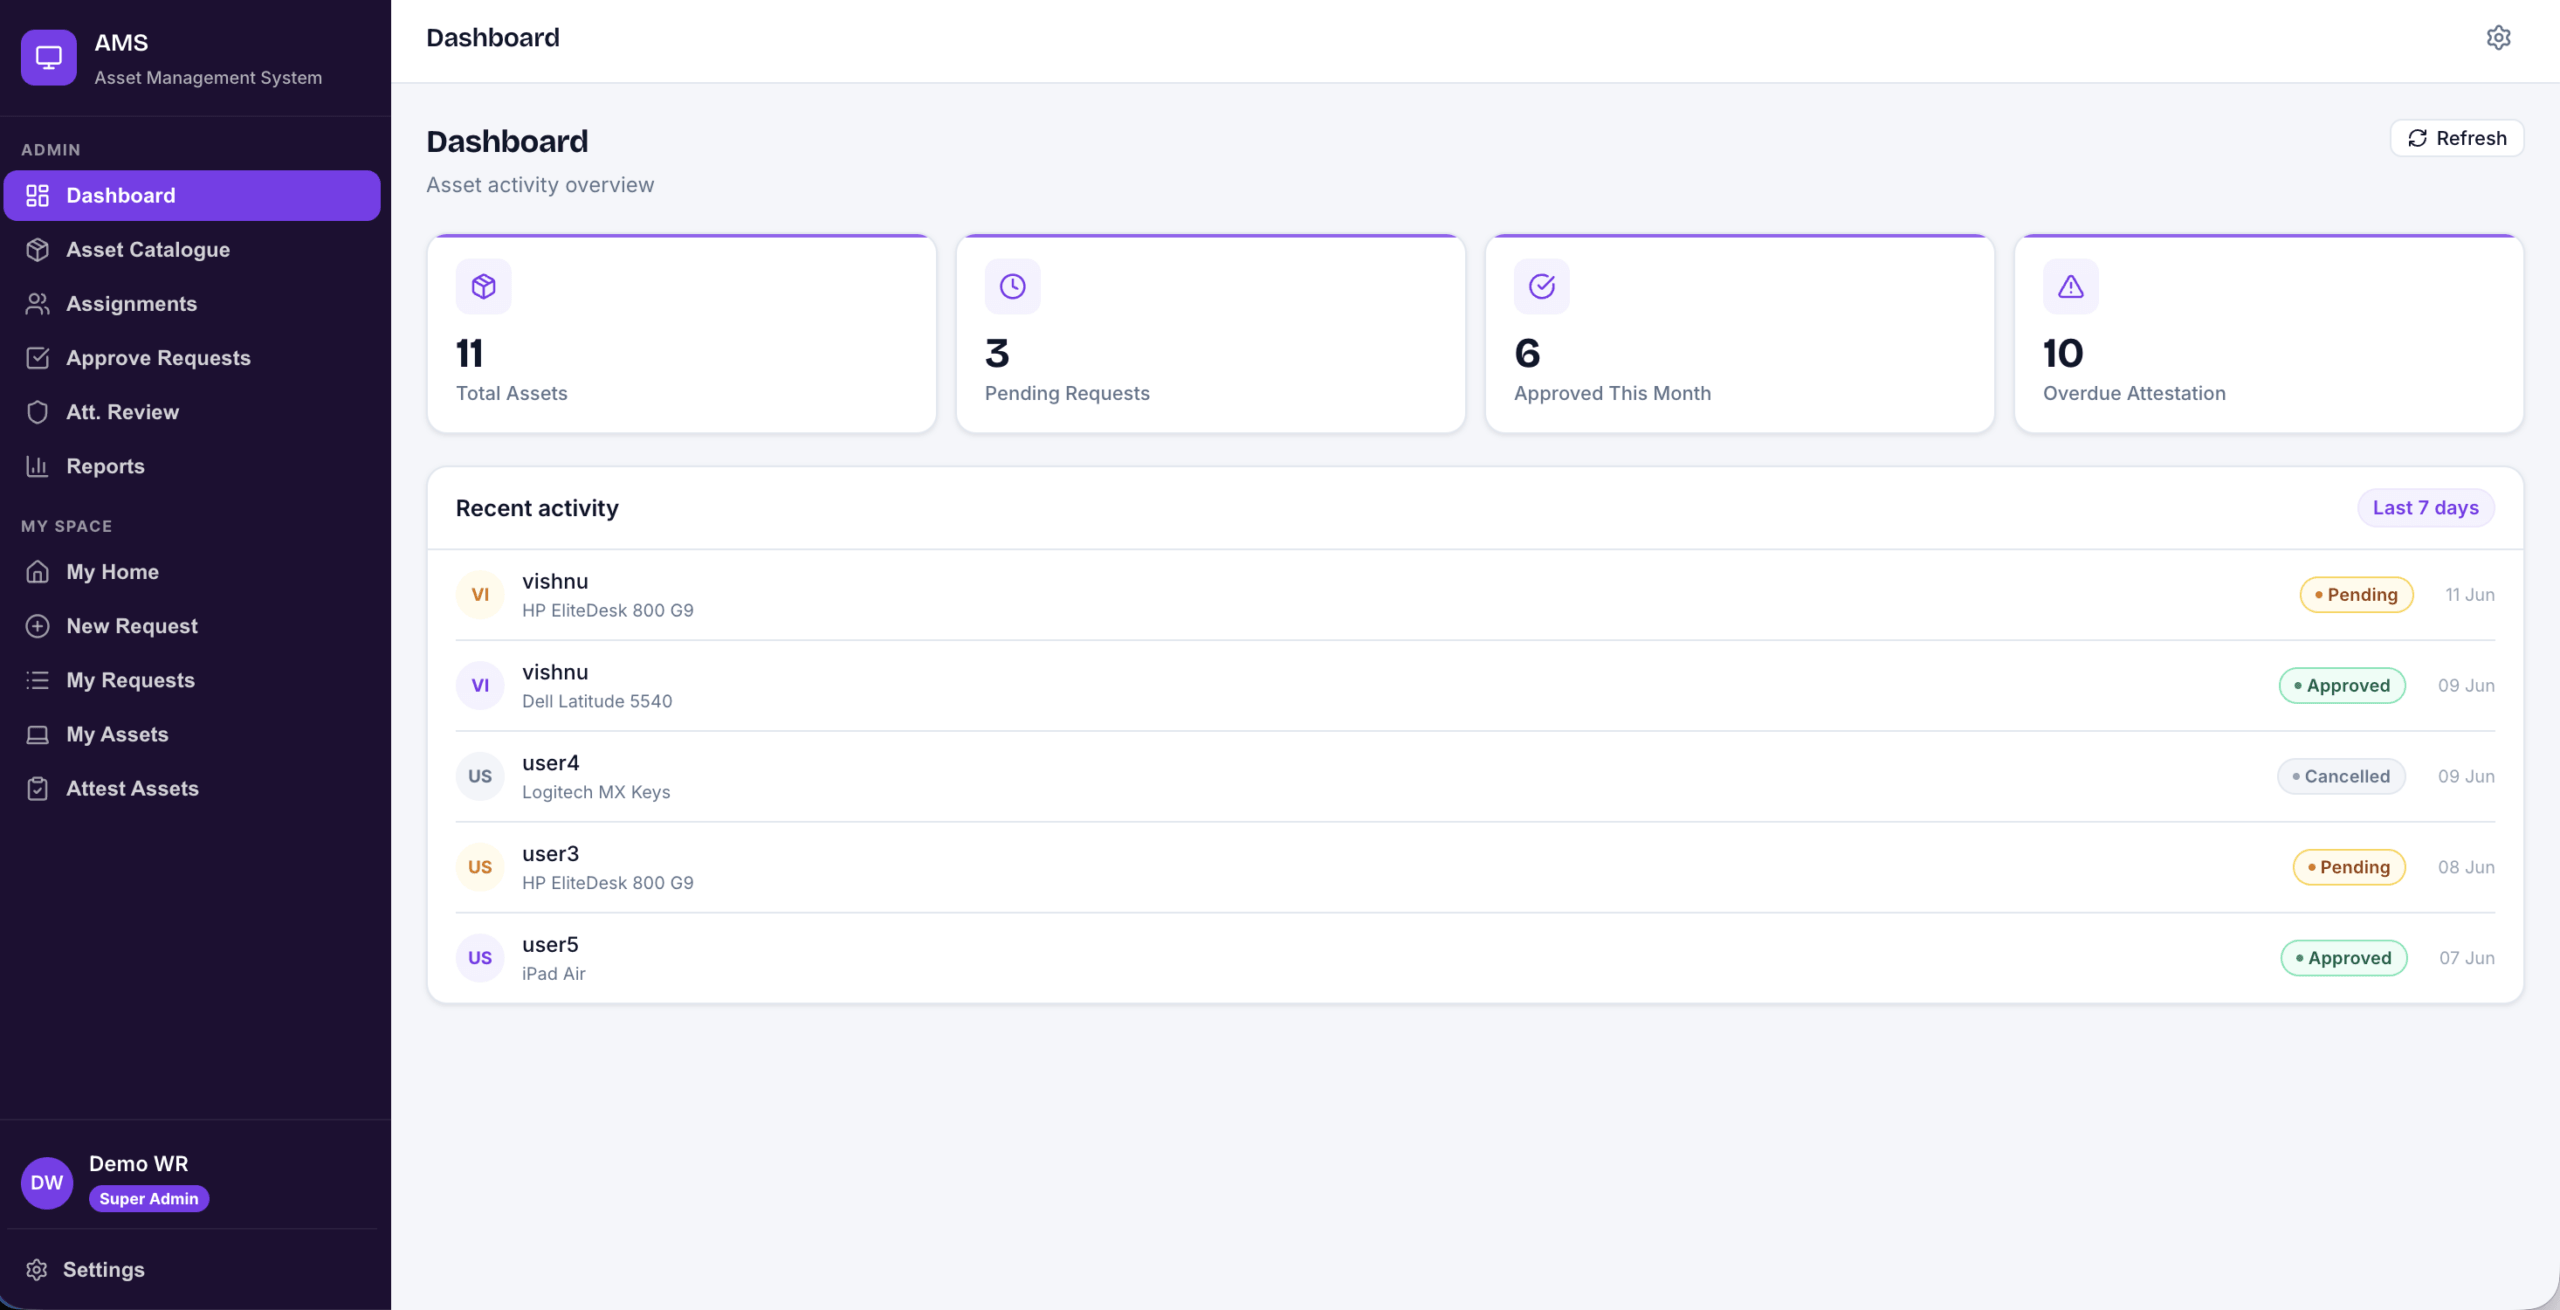
Dashboard
The same four KPI cards are at the top: Total Assets, Pending Requests, Approved This Month, and Overdue Attestation. A live Recent Activity feed sits below with a Refresh button in the top right. The layout uses a clean icon-based design and gives IT an instant read on the current state of the environment.
Asset Catalogue
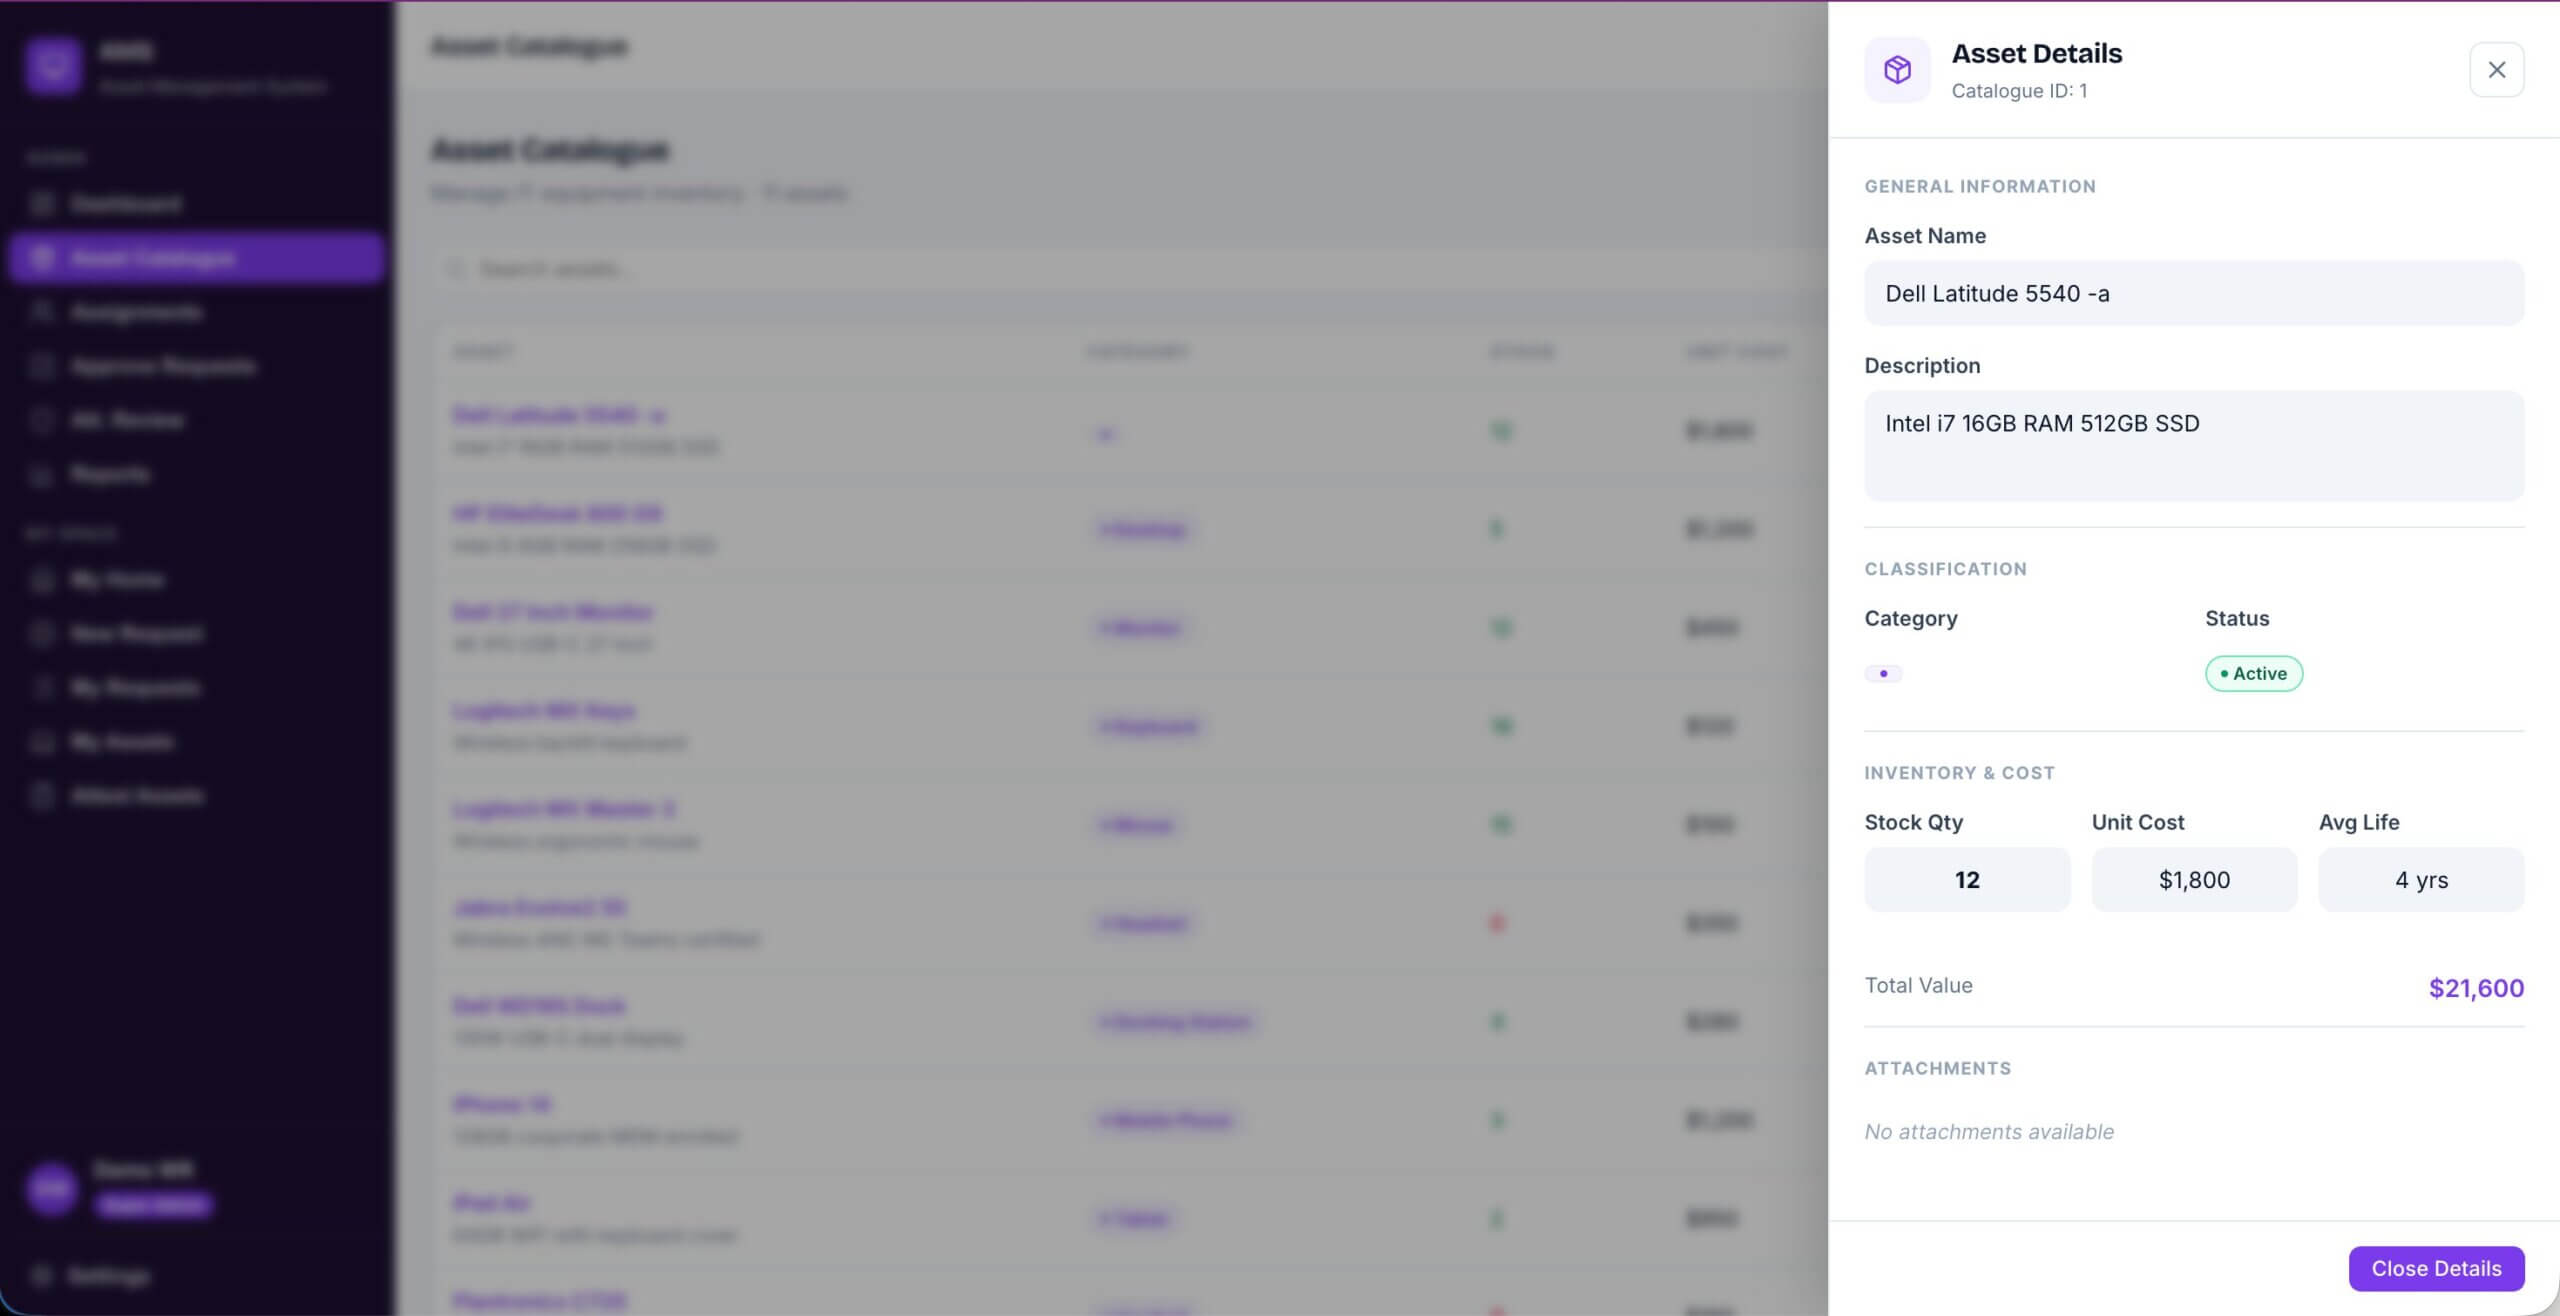
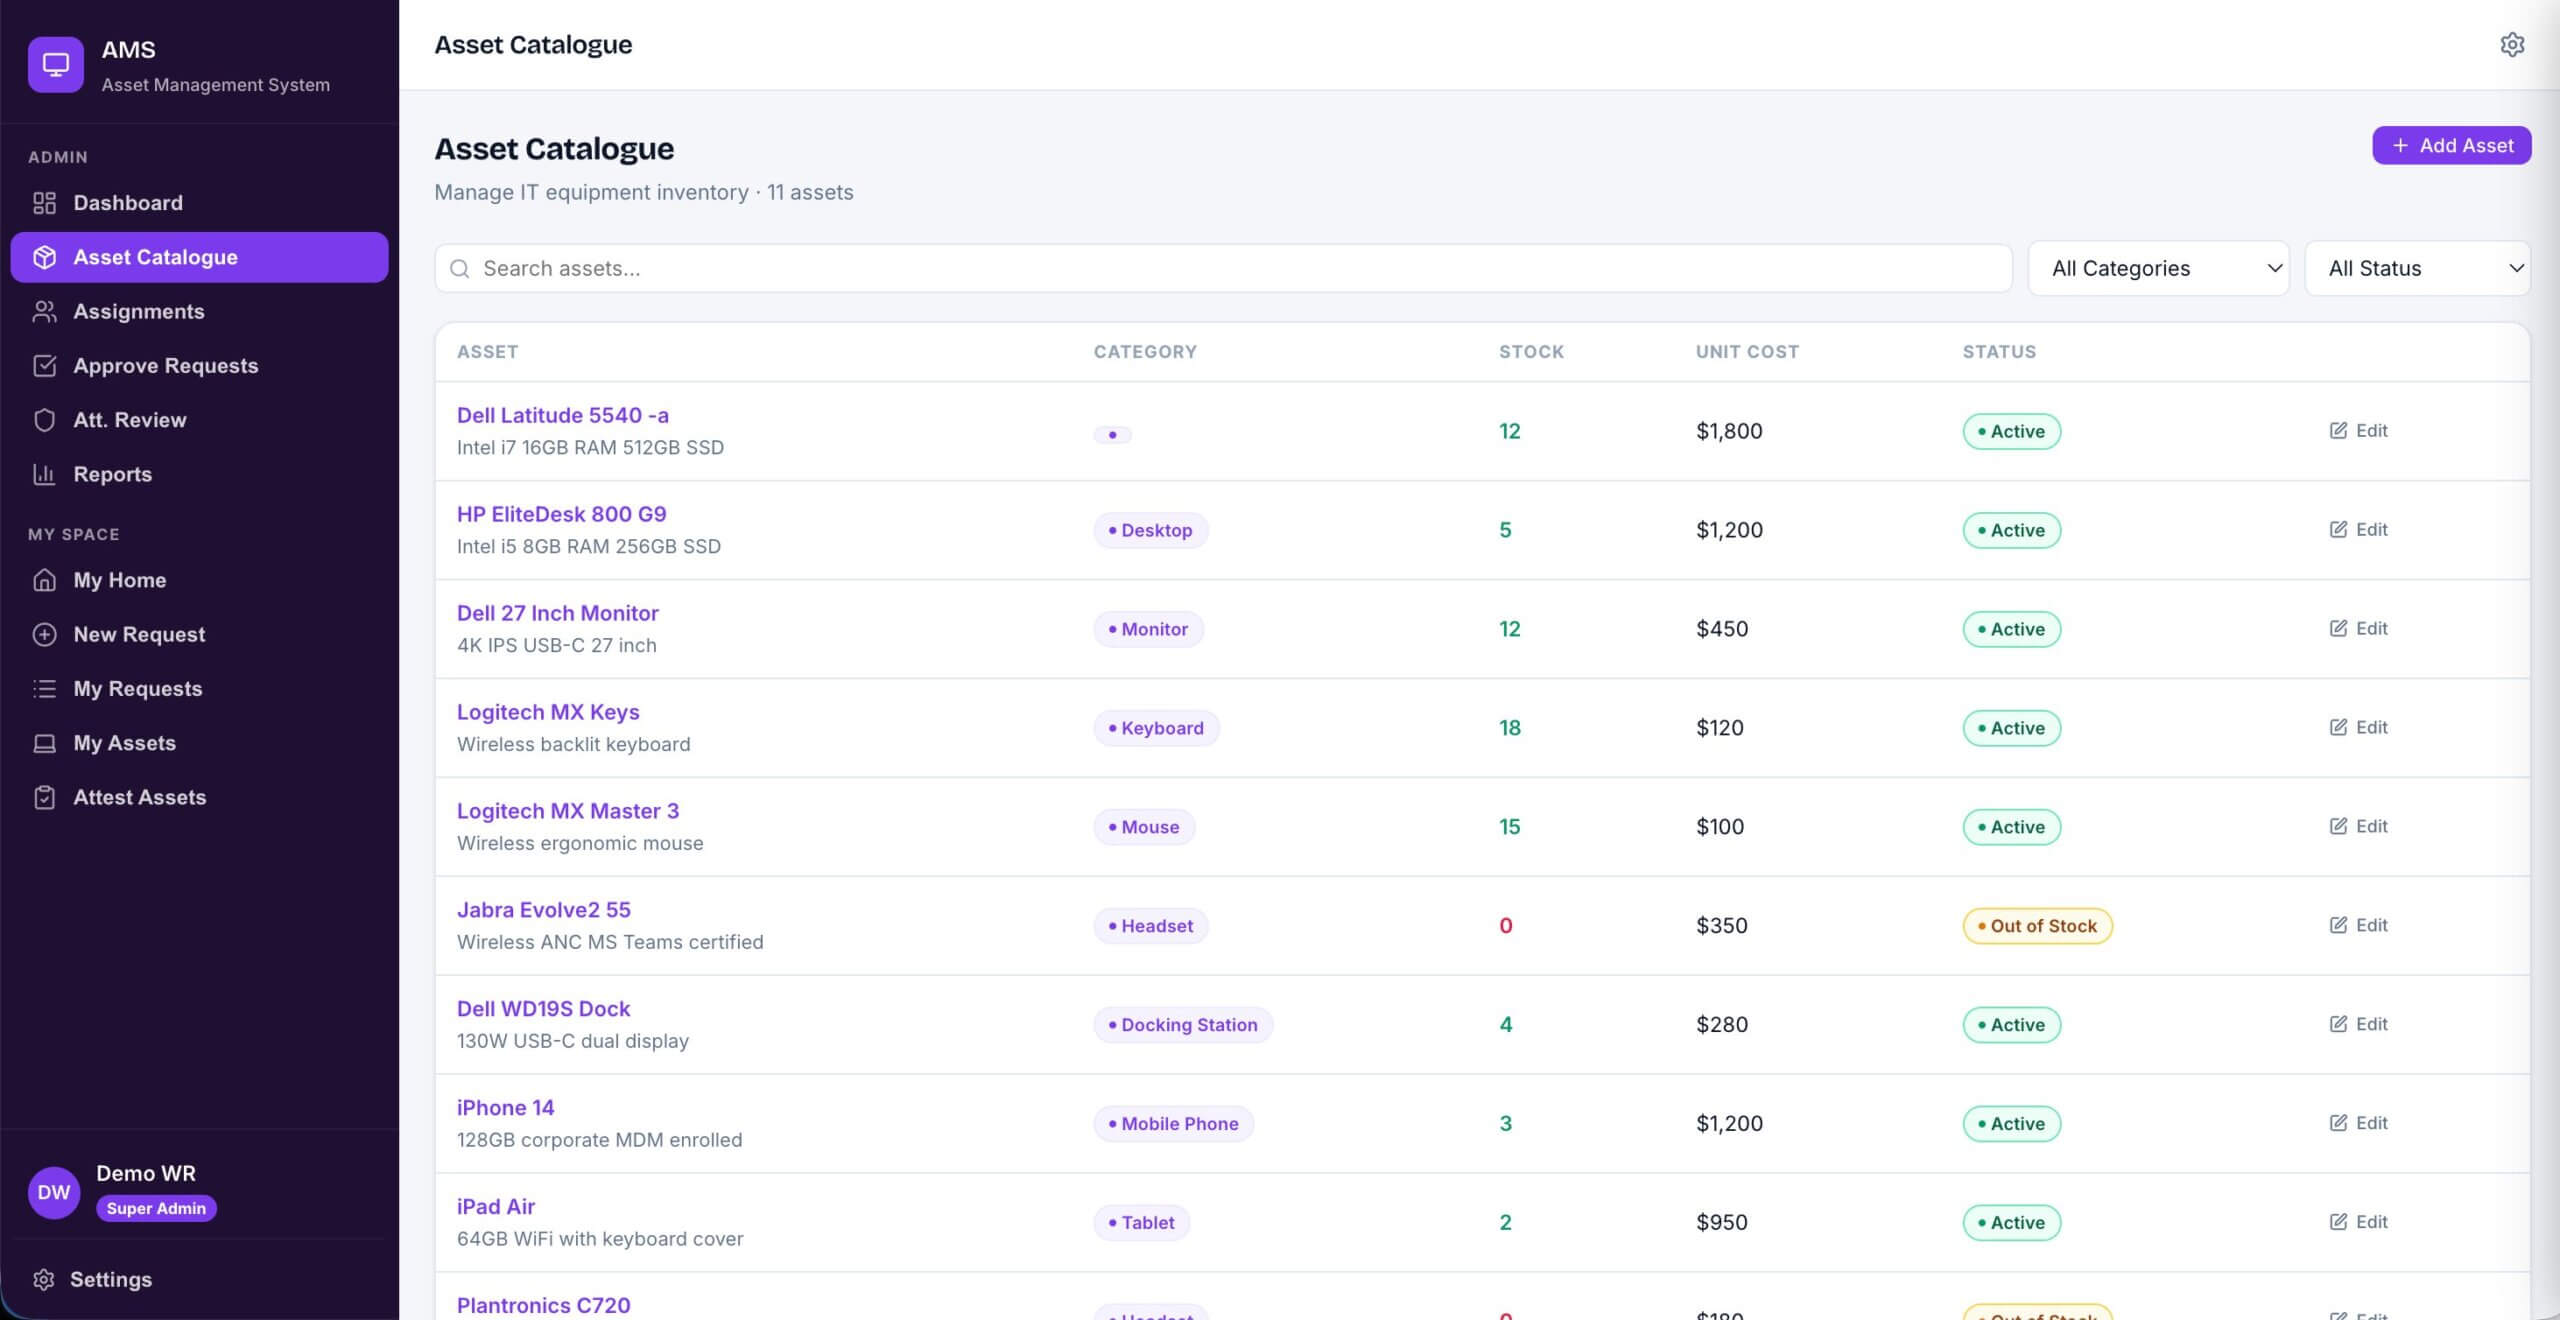
The full inventory list shows category badges, live stock counts, unit cost, and status indicators. You can search and filter by category or status. Each row has an inline Edit link that opens an Asset Details panel on the right covering name, description, classification, stock, cost, and total value, all without leaving the catalogue screen.
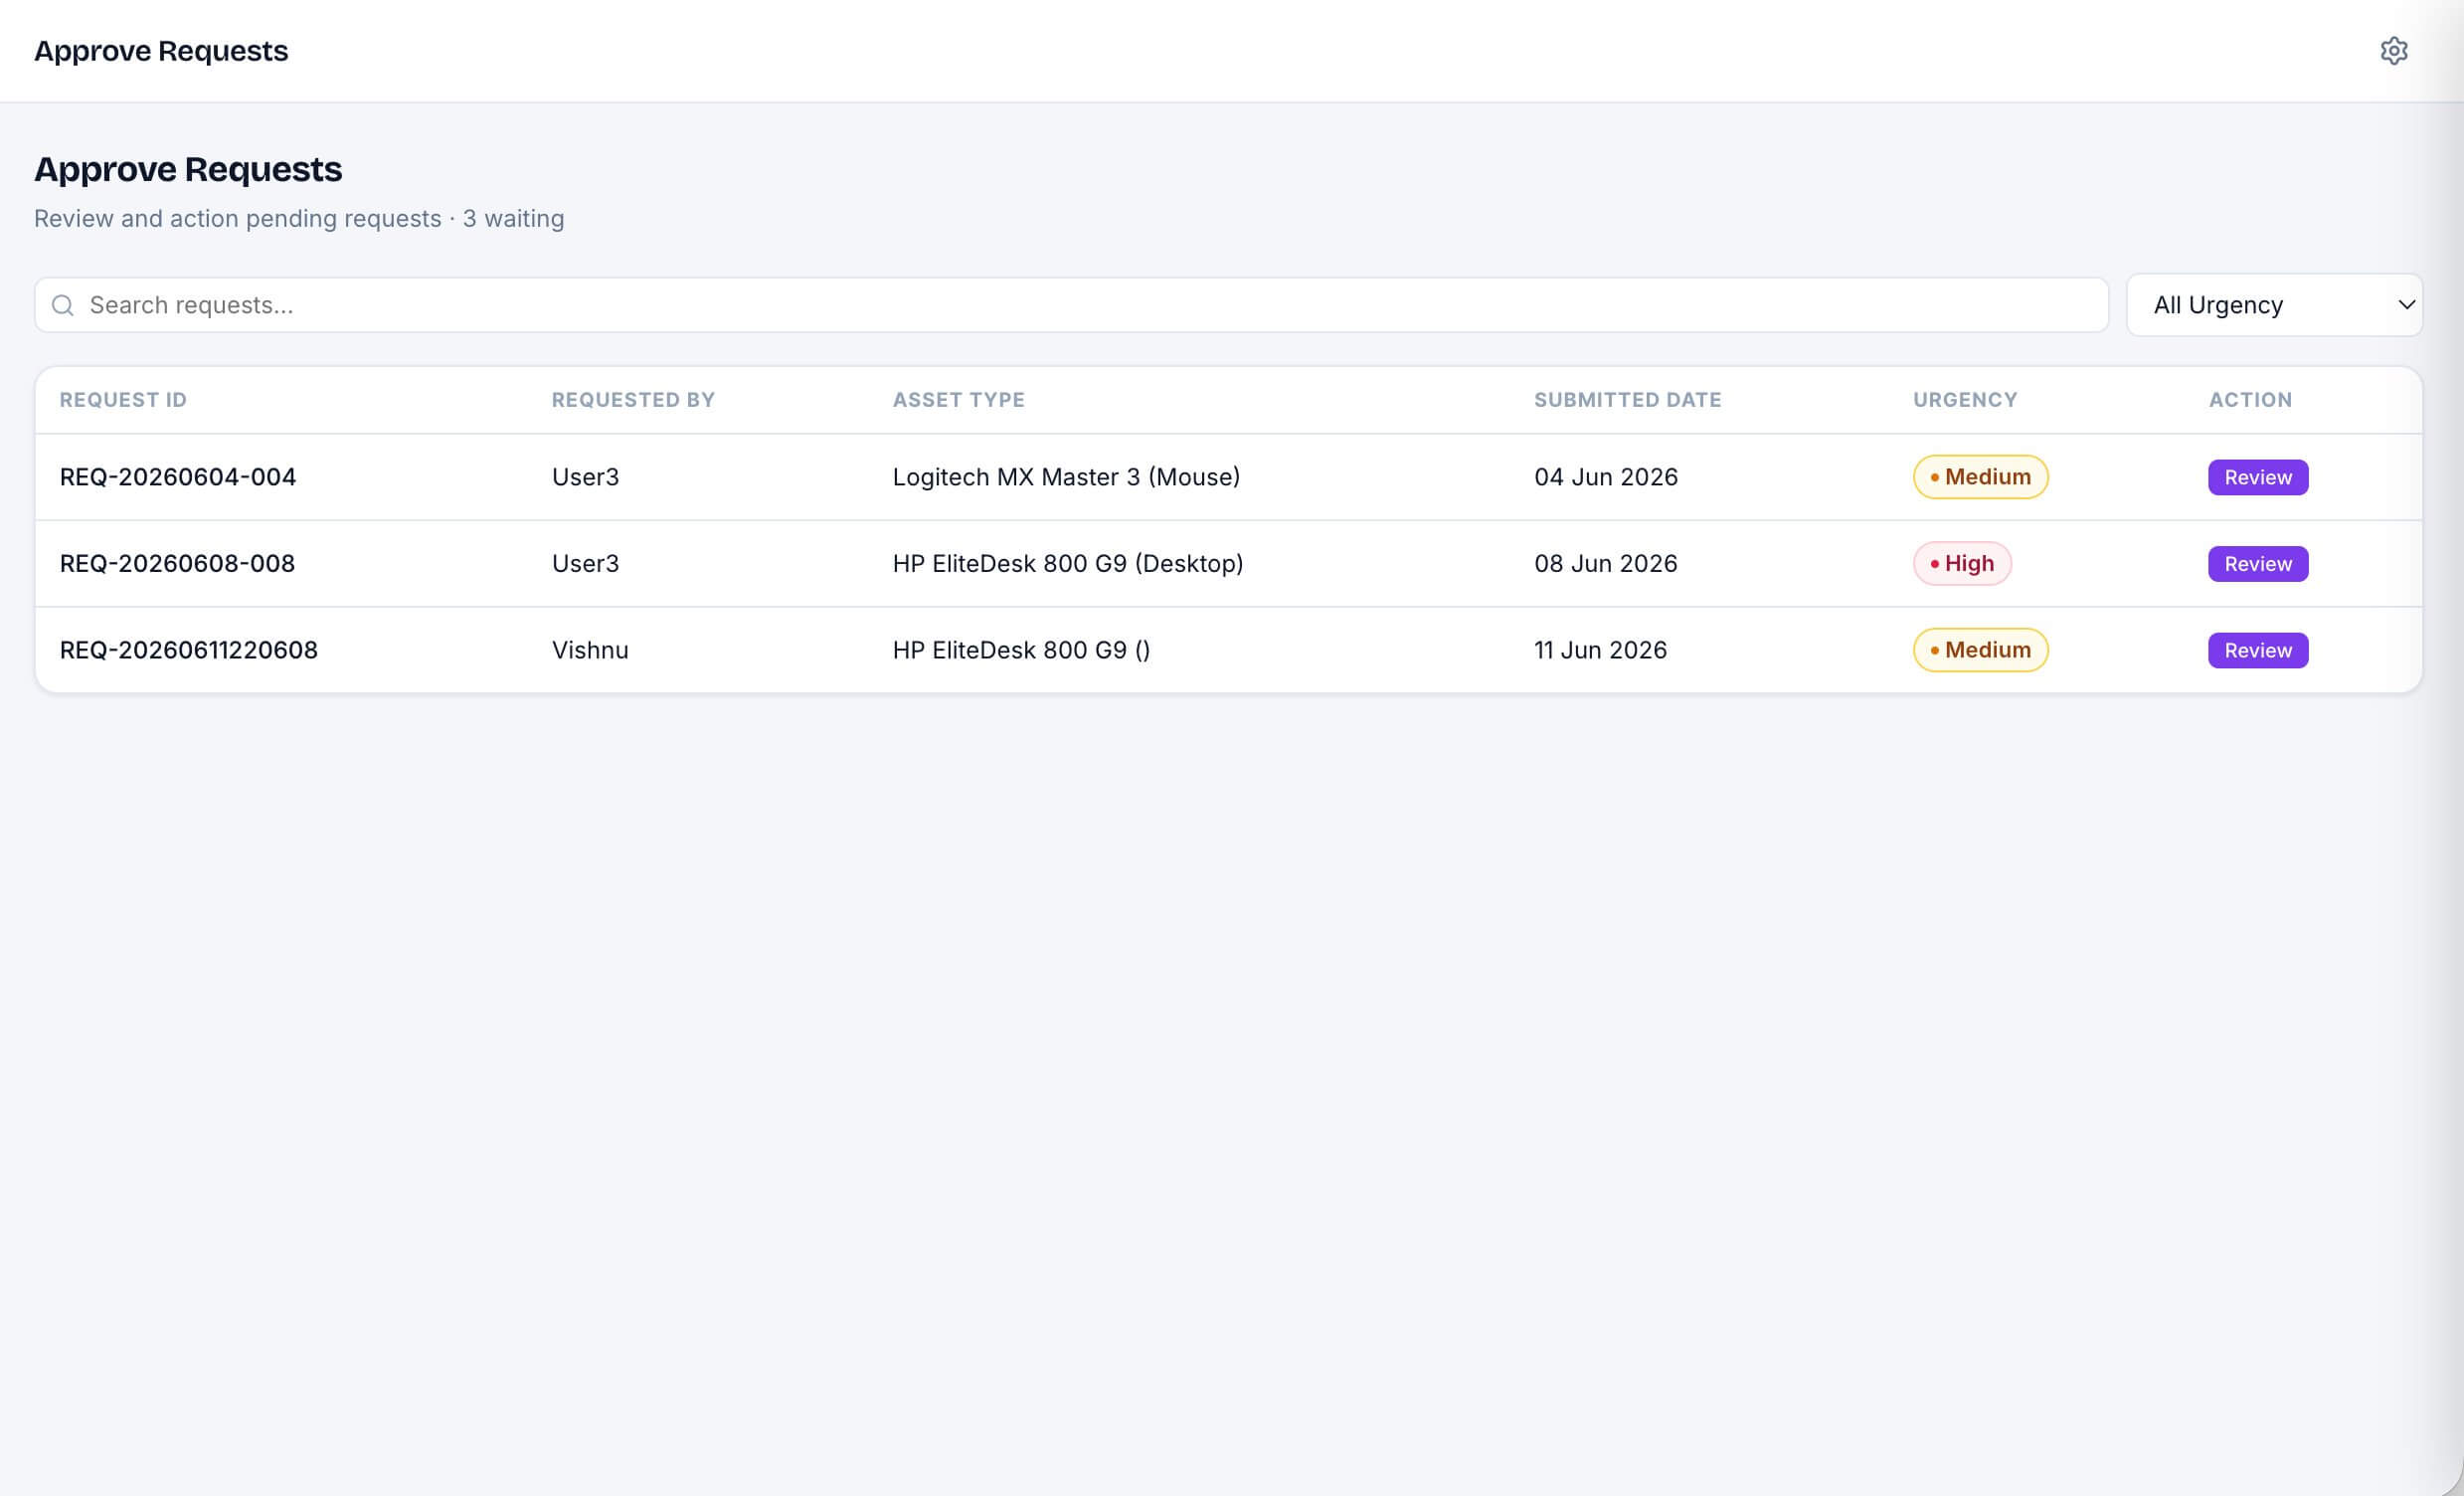
Approve Requests
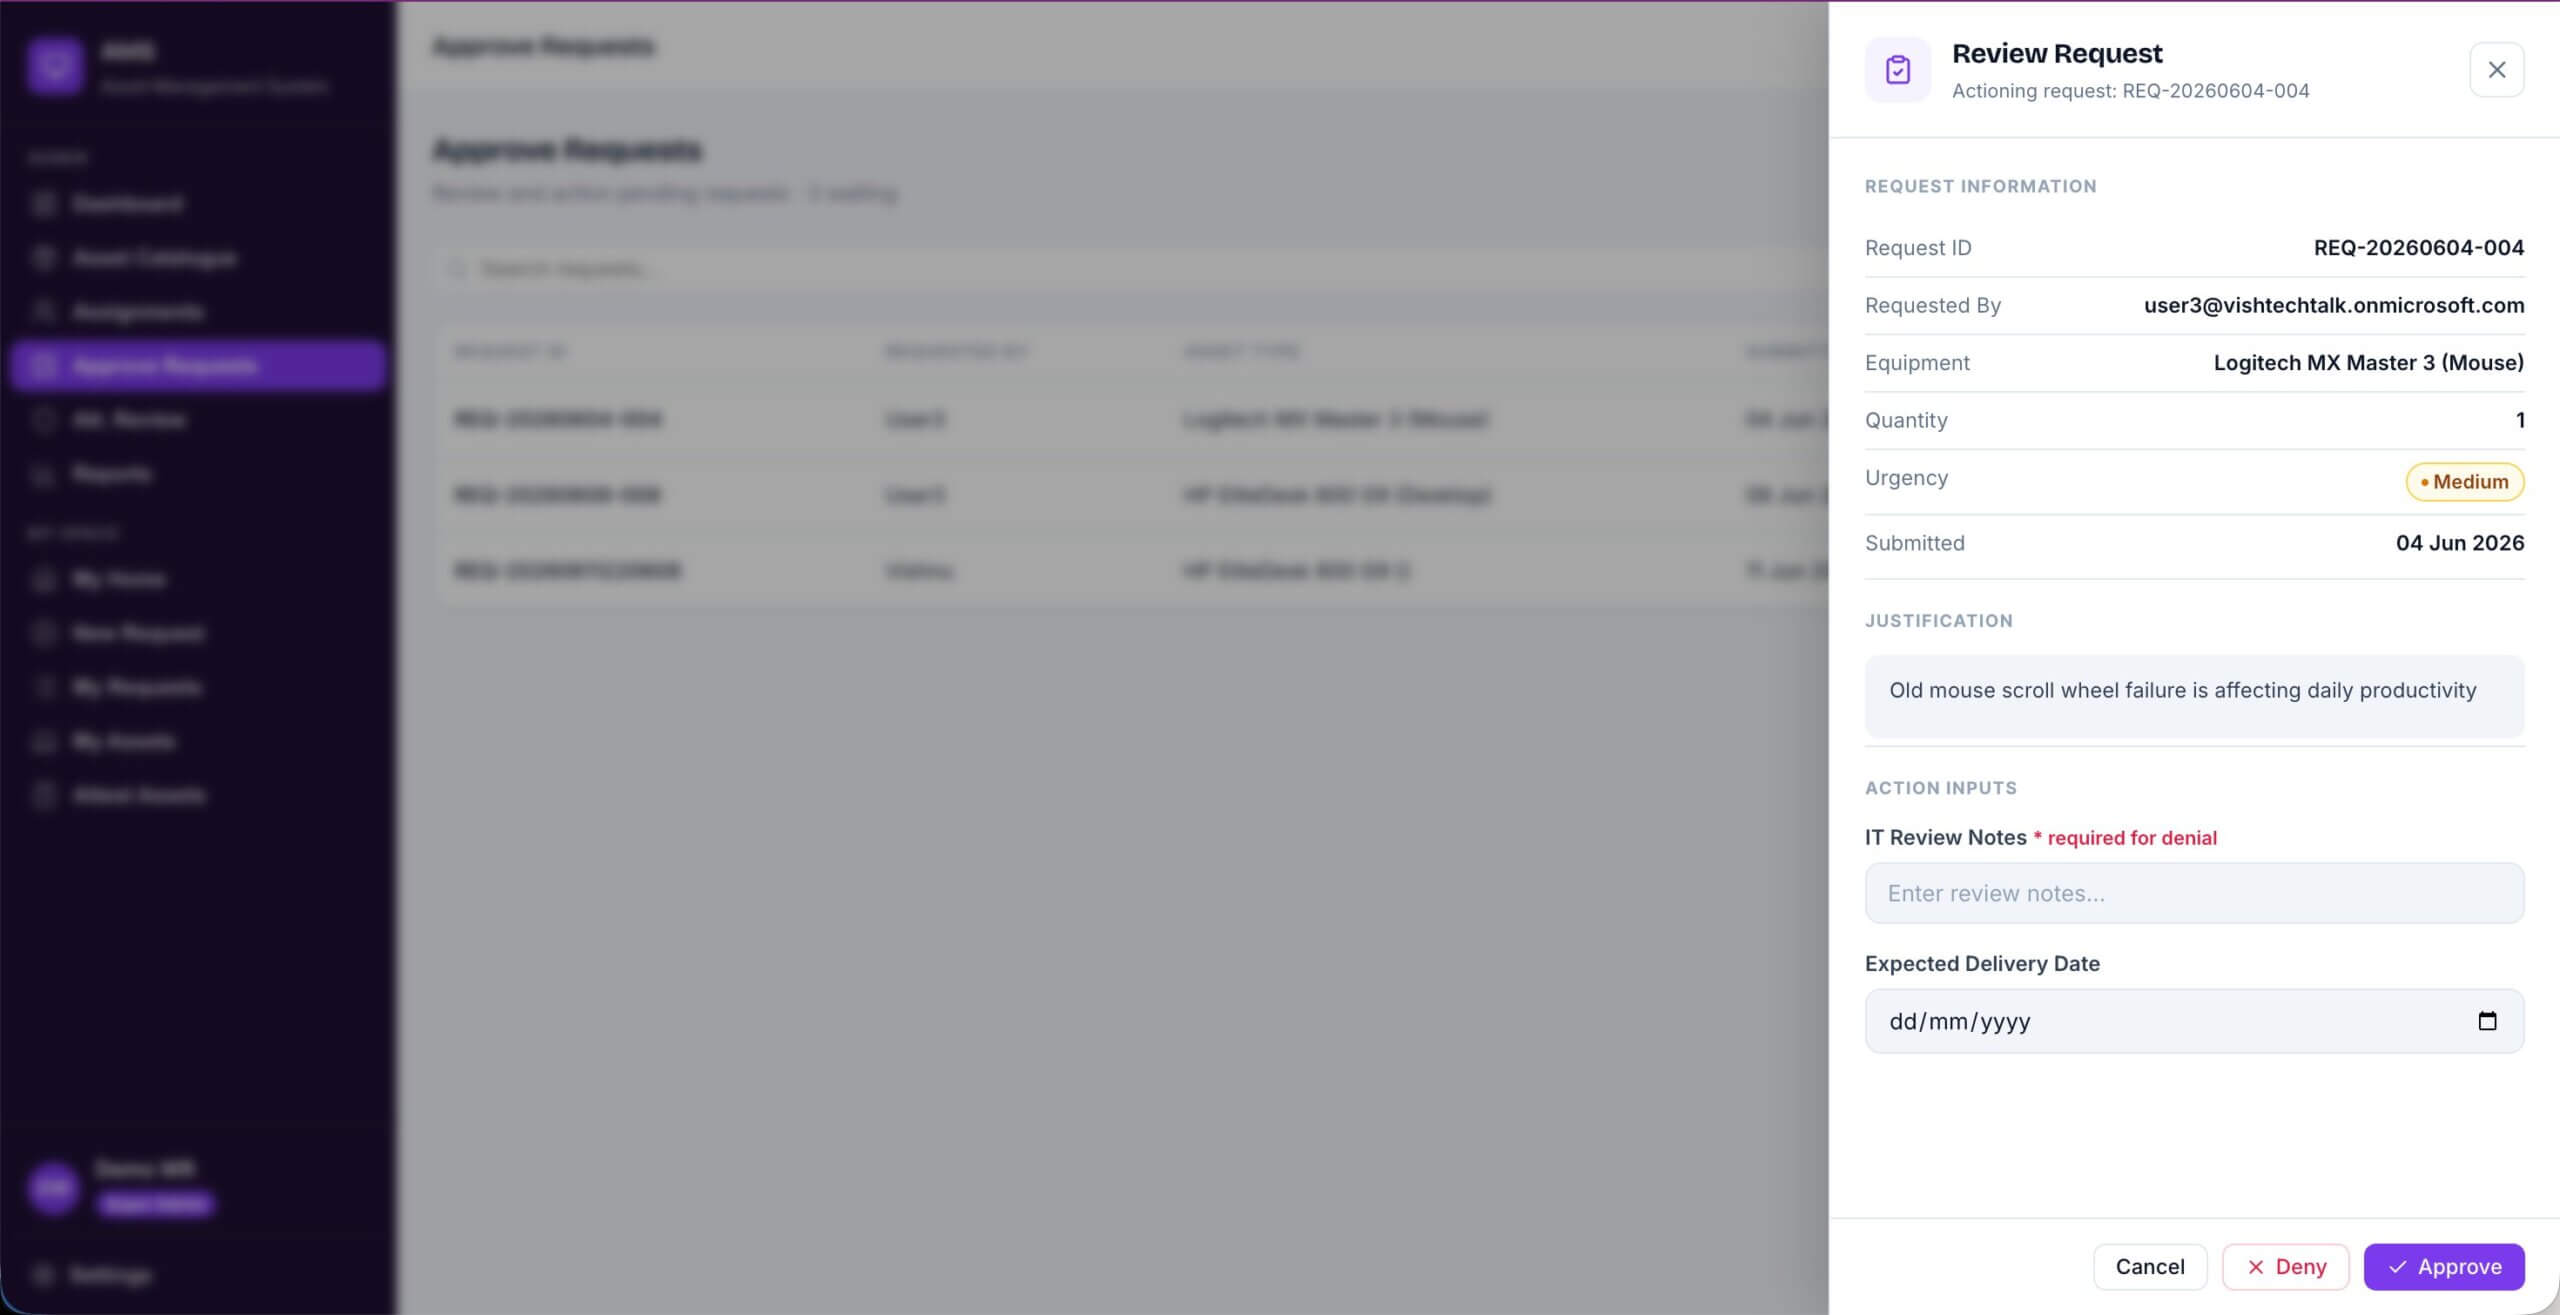
The pending requests table shows Request ID, requester name, asset type, submitted date, and an urgency badge. Each row has a Review button that opens a side panel with the full request detail including justification, IT review notes field, expected delivery date, and the Approve or Deny actions. Everything happens on the same screen without navigating away.
Attestation Review
The quarterly cycle header shows attested versus outstanding counts alongside a cycle completion progress bar. The Not Yet Attested table lists every unattested asset with the assigned user, their email, and the assignment date. IT can monitor completion in real time rather than checking the SharePoint list directly.
User screens
New Request
Step 1 presents a horizontal scrollable card gallery of active assets. Each card shows the asset name, category, and live stock count. Selecting a card highlights it and confirms the selection in a label below. Step 2 then reveals the request form where the user enters quantity, urgency, a needed-by date, and a business justification. The Submit button validates the form before writing to SharePoint.
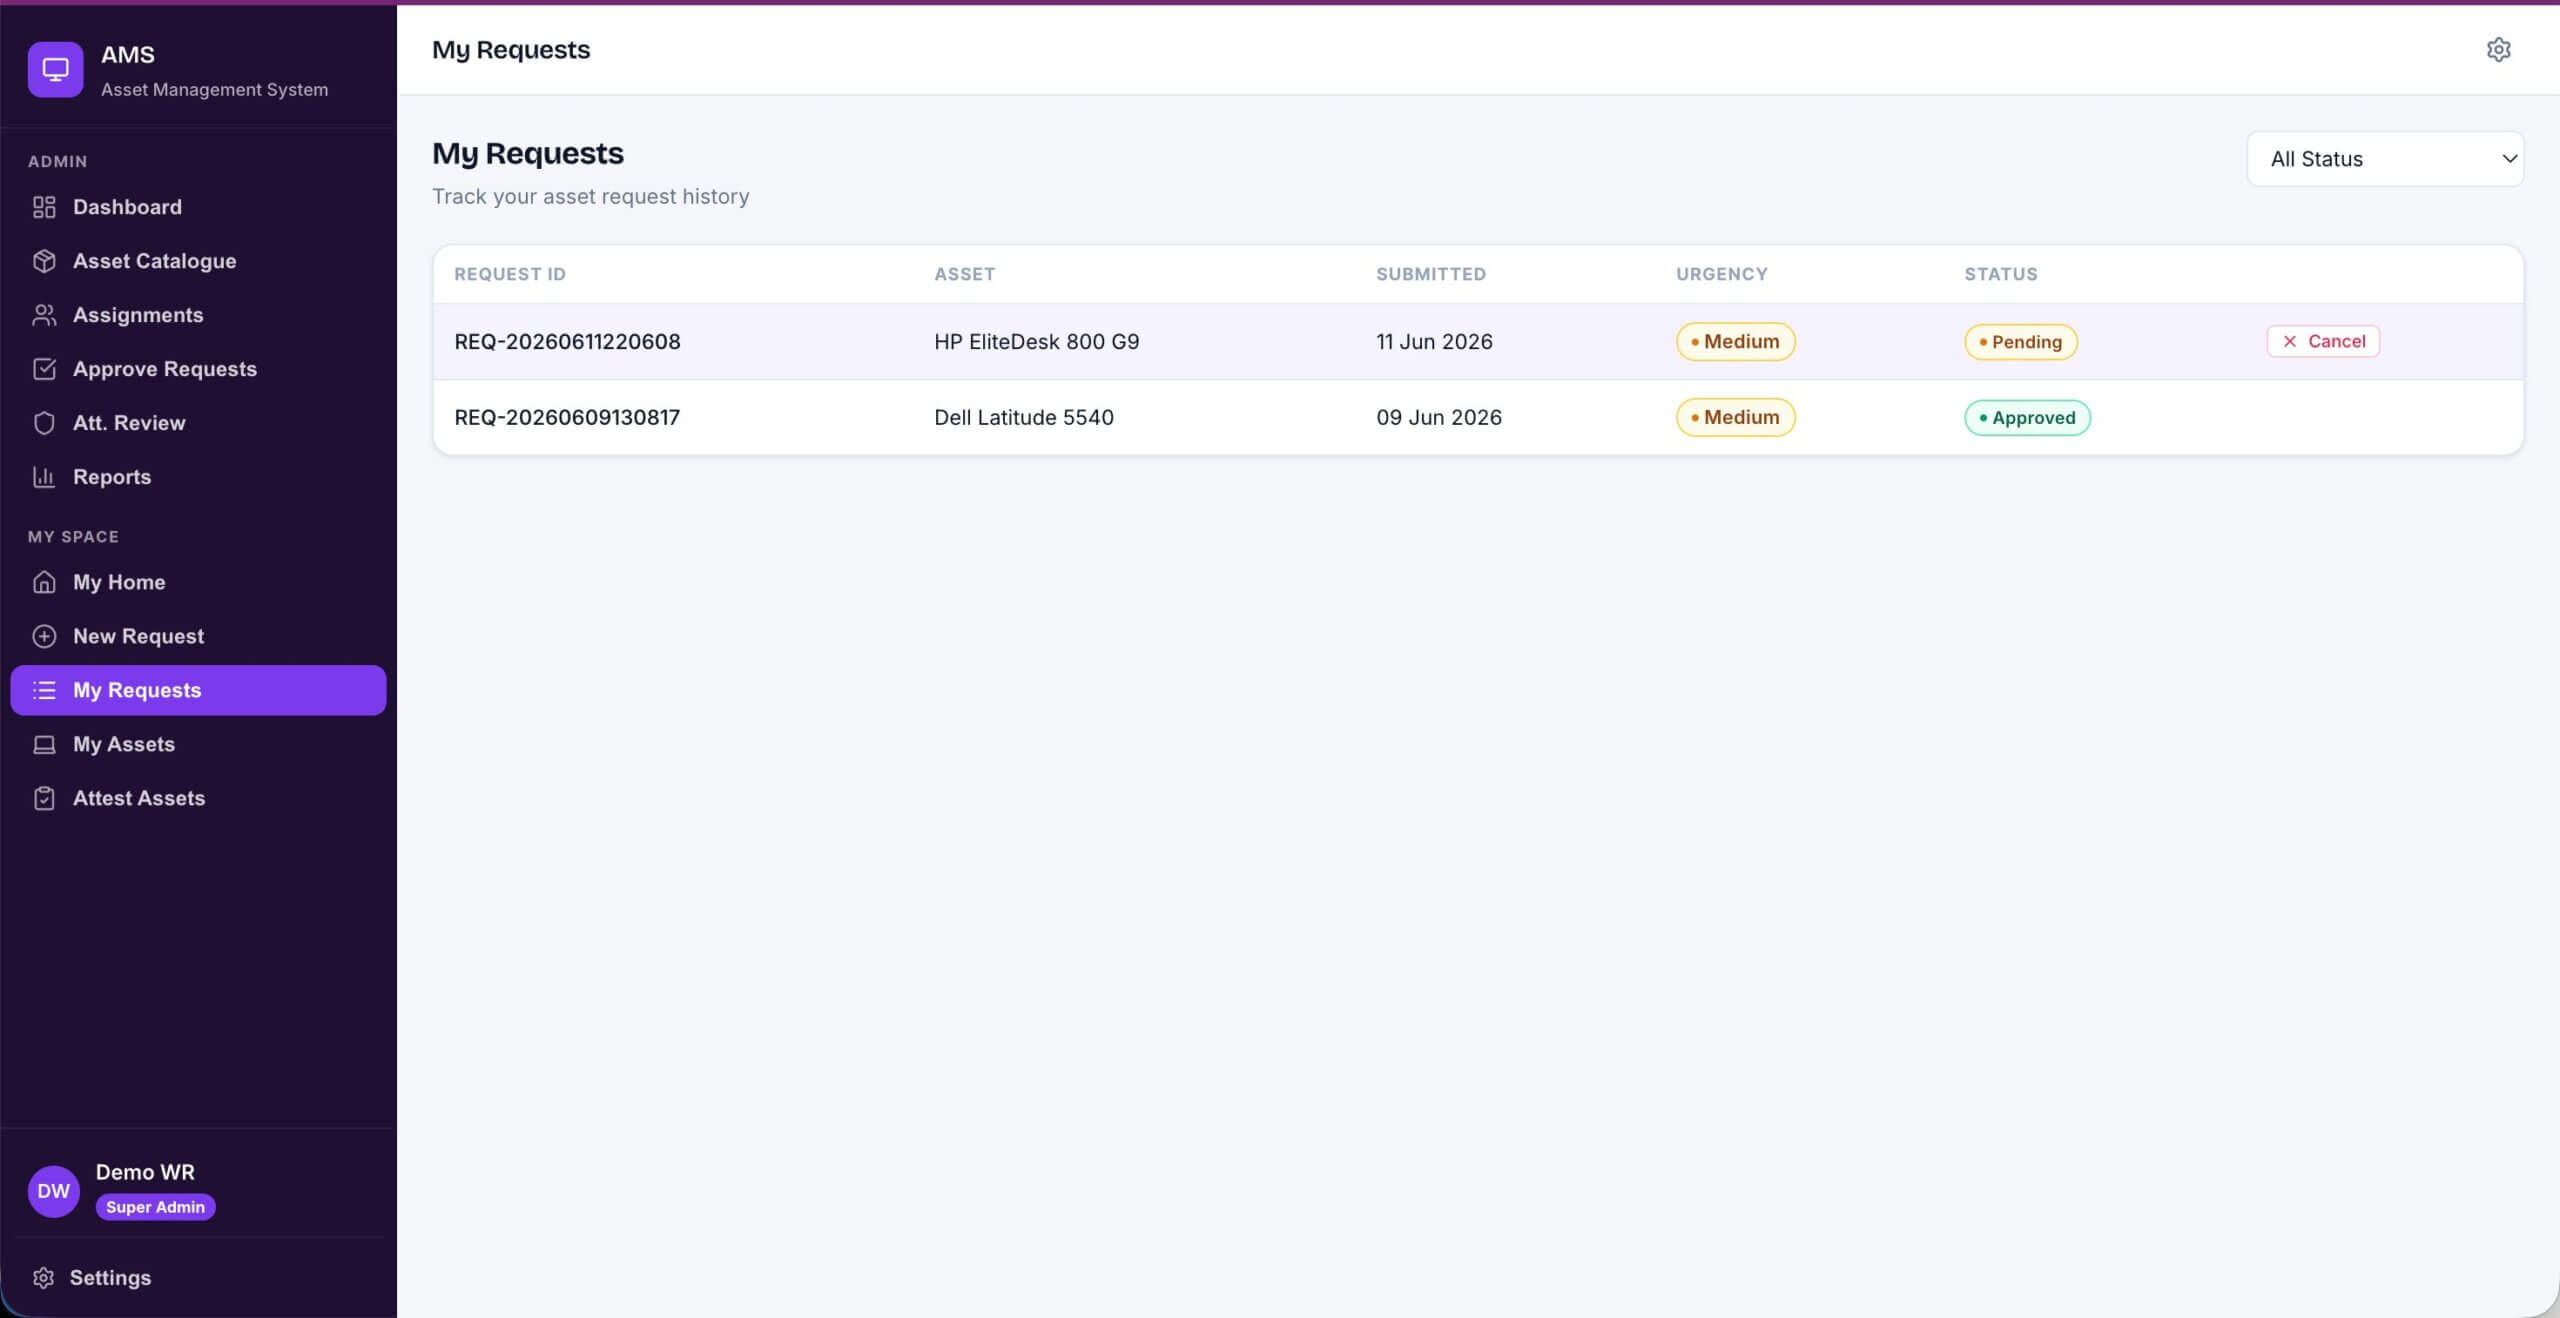
My Requests
The full request history shows Request ID, asset name, submitted date, urgency badge, and status badge for Pending, Approved, Denied, and Cancelled requests. A status filter dropdown at the top helps when the list grows long. Pending requests show a Cancel button inline so users can withdraw without contacting IT.
My Assets
All assets assigned to the logged-in user are listed here with asset name, category, serial number, asset tag, warranty expiry, and attestation status badge. An Attest Assets button in the top right navigates directly to the attestation screen when the quarterly cycle is open.
Settings (Personalisation)
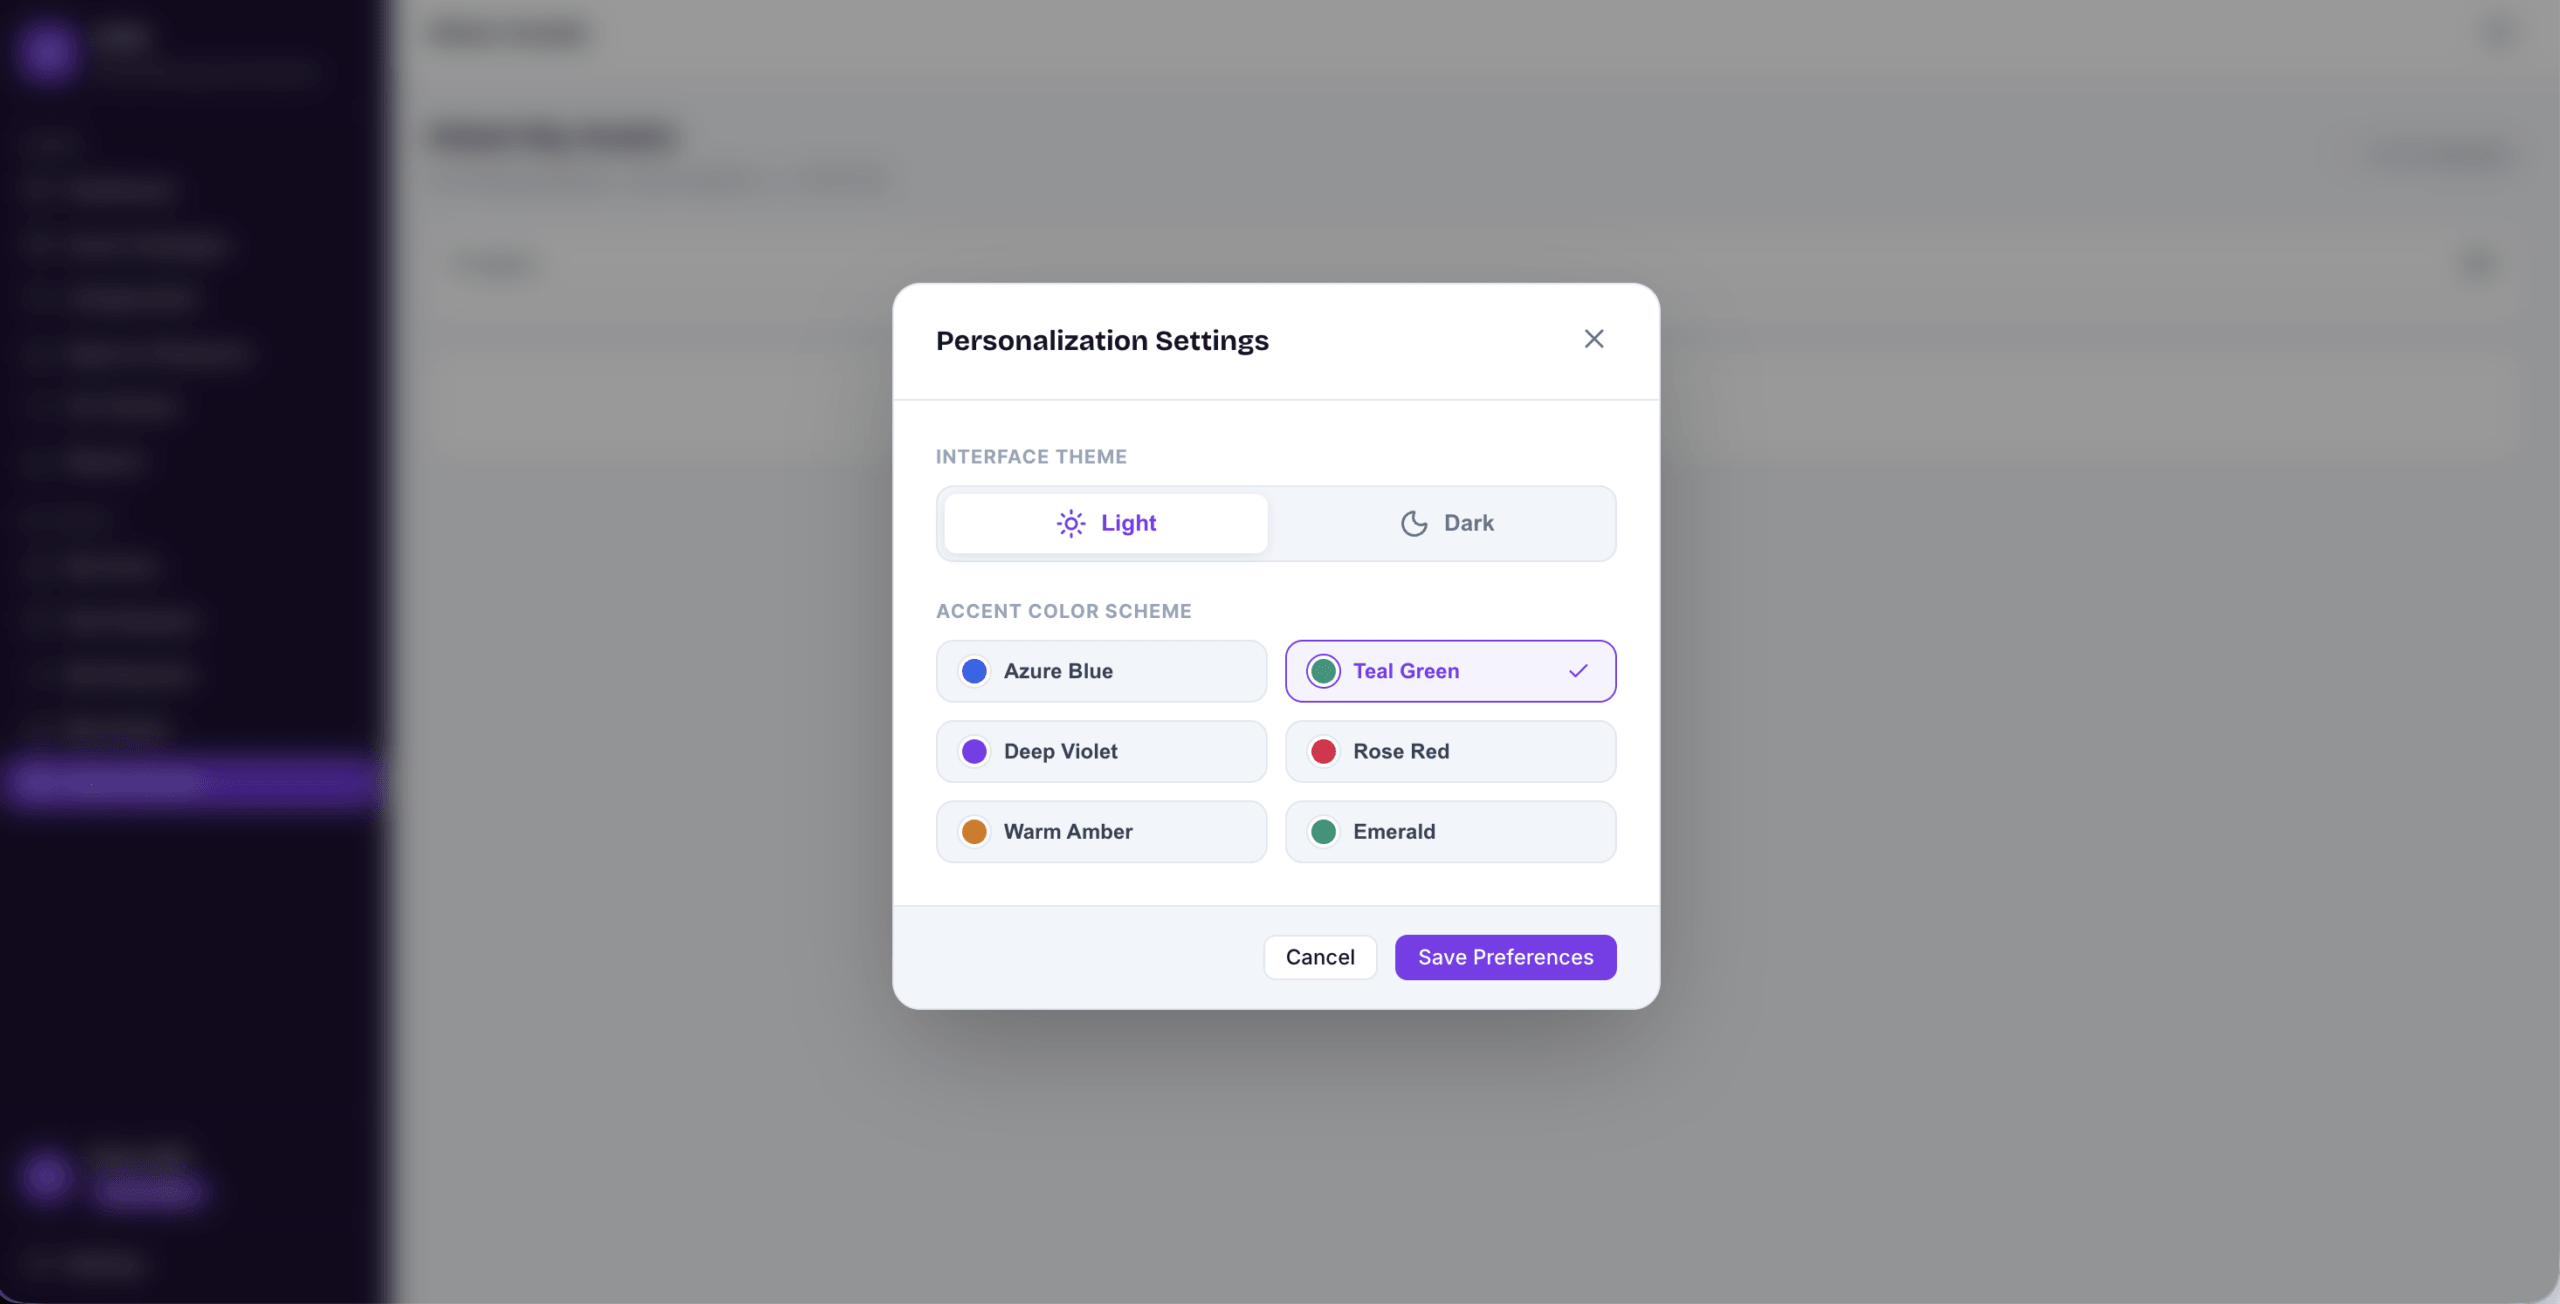
The Code App includes a Personalisation Settings panel where users can switch between light and dark themes and choose from six accent colour schemes. It is a small addition compared to the functional screens but it matters more than you might expect in organisations where the app is open for most of the working day. The Canvas App version does not have this.
Video walkthrough
🟢 Canvas App (Standard Licence)
The Canvas App version in action, covering request, approval, assignment, and attestation end to end. Works on any standard Microsoft 365 plan with no premium licence required.
🔵 Code App (Premium Licence)
The Code App version covers the same full asset lifecycle with a significantly richer UI, Fluent 2 design tokens, and mobile-responsive layout. Requires a Power Apps premium licence.
Power Automate flows (Note: the required flows will be added in next updates or the developer needs to build them; refer to the Asset Management System.md for the required flow spec)
Four flows handle the automation that runs outside the app itself. If you want a deeper look at how to build them, the Power Automate tutorials on this site go through the approach in detail.
- Flow 1 (Request Approval) (Note: to be added in next updates or built by developer; see Asset Management System.md): Triggers when a new row appears in AssetRequests. Starts an approval, creates the AssetAssignment on approval, emails the requester with the outcome, and writes a notification record.
- Flow 2 (Attestation Reminder) (Note: to be added in next updates or built by developer; see Asset Management System.md): Runs quarterly on a schedule. Resets AttestedThisCycle to false across all active assignments so the Attest screen repopulates at the start of each cycle. Sends reminder emails and a follow-up seven days later for anyone who has not yet completed their attestation.
- Flow 3 (Attestation Alert) (Note: to be added in next updates or built by developer; see Asset Management System.md): Triggers when a new row is created in the Attestations list. Sends the user a confirmation and alerts IT if the condition logged is Missing or Lost.
- Flow 4 (Assignment Notification) (Note: to be added in next updates or built by developer; see Asset Management System.md): Triggers when an AssetAssignment is created or updated with a SerialNumber populated. Sends the assigned user an email with their equipment details and writes a notification record in the app.
All four flows in this Power Apps Asset Management System solution use standard connectors only: SharePoint, Office 365 Outlook, Approvals, and Office 365 Users. Nothing in the solution requires a premium connector.
Solution files on GitHub
The full Power Apps Asset Management System solution is on GitHub, organised into four folders.
- SPO-Schema: JSON schema files for all six SharePoint lists and the PowerShell provisioning script (
Deploy-ITAssetManagement.ps1). - PowerApps: The exported canvas app package (.msapp or zip) ready to import directly into your environment.
- Flows (Note: to be added in next updates or built by developer; see Asset Management System.md): Exported Power Automate flow packages for all four flows.
- Designs: Screen design files and the build guide in Markdown format with step-by-step instructions covering every control, property, and formula.
Asset Management System (Power Apps Solution)
Available in two versions: a Canvas App version that works with a standard licence, and a Code App version with a richer UI that requires a premium licence. Both include SPO schema files, PowerShell provisioning script, Power Automate flows, and a step-by-step build guide.
SharePoint Online
Power Automate
PowerShell
Things worth knowing before you deploy
A few things about this power apps asset management build that are not obvious from reading the app structure.
Email matching is exact. The app filters assignments and requests using User().Email. That value needs to match exactly what is stored in AssignedToEmail and RequestedByEmail in SharePoint, full UPN and same case. If your test data uses a short alias and the app is returning the full onmicrosoft.com address, nothing will show up for that user. Worth putting a temporary label on screen that displays User().Email before you load any test data, so you can see exactly what format the app is working with.
Flow 2 needs to run before the second attestation cycle starts. After the first round of attestations, AttestedThisCycle is set to true across all assets. Flow 2 is what resets it at the start of each new quarter. If the flow is not built and running, the Attest screen will show zero pending items from the second cycle onwards. Test this flow before the app goes live.
Lock down AppAdmins list permissions before go-live. Break inheritance on the AppAdmins list and remove all non-IT groups. Standard staff should not be able to read that list at all. If they can, role elevation becomes easy to achieve and the whole role model is compromised.
Related guides
If you found this IT asset management app build useful, these tutorials on the blog go deeper into the individual pieces:
- Power Platform tutorials and Canvas App guides
- SharePoint Online list and SPFx development guides
- Microsoft 365 Copilot and Copilot Studio guides
Frequently asked questions
Do I need a premium Power Apps licence to build this Asset Management System app?
It depends on which version you use. The Canvas App version runs entirely on a standard Microsoft 365 licence with no premium connectors, no Dataverse, and no per-app or per-user premium plan. The Code App version requires a Power Apps premium licence but delivers a significantly richer UI with Fluent 2 design tokens, a custom component library, and a mobile-responsive layout. Both versions share the same SharePoint data layer and the same Power Automate flows.
What data source does the app use?
All data is stored across six SharePoint Online lists: AssetCatalogue, AssetRequests, AssetAssignments, Attestations, AppAdmins, and Notifications. A PowerShell provisioning script creates all six lists with the correct columns in a single run so you do not have to build them manually.
How is role-based access handled without Azure AD groups?
Roles are managed through a single SharePoint list called AppAdmins. IT Admins, Super Admins, and Read-Only Admins are listed there with their email addresses. Anyone not on the list automatically gets the staff view when they open the app. The app checks the logged-in user against this list at startup, so there are no Azure AD groups or environment variables to configure.
How does the quarterly attestation work?
Each quarter, users see a list of assets assigned to them that have not yet been attested in the current cycle. They select a condition for each item and tap Confirm, which writes a record to the Attestations list and marks the assignment as attested. A scheduled Power Automate flow resets the attestation flags at the start of each new quarter so the process repeats automatically without any manual intervention.
Can I import the full solution rather than building it from scratch?
Yes. The GitHub repository includes the exported Power Apps package, four Power Automate flow packages, SharePoint schema files, and the PowerShell provisioning script. You can import the app and flows directly into your environment, or follow the step-by-step build guide if you prefer to build each screen yourself and understand how everything is connected.
What is next
The current Power Apps IT Asset Management App covers the core asset lifecycle. Here is what is on the roadmap for Phase 2.
Power Automate integration
The existing flows handle approval routing, assignment notification, and attestation reminders. The next phase extends this with automated warranty expiry alerts, stock threshold notifications when catalogue quantities drop below a set minimum, and a scheduled report delivery flow that emails IT admins a weekly asset summary. The idea is that IT should not have to open the app to know when something needs attention.
Approval via Microsoft Teams
Currently approvals arrive by email and through the Power Automate approval centre. The next version replaces this with Teams Adaptive Cards. The IT admin gets the full request detail as an interactive card in their Teams chat and approves or denies it there without switching to a different application.
QR code scanning and label generation
Physical asset tagging is the gap between the digital record and what is actually on the shelf. The next phase adds a camera control for scanning QR codes on asset labels and auto-filling the assignment form from the scan result. On the admin side, label generation from the catalogue will let the team print QR asset tags directly from the app.
Power BI dashboard and reports
The built-in dashboard KPIs cover the day-to-day picture well enough. For trend analysis like request volumes by department, asset age distribution, attestation completion rates over time, and cost by category, a Power BI report embedded in the admin dashboard is the better tool. This is planned for Phase 2 once the solution has been running long enough to have meaningful data behind the charts.
That covers the full Power Apps IT Asset Management App build from end to end. If you have questions about it or something you would like to see covered in a future post, drop a comment below or reach out via the contact page.